Prep 6: Introducing Persistence
(But first, some final little pieces about forms.)
Textbook++ Reading
- HTML/CSS
- 5.5 Table and Form Accessibility
- 5.6 Styling and Designing Forms
- JS
- 8.9 Scope and Closures in JavaScript
- 🌐 LocalStorage, sessionStorage (The Modern JavaScript Tutorial)
Grocery List with Persistence
This week, we are building a grocery list app from scratch using a starter page that already has the table and styling in place. Your job is to add the form, write the JavaScript to add items, and then save/load the list using localStorage so it persists across reloads.
Getting Started
First, please download and extract the prep06.zip starter code into a prep06 folder somewhere safe (like your cs343 folder). The starter contains the basic page structure and a styled grocery table, but it does not yet include the form or the JavaScript for adding items.
Open the three files in VS Code and preview grocery.html in the browser.
The starter page already includes a data table similar to this:
<table>
  <thead>
    <tr>
      <th scope="col">Item</th>
      <th scope="col">Quantity</th>
      <th scope="col">Category</th>
      <th scope="col">Notes</th>
    </tr>
  </thead>
  <tbody id="groceryList"></tbody>
</table>
Your goal is to complete the rest of the app: build the form, wire it into JavaScript, style it to match the example, and persist the list to localStorage.
Part 1: Build the Grocery Form
Your starter already includes the table, but the form still needs to be created. Use the textbook examples as a reference for how a basic form should be laid out.
- In
grocery.html, add a form with labels and controls for:- item name
- quantity
- category
- notes
- Include a submit button.
-
Give each form control a sensible
id(so its<label for="...">can point to it) and aname, such as:Control idnameItem itemInputitemQuantity quantityInputquantityCategory categorySelectcategoryNotes notesInputnotes -
The category field should be a
<select>with the following options:- Produce
- Dairy
- Poultry
- Meat
- Pantry
- Other
- The notes field should be a
<textarea>withrows="4". - In
grocery-script.js, write the JavaScript needed to:- read the values from the form, using whichever approach you prefer:
FormData:new FormData(formElement)collects every control’s value at once, andformData.get("item")looks one up by itsnameattribute.- Individual controls: look up each control by its
id(e.g.,document.getElementById("itemInput")) and read its.valueproperty.
- create a new row in the table
- add the four cells: item, quantity, category, and notes
- append the row to the table body
- reset the form after submission
- read the values from the form, using whichever approach you prefer:
- Test the form before moving on. Add a few items and make sure they appear in the table.
Before any styling, your page should look something like this:
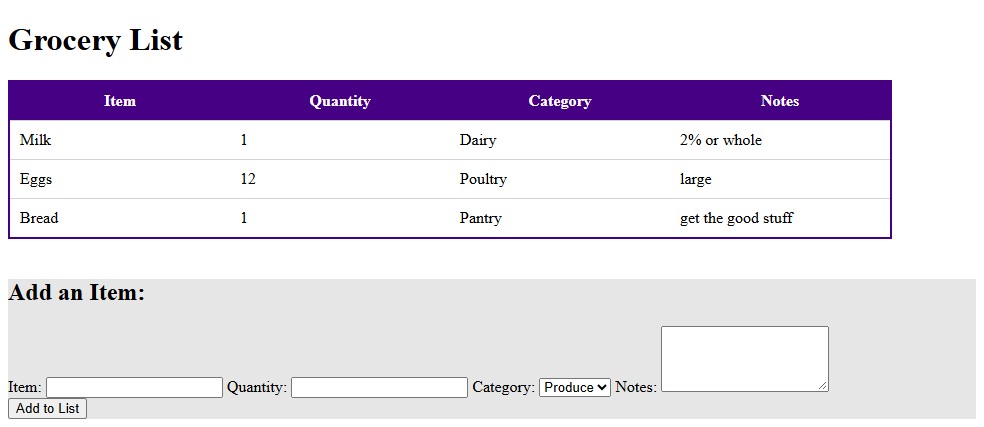
This part is intentionally more open-ended than the previous prep. You are expected to decide on the structure and names for your JavaScript and HTML elements, as long as the app behaves correctly and the code stays organized.
Part 2: Style the Form
The form should look clean and match the styling patterns from the textbook. The table is already styled for you; now you need to make the form look intentional and readable.
- In
grocery-styles.css, set the form container width tofit-contentand give it5pxvertical padding and10pxhorizontal padding. - Create a CSS rule that selects all of the form controls except the submit button, including:
- the item input
- the quantity input
- the category selector
- the notes textarea
- In that rule, do the following:
- Add the properties to style them like the inputs in Figure 5.31 from the textbook
- Including the bottom border too! (but not the placeholder)
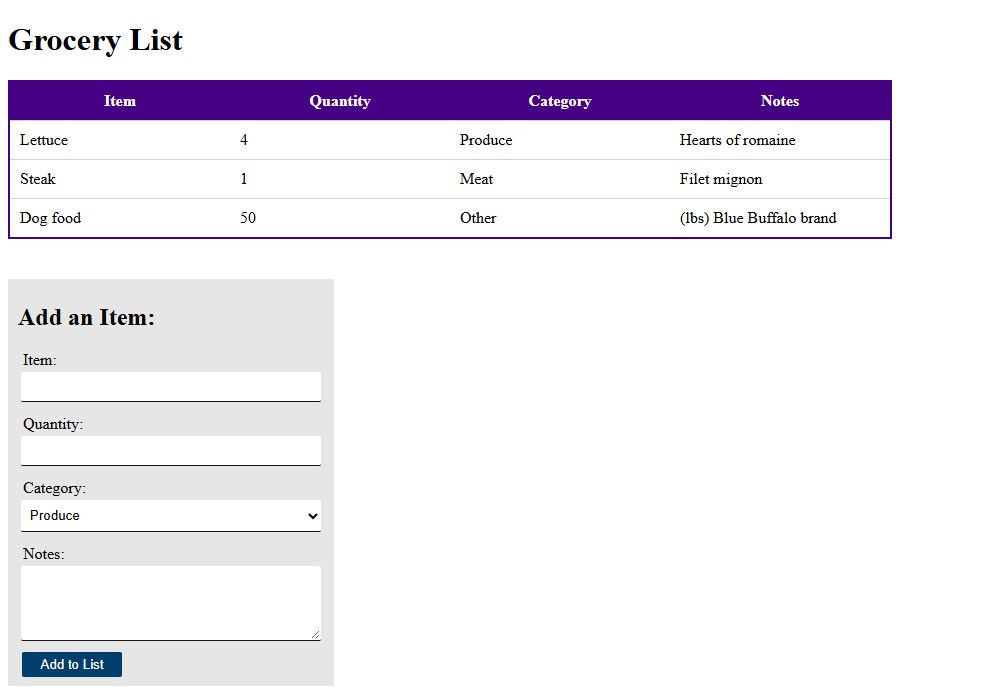
- See the image below for a reference
- In addition, add a declaration to set the width to
300pxso that they are all the same width. - But wait! They’re not the same width because of how the box model works.
- Add another declaration to set
box-sizing: border-box;to fix this issue.
- Add the properties to style them like the inputs in Figure 5.31 from the textbook
- Style the submit button to look like the “Click” button in Figure 5.31 from the textbook.
- Style the form’s labels so that they match the “Vertical” layout in Figure 5.32 from the textbook.
- Preview your page and make sure the form looks neat and aligned.
At this stage, the exact CSS names and selectors are up to you, as long as the end result is visually consistent and easy to use. When you’re done, your page should look something like this:
Part 3: Saving and Loading from localStorage
Right now, refreshing the page clears out the table. We want the grocery list to persist using localStorage so the items remain after a browser refresh.
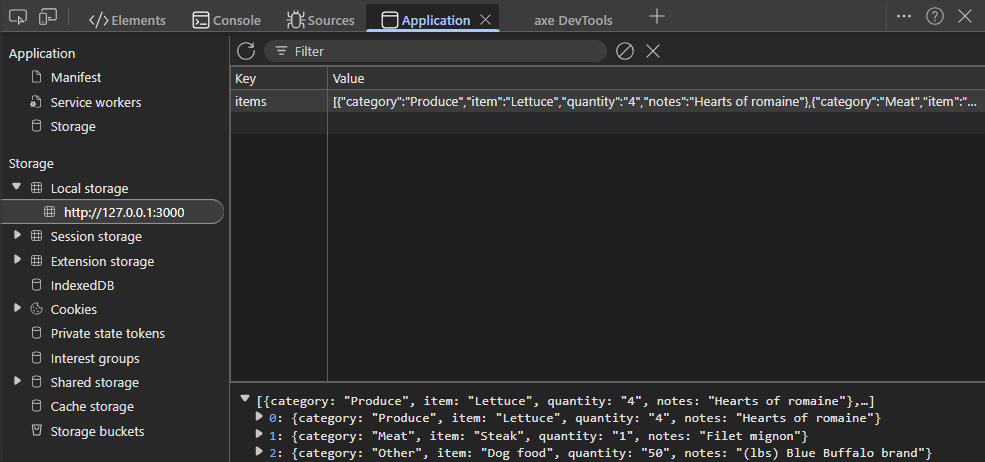
(Note: the above image is from Chrome/Edge DevTools. Firefox uses a “Storage” tab instead of “Application”.)
In grocery-script.js, implement the following pieces:
appendToSavedList()- Read the saved list from
localStorageif it already exists. - The list is stored as a string, using the key
"items". - You will need to parse it with
JSON.parse(...)before using it. - If the data does not exist yet, start with an empty array.
- Add the new item to the array.
- Save the updated array back to
localStoragewithJSON.stringify(...). - Remember: everything in
localStorageis stored as a string.
- Read the saved list from
loadList()- Check whether the key
"items"exists inlocalStorage. - If it does not exist, do nothing.
- If it does exist, parse the array and add each item back into the table.
- Use the same table-building logic you used when adding an item manually.
- Check whether the key
- Call
loadList()when the page loads. Either of these approaches works:- Add a
DOMContentLoadedlistener. This event fires once the browser has read the entire HTML document, so it works no matter where the<script>tag is placed. - Or just call
loadList()directly at the bottom of the script. The browser runs a script as soon as it reaches the<script>tag. Since our<script>tag is at the very end of the<body>, the table has already been built by then, soloadList()can find#groceryList. (If the script were in the<head>, the table wouldn’t exist yet, and this would fail!)
- Add a
- Make sure you save the list after each item is added.
- Test the app by adding items, refreshing the page, and confirming the list still appears.
This is the main persistence step of the prep. The starter file includes TODO comments for the localStorage work, so use those as your guide while you write the code.
If you still have any sample rows in the HTML, remove them before you test the final app so the list comes only from user input and localStorage.
Submission
Submit your three files (grocery.html, grocery-styles.css, and grocery-script.js) to Gradescope.