Reusable CSS Classes
In this activity, you’ll write CSS rules for a set of reusable classes, then apply those classes to several different elements on a page.
A price might show up in a table cell and again in a regular sentence. A warning might show up near the top of a page and again near the bottom. Instead of writing a new rule for every element that needs the same look, you write one class with the properties you want, then add class="..." to every element that should look that way.
Context
Your friend Sam runs Duke’s Diner, a small breakfast diner near campus. Sam put together a menu page but hasn’t styled it yet. Some items should stand out as new arrivals, one item is sold out, and a couple of announcements need to be boxed off so people notice them. Sam wants all of this done with reusable classes, since items get added and removed from the menu all the time and Sam doesn’t want to write new CSS every time the menu changes.
Getting Started
Download both files below and save them in the same folder (like in cs343/acts/reusable-css).
Open the folder in VS Code and start a live preview.
- Guide for Live Preview extension
- Guide for Live Server extension
The page will look completely unstyled at first. The stylesheet is already linked from the HTML, but none of the class rules have any properties yet, and none of the HTML elements reference them.
Take a look at both files before you start:
index.htmlhas all of the page’s content, but nothing linking elements to the style yet. A few pieces of text will need a<span>added around them before you can give them a class.styles.csshas ten class selectors already set up, but each rule is empty.- The first four (
.price,.badge-new,.unavailable, and.note) are semantic: their name describes what they’re for on this page. - The last six (
.mb-10,.mt-10,.text-center,.big,.fancy,.rounded) are utility classes: small, generic classes that each do one simple thing and don’t care what page they’re used on.
- The first four (
Write the Rules, Apply the Classes
For each class below, do two things:
- Fill in the CSS rule in
styles.css, then - Find every element in
index.htmlthat should use that class and addclass="..."to it.- If you need to style just a small piece of text, wrap that text in a
<span>first, then add the class to the span.
- If you need to style just a small piece of text, wrap that text in a
Tip
An element can have more than one class. List them in one class attribute, separated by a space, e.g. class="note rounded".
Here’s what the finished page looks like:
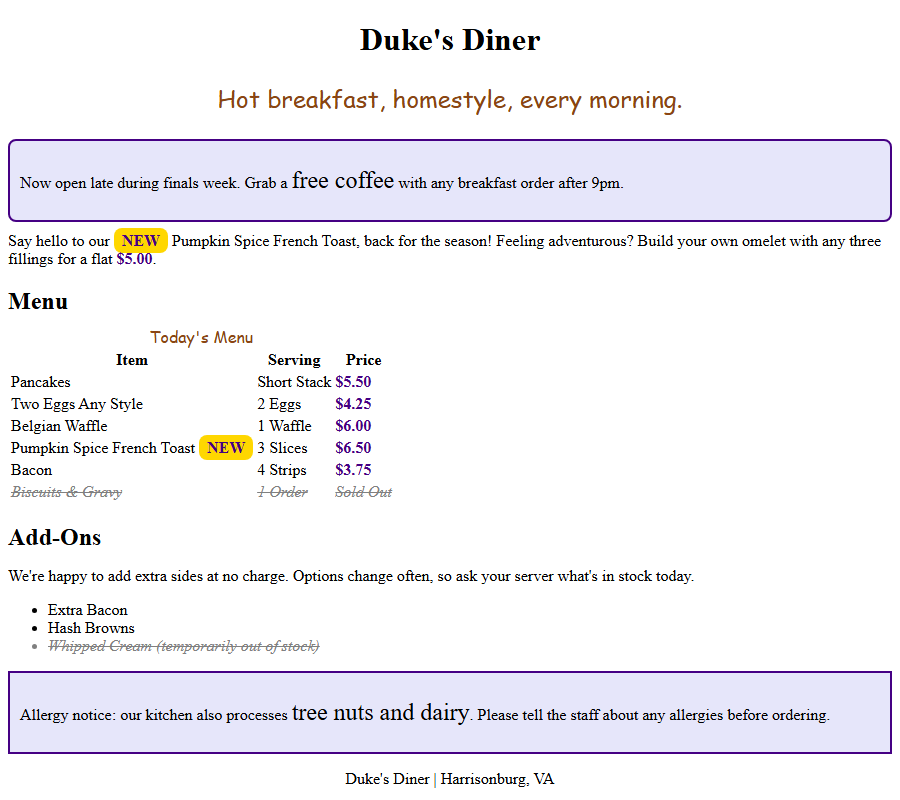
(Note that “cursive” font appears as Comic Sans on some OS/browser combinations, but that’s okay.)
.price
Make text with this class bold and colored JMU purple. Check the JMU brand colors page.
Add class="price" to:
- Every price in the Price column of the menu table, except the sold-out row
- The
$5.00mentioned in the paragraph about the build-your-own omelet (hint: wrap the price in a<span>first)
.badge-new
Give this class a gold background, bold JMU purple text, 4px of padding on the top and bottom, 8px of padding on the left and right, and an 8px rounded border radius.
Add class="badge-new" to:
- The word “NEW” in the paragraph under the announcement box (hint: you’ll need to wrap these too)
- The word “NEW” next to the Pumpkin Spice French Toast in the table
.unavailable
Make this class’s text gray, italic, and give it a strikethrough line (hint: use text-decoration).
Add class="unavailable" to:
- All three cells in the Biscuits & Gravy row
- The out-of-stock item in the add-ons list
.note
Give this class a 2px solid border in JMU purple, 10px of padding, 10px of margin on the top and bottom, and a background color of lavender.
Add class="note" to:
- The
<div>with the finals week announcement - The
<div>with the allergy notice
Utility Classes
These six are much simpler: one or two properties each!
| Class | Property |
|---|---|
.mb-10 |
margin-bottom: 10px; |
.mt-10 |
margin-top: 10px; |
.text-center |
text-align: center; |
.big |
font-size: 1.5em; |
.fancy |
font-family: cursive; color: saddlebrown; |
.rounded |
border-radius: 8px; |
Fill in those six rules, then add the classes to index.html:
text-centeron the<header>and on the<footer>mt-10on the intro paragraph (the one with the NEW badge) and on the<footer>, alongsidetext-centerfancyon the tagline in the header and on the table<caption>bigon the tagline in the header too, and on “free coffee” in the announcement and “tree nuts and dairy” in the allergy notice — wrap each phrase in a<span>firstmb-10on both<h2>headings, and also on the<div>with the allergy notice, alongsidenoteroundedon the<div>with the finals week announcement, alongsidenote
Notice that the two <div> elements both have the note class, but each one pairs it with a different utility class, so they end up styled a little differently even though they share the same base look.
That’s the point of combining classes: mix and match to get exactly the combination each element needs.
Think: Semantic vs. Utility
When would a semantic class be better than a utility class? When would a utility class be better than a semantic class? Why not use only one or the other?
Bonus: CSS Variables
If you finish early, you probably noticed that you typed the same JMU purple value three times, once each for .price, .badge-new, and .note. That’s the same problem classes solve, but for a single value instead of a whole rule.
At the top of styles.css, define a CSS variable for the purple:
:root {
  --jmu-purple: #450084;
}
Then replace each hardcoded purple value with var(--jmu-purple). That way, if the brand color ever changes, you only have to change it in one place.
Submission
Submit your index.html and styles.css files (even if incomplete) to Canvas for participation credit.