Lab 3: Styling & DOM
This lab is worth 20 points total, and consists of two parts on the same page: Parts 1-3 are about styling and CSS and Part 4 is about DOM and JS. Submit all files together to Gradescope.
Getting Started
Download this lab03.zip file and extract its contents to a lab03 folder, somewhere in your cs343 folder (or anywhere else safe).
Open the cs343 or lab folder in VS Code. Remember to use the live preview/server feature when working with HTML files to see your changes in real time.
- Guide for Live Preview extension
- Guide for Live Server extension
Style Overflow 💅
For this lab, you will take a naked (🙈) HTML page and apply CSS styles to make it look fab.
There will be less hand-holding in this lab, so be prepared! You will also learn a few more simple CSS selectors to use.
Objectives
- Link an external stylesheet to an HTML page
- Understand the difference between element, id, and class selectors
- Write rules to style basic CSS properties such as font, color, size, margin, padding, and border
- Style an HTML page according to an image by writing CSS rules
Context
Your friend, Taylor, has recently started a new business in town, “Style Overflow,” a beauty salon that specializes in hair, nails, and more. They’ve been learning some HTML on their own to create a website for their business, but would like your help, since you’re taking CS 343 right now at the best school in the world, JMU.
✨ Note
Do NOT use AI for this specific lab, even as a reference. It is too easy to have it generate the CSS styles for you. Please get familiar with CSS syntax and start to learn how to find the properties and values you need (like with reference guides and Google).
Part 1: Housekeeping 🧹💨
Open the style-overflow.html file in VS Code and open a live preview.
If you already see an error on your page…
- As you should pretty much every time you open your browser to preview your work, open your browser’s Dev Tools
- Show the Web Console
- You should see an error message similar to:
GET http://127.0.0.1:3000/favicon.ico [HTTP/1.1 404 Not Found 2ms] - If you have this error, great job! 🏆 You’re supposed to 😅. You’ll fix in step 1 below.
Before we can really get down to business, let’s change a few things to the HTML.
-
Add a “favicon”
- A favicon is the little icon that appears in the browser, next to the name of the page in a tab, or in a bookmark.
- You typically need to upload an image and link to it in the page’s
<head>, like so:
<link rel="icon" href="path/to/image.ico"> - Let’s do something more fun. Go to https://fav.mhciael.com/
- Take a look at the examples on the page of how to make an emoji 💇♀️ into a favicon using HTML.
- Go to your HTML and write the code from fav.farm in the
<head>to add your own emoji favicon.- You just write:
<link rel="icon" href="https://fav.mhciael.com/🦆"> - Instead of a duck, replace that part with whatever emoji you want.
- How to type emoji on Windows/Mac, or copy/paste online: https://getemoji.com/
- You just write:
-
Link to the CSS!
- We’ve kept our CSS styles in a separate file, in an “external stylesheet” called
styles.css. - In order to use those styles, we need to link to that file from the HTML.
- In the
<head>, add a link to thestyles.cssfile.- Hint:
<link rel="stylesheet" href="...">
- Hint:
- Open the
styles.cssfile in VS Code as well.
- We’ve kept our CSS styles in a separate file, in an “external stylesheet” called
-
Look at the CSS
- Arrange your windows/tabs so that you can see the HTML, the CSS, and the rendered page at the same time.
- Take a look at the style rules we’ve included:
nav a- this spaces out the links in the navigation bar.horizontal- this is responsible for making an element’s children display horizontallyarticle- this puts a border around all article elements
-
Let’s do a little analysis first:
- What does the
nav arule do?- Does it style all
aelements, or just some of them? - Which elements in the HTML will this rule apply to?
- Does it style all
- What does the dot (
.) in front of “horizontal” mean in CSS?- Is “horizontal” an HTML element? No… what is it?
- Where in the HTML code do you see the word “horizontal” used?
- For the “article” rule, take a look at border, padding, and margin.
- Change each of these values one at a time and observe what happens in the rendered page.
- Make sure you understand the difference between these three properties!
Answers
- The
nav arule styles only theaelements that are descendants of anavelement.- That’s what multiple selectors with spaces means in CSS: “select elements that are inside other elements.”
- The dot (.) in front of “horizontal” means that it is a class selector.
- “horizontal” is the name of a “class” that can be applied to any HTML element.
- The “article” rule applies to all
<article>elements.borderis the outline around the element.paddingis the space between the border and the content inside the element.marginis the space outside the border, between this element and other elements.
- What does the
Part 2: Get Styling! 🌟
Now, you will write CSS rules to style the page so that it looks like this image (open and reference it!):
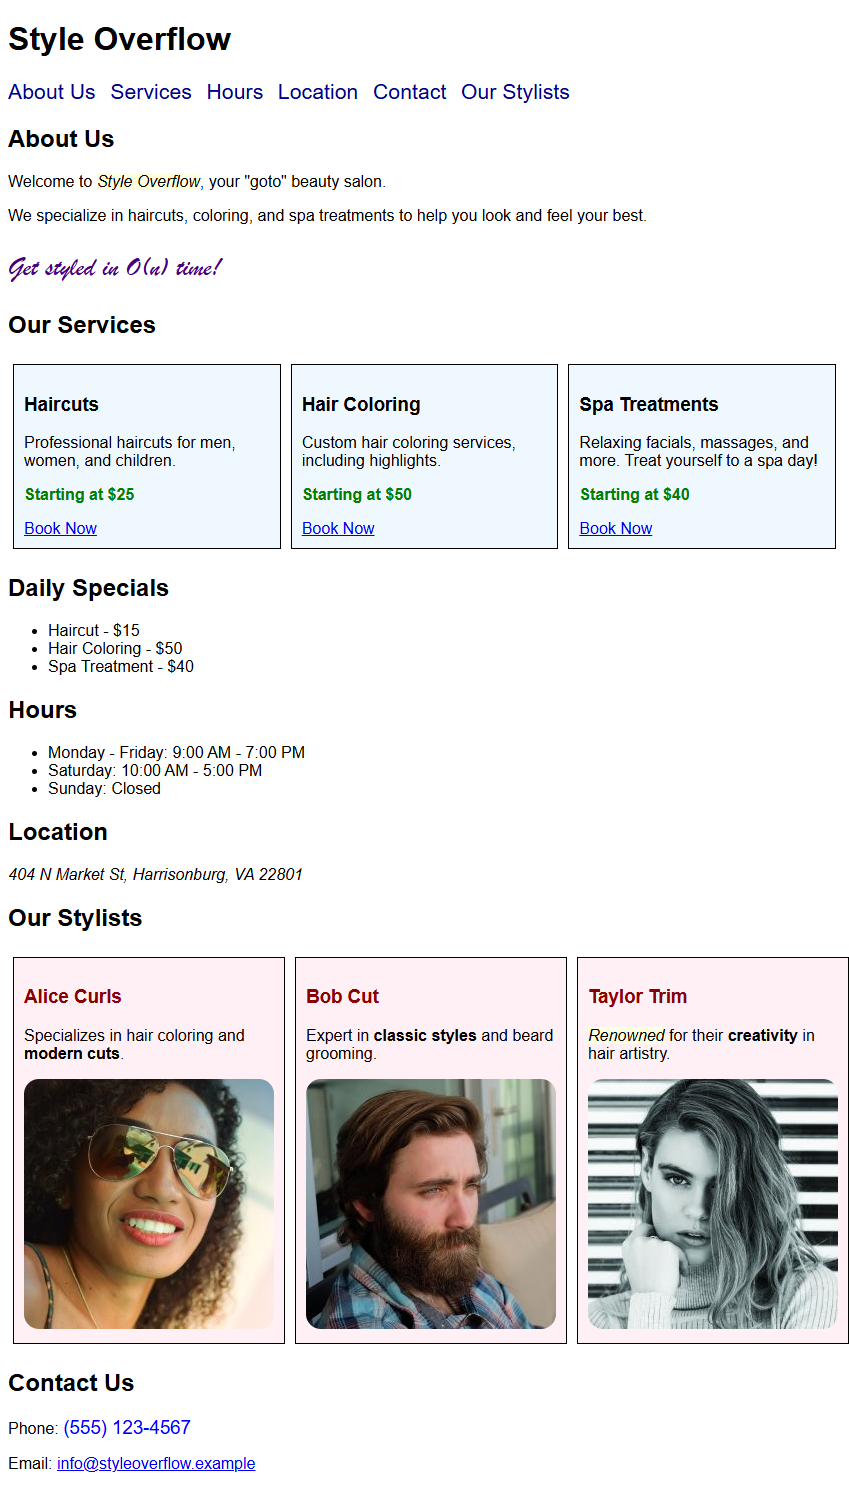
I recommend referencing these resources:
Follow the instructions in both parts 2 & 3 below for step-by-step guidance. I recommend going through them in order.
CSS Only
Do NOT modify any of the HTML after this point; you should only be writing CSS!
You should reference the HTML structure to figure out how to select the elements you need to style.
You must write a separate CSS rule for each of the objectives below. You should only use one rule per objective.
-
Make the entire page use a
sans seriffont.- You may have many fonts on your computer, but does everyone else?
- For now, use a web-safe font that is commonly available on most computers. You should also specify a “fallback” font, in case the first one isn’t available.
- Hint: the “body” selector will apply styles to all visible content.
- You may have many fonts on your computer, but does everyone else?
-
Give the boxes in “Our Services” and “Our Stylists” a margin of 5px and a padding of 10px.
- Each box should have exactly
5pxof space around it. - The content inside each box should have exactly
10pxof space from the outline.
- Each box should have exactly
-
Make the tagline use a
cursivefont, give it a 20pt font size, and make it JMU purple.- BTW, on some computers, the
cursivefont may look like Comic Sans 👀 - Hint: Go look at the HTML. What’s the easiest way to select the tagline?
- What color is JMU purple?
- What ways can you specify colors in CSS?
- BTW, on some computers, the
-
All text in a span with class “highlight” should be italicized and have a “lightyellow” background.
- Hint: How do you select all elements with a specific class? You saw this earlier!
- The color should be the named color
lightyellow.
-
Make all the prices bold and “green”.
- Use the named color
green.
- Use the named color
-
Make the phone number in the contact section have a 14pt font size and be “blue”.
That’s a great start practicing your CSS selectors and properties. You’ll finish up with some more difficult selectors!
Part 3: Complex Selector Styles 🎯
Continue your styling. The following instructions will require more complex CSS selectors and properties.
Reference the provided image again to see how the final result should look.
⚠️ Again, do NOT modify the HTML code! ⚠️
-
Make the boxes for just the services have an “aliceblue” background.
-
Make the boxes for just the stylists have a “lavenderblush” background.
-
Make the images of the stylists have a rounded border (15px radius).
-
Make only the links in the navigation bar have no underline, be “darkblue”, and have a 16pt font size.
-
Make only the names of the stylists have a “darkred” color.
-
Make just the text for the address italicized.
Part 4: Time for JavaScript ☕
Taylor wants Style Overflow’s homepage to advertise a rotating list of “Daily Specials,” but doesn’t want to hand-edit the HTML every time the specials change. Let’s write some JavaScript that builds this list dynamically from an array of data instead.
- Back in
style-overflow.html, find the#specialssection. Notice it’s empty except for an<ul id="specials-list"></ul>- You’re going to write JavaScript to dynamically fill out this list!
- There’s a
<script src="specials.js"></script>tag added at the end of the<body>so this file runs on the page.
- Open
specials.js. - Read and understand the provided
createListItem(listEl)function.- It creates a new
<li>, appends it as the last child of the given list, and returns it.
- It creates a new
- Look at the
specialsarray.- It’s an array of objects, where each object has a
nameand apricefield, e.g.{ name: "Haircut", price: 15 }. - You’ll use this array to build the list of specials.
- It’s an array of objects, where each object has a
- Complete the
renderSpecials(specials)function. Hints:- Use a
forloop to iterate over thespecialsarray. (or afor...ofloop if you prefer) - Don’t forget that each item in the array is an object with a
nameand apricefield. - How do you get a DOM element in JavaScript? (
document.getElementById()ordocument.querySelector()) - The
createListItemreturns a DOM element. How do you set the text for a DOM element?
- Use a
Test your code by opening the page in a browser and checking that the list of specials appears correctly.
JavaScript Debug Console
Don’t forget! Open the browser’s Dev Tools and show the Console to see any errors or messages from your JavaScript code.
Submitting
Upload style-overflow.html, styles.css, and specials.js to the corresponding Gradescope assignment.
(You do not need to zip them first.)