Lab 7: Teamwork with Git
Real websites are built by teams, and teams need a way to work on the same files at the same time without overwriting each other. That’s what git branches are for.
In this lab, your team of three (or four) will create your own GitHub repository, build a website about nocturnal zoo animals on separate branches, and merge everything back together.
You will hit merge conflicts on purpose, and you’ll learn how to resolve them. Finally, you’ll deploy the site with GitHub Pages.
The goal of this lab is to practice using Git and feel comfortable with a team-based Git workflow where everyone is able to contribute to the project at the same time.
Getting to know git 😬
If you’re feeling a little uncertain about your git skills, no worries! You’re learning. Break things now rather than later!
Make sure git is installed and configured, and consider installing a GUI for git to help you see what’s going on in your repository. VS Code has a good Git integration, GitHub Desktop is easy to use, and there are many others. You can also use the command line if you prefer.
To use git from the command line with GitHub, you should also have set up an SSH key.
Teams and Roles
Work in teams of three (or four, see below). Decide who is Person A, Person B, and Person C (for example, by alphabetical order of eID). Each role owns one feature, which they build on their own branch:
| Role | Branch | Feature |
|---|---|---|
| Person A | grid |
Responsive page layout with CSS grid |
| Person B | nav |
Navigation with a hamburger menu |
| Person C | dark-mode |
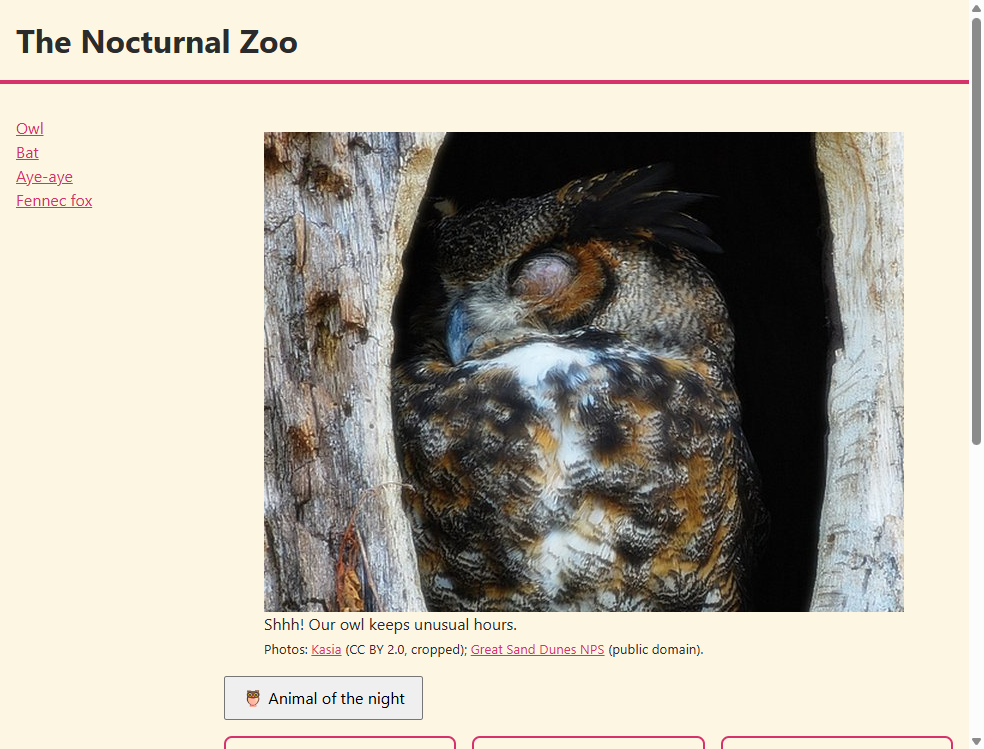
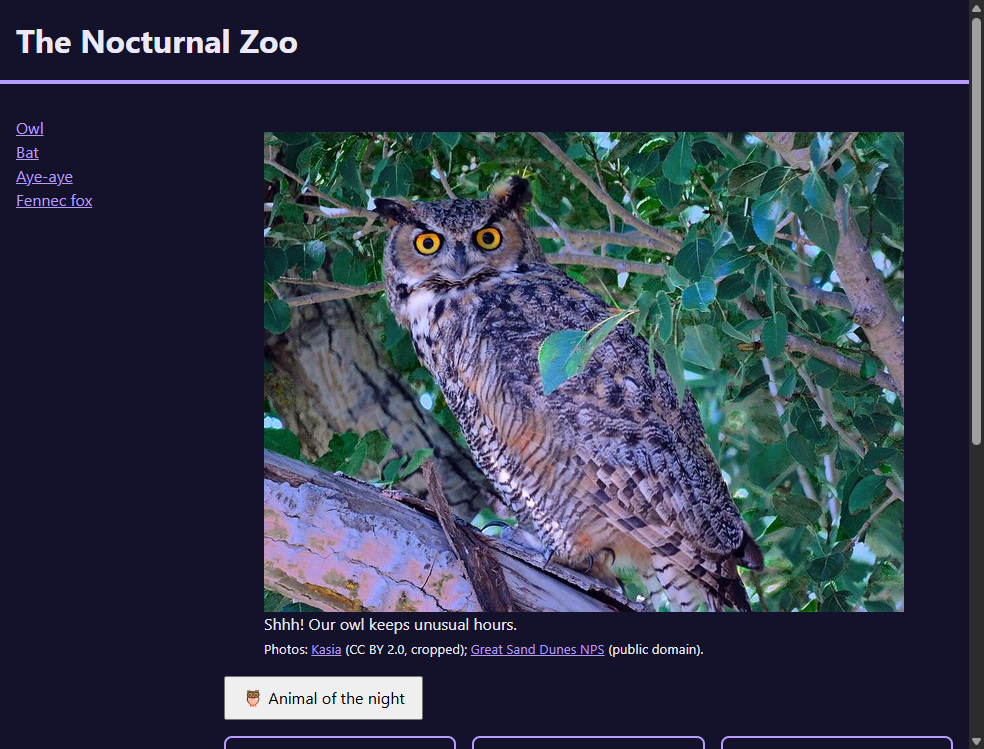
Dark mode (and a different owl) |
| Person D (teams of four only) | cards |
A fourth animal and an “Animal of the night” button |
Team of four?
Person D joins in wherever the lab says “everyone” or “Persons B and C” (collaborator, clone, branch, pull request, and so on), so just read those steps as including you.
Part 1: Create Your Repository
First, one teammate (Person A) will need to create a new repository and add the others as collaborators. Then everyone will clone it to their own computer and add the starter files.
- Person A: on github.com/new, create a repository.
- Name it
nocturnal-zooor something similar. - Make it Public (GitHub Pages is free only for public repositories).
- Do not add a README,
.gitignore, or license. You want an empty repository.
- Name it
- Person A: in the repository’s Settings → Collaborators, click Add people and add Person B and Person C.
- Persons B and C: accept the invitation (check the email connected to your GitHub account, or go to github.com/notifications).
-
Person A: clone the empty repository to your laptop.
-
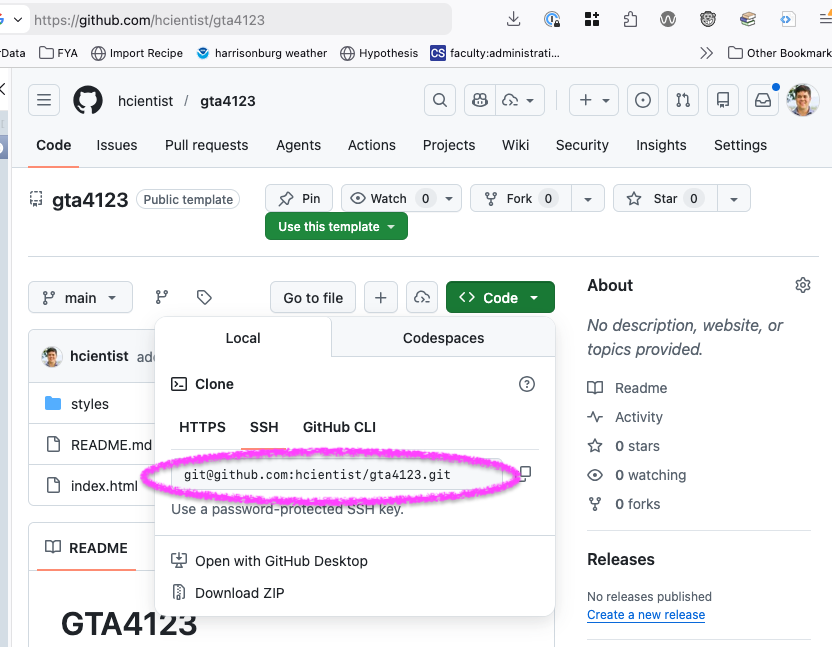
Copy the HTTPS or SSH address from the green Code button.
-
Then clone it into your 343 folder (not inside another repository):
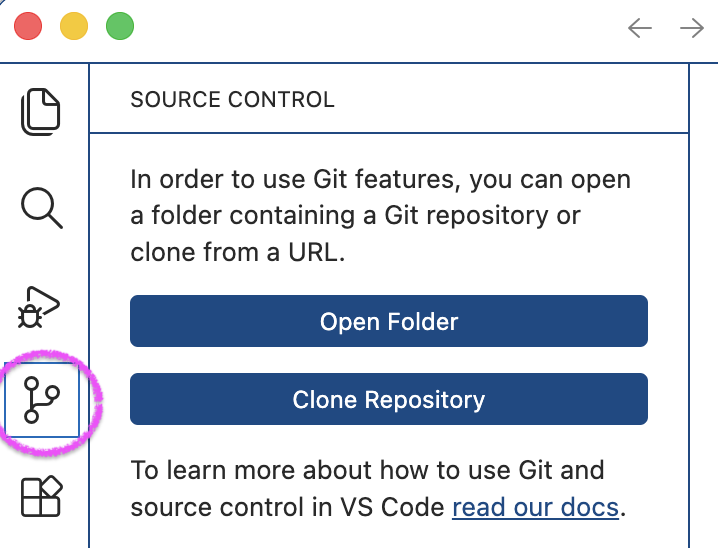
Click the Source Control icon in the sidebar (the one that looks like a branch), then Clone Repository. Paste the address, choose your 343 folder as the destination, and click Open when VS Code offers to open the clone.
git clone https://github.com/YOUR-USERNAME/nocturnal-zoo.git
-
-
Person A: download lab07.zip and extract it. Copy its contents into your
nocturnal-zoofolder so thatindex.htmlis directly inside the folder (not inside a subfolder). -
Person A: commit the starter files to
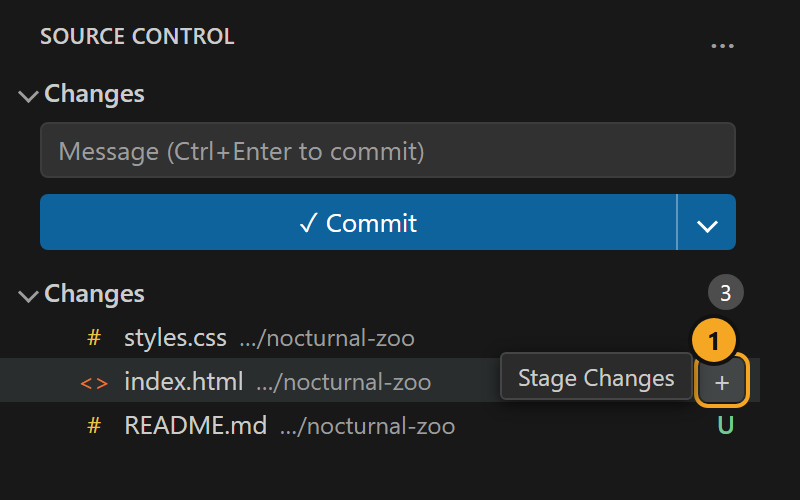
mainand push:Open the Source Control view. Your new files are listed under Changes, but git doesn’t commit them until you stage them.
-
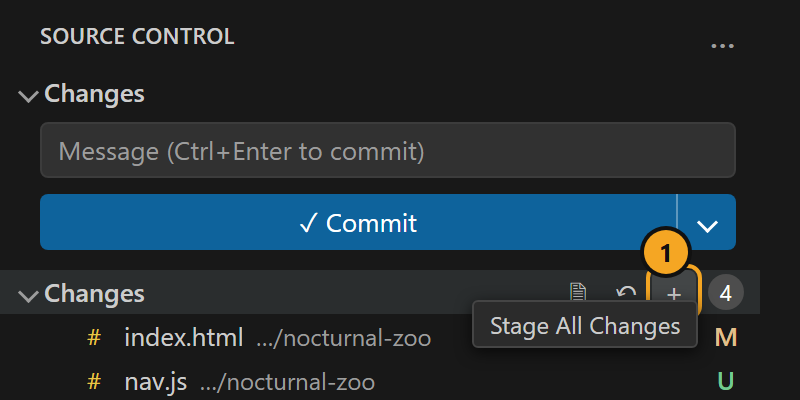
Stage the files: hover over the Changes heading and click its +.
-
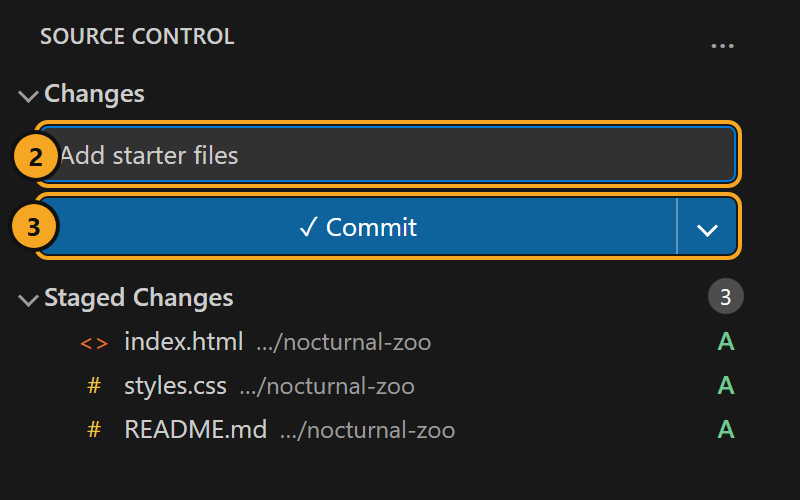
Type
Add starter filesin the message box. -
Click Commit.
-
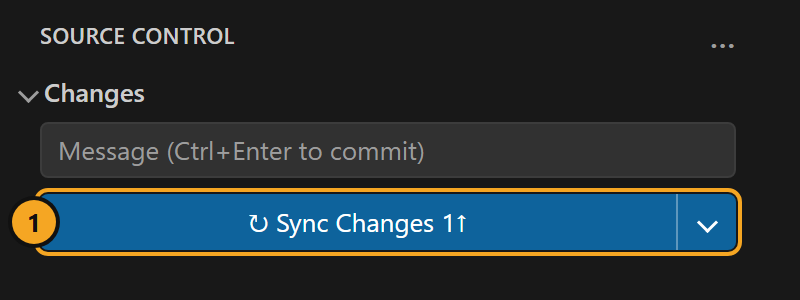
Click Sync Changes (or Publish Branch, the first time) to push.
git add . git commit -m "Add starter files" git branch -M main git push -u origin main- Persons B and C: now that the starter files are on GitHub, clone the repository too.
- Everyone: open the folder in VS Code and look over
index.htmlandstyles.css. Openindex.htmlwith Live Preview (or Live Server) to see it. Notice the marked sections at the bottom ofstyles.css, one for each role.
-
Part 2: Build Your Feature on Your Own Branch
Everyone: create and switch to your own branch (grid, nav, dark-mode, or cards):
- Click the current branch name (
main) in the status bar at the bottom left of the window. -
Choose Create new branch… at the top of the list, and type your branch name (e.g.,
grid). VS Code switches to the new branch.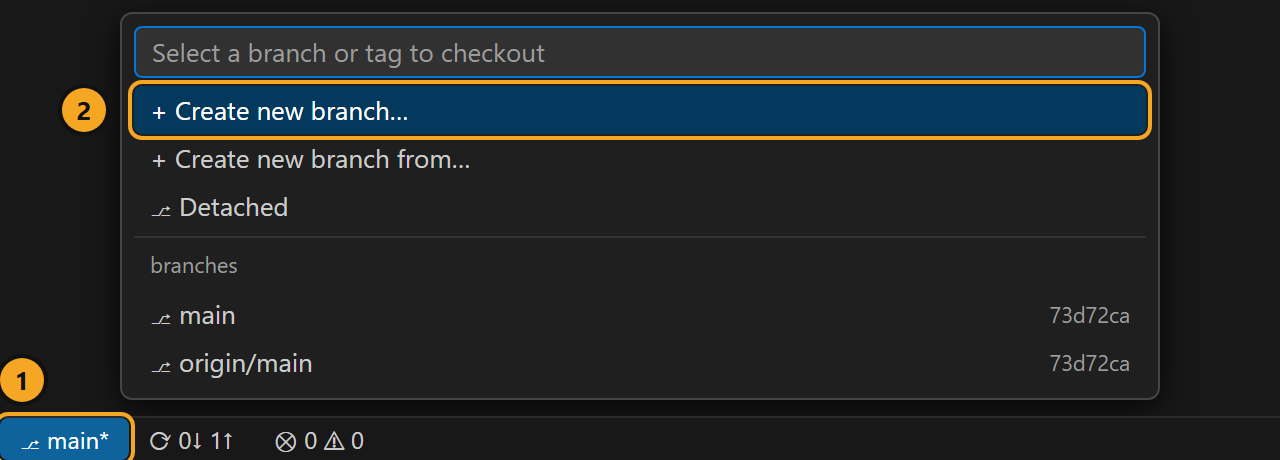
-
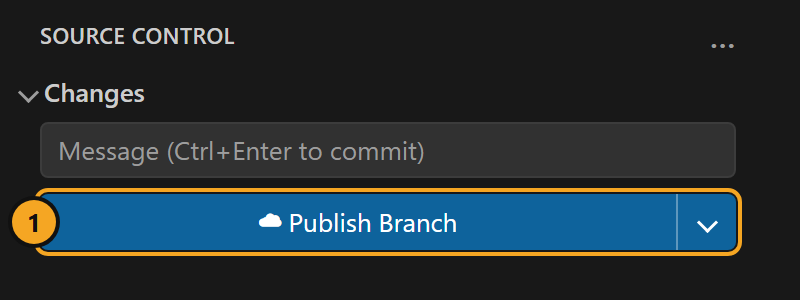
Open Source Control and click Publish Branch to push it to GitHub.
Replace grid with your branch name:
git switch -c grid
git push -u origin grid
Commit and push after every step!
Your work exists only on your laptop until you push it. After each numbered step below, commit and push:
In Source Control, hover over the Changes heading and click its + to stage everything. Type a message, click Commit, then click Sync Changes.
git add .
git commit -m "Say what you just did"
git push
Now complete your role’s task below.
Copy the code!
This lab is about git, not CSS or JavaScript, so feel free to copy and paste (or type) the code below. Go one step at a time: read each piece, add it, and look at what changed in the browser before moving on. Put your CSS under your own marker comment in styles.css.
Person A: Grid
Lay out the page with CSS grid: one column on phones, and a sidebar for the nav on wider screens.
- In
index.html, replace(your name here)in the footer with your name. - In
styles.css, change the--accentcolor at the top of the file to your favorite color (for example#c2255correbeccapurple). - In
index.html, add this inside thehead:<meta name="viewport" content="width=device-width, initial-scale=1"> - In
styles.css, under the Grid layout marker, give each part of the page a grid area name:.site-header { grid-area: header; } .site-nav { grid-area: nav; } .site-main { grid-area: main; } .site-footer { grid-area: footer; } - Make
.pagea grid that stacks those areas in one column (for phones):.page { display: grid; grid-template-areas: "header" "nav" "main" "footer"; } - On wider screens, put the nav in a sidebar next to
main:@media (min-width: 40rem) { .page { grid-template-columns: 12rem 1fr; grid-template-areas: "header header" "nav main" "footer footer"; } }
Test it: open DevTools and toggle the device toolbar to make the page narrow and wide.
Person B: Navigation Menu
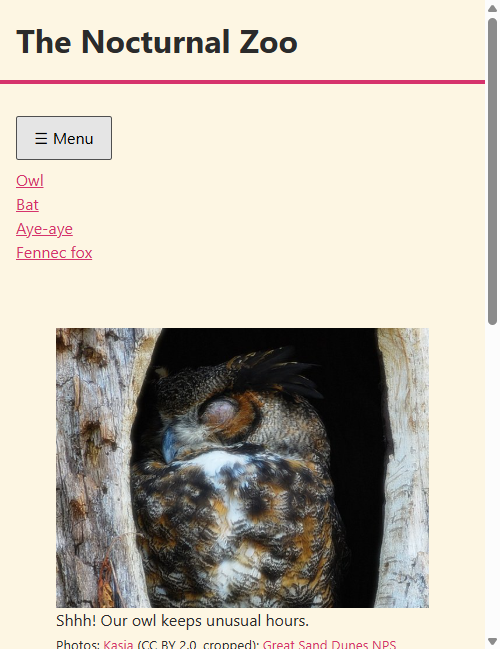
On small screens, hide the links behind a “hamburger” menu button.
- In
index.html, replace(your name here)in the footer with your name. - In
styles.css, change the--accentcolor at the top of the file to your favorite color (for example#c2255correbeccapurple). - In
index.html, add this button as the first thing inside thenavelement:<button class="nav-toggle">☰ Menu</button> - Create a new file named
nav.js, and inindex.html, load it right before</body>:<script src="nav.js"></script> - In
nav.js, find the button and the list of links:const toggle = document.querySelector(".nav-toggle"); const menu = document.querySelector(".site-nav ul"); - When the button is clicked, turn the
openclass on or off:toggle.addEventListener("click", () => { menu.classList.toggle("open"); }); - In
styles.css, under the Navigation menu marker, hide the links unless they have theopenclass:.site-nav ul { display: none; } .site-nav ul.open { display: block; } - On wider screens, hide the button and always show the links:
@media (min-width: 40rem) {
    .nav-toggle {
        display: none;
    }

    .site-nav ul {
        display: block;
    }
}
Test it: use DevTools’ device toolbar to make the page narrow, then click the menu button.
Person C: Dark Mode
Make the site follow the computer’s light or dark mode setting, and wake the owl up at night.
- In
index.html, replace(your name here)in the footer with your name. - In
styles.css, change the--accentcolor at the top of the file to your favorite color (for example#c2255correbeccapurple). - In
styles.css, under the Dark mode marker:@media (prefers-color-scheme: dark) { :root { --bg: #1b1b2f; --fg: #e8e8f0; --accent: #f5c542; } } - In
index.html, replace the owl’simgwith thispictureelement:The browser checks each<picture> <source srcset="images/owl-awake.jpg" media="(prefers-color-scheme: dark)"> <img src="images/owl-asleep.jpg" alt="A great horned owl: sleeping by day, wide awake by night"> </picture>sourcein order. If itsmediacondition is true (here, the visitor is using dark mode), it shows the image from that source’ssrcset. If no source matches, it falls back to theimg. Themediaattribute uses the same conditions as a CSS@mediaquery. See MDN’spictureelement andprefers-color-schemepages for more.
Test it: in DevTools, press Ctrl+Shift+P (Cmd+Shift+P on Mac), type “dark”, and choose Emulate CSS prefers-color-scheme: dark.
Person D: Animal Cards (teams of four only)
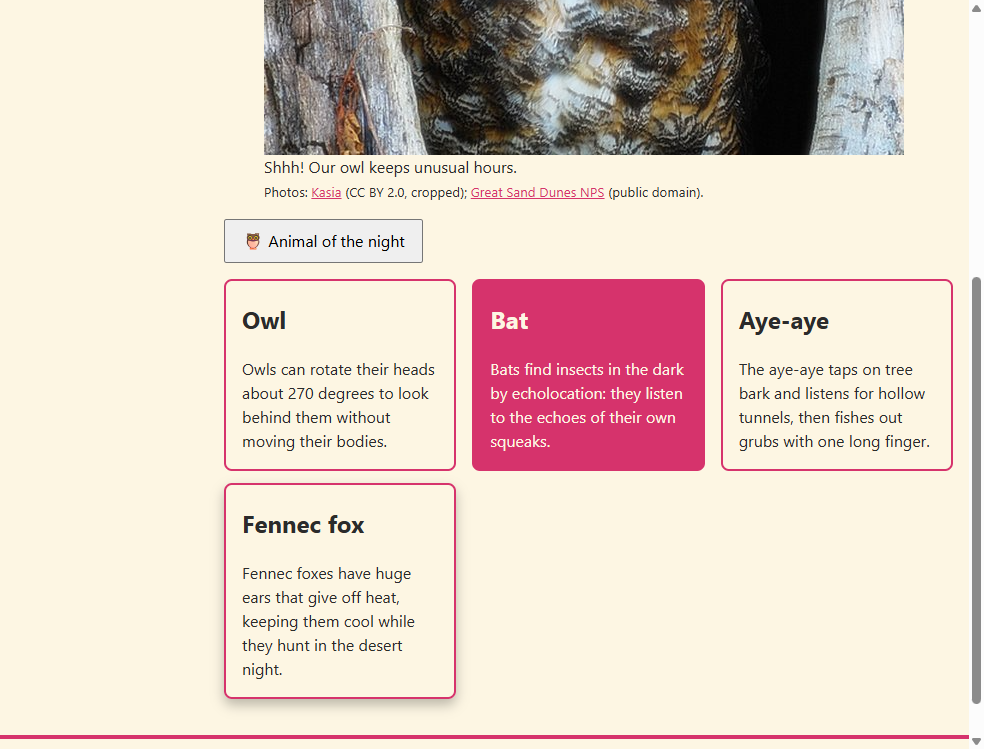
Add a fourth animal and an “Animal of the night” button that highlights a random card.
- In
index.html, replace(your name here)in the footer with your name. - In
styles.css, change the--accentcolor at the top of the file to your favorite color (for example#c2255correbeccapurple). - In
index.html, add this card inside the.factsdiv, after the aye-aye:And add a link to it at the end of the<article class="fact" id="fennec-fox"> <h2>Fennec fox</h2> <p>The fennec fox's huge ears help it hear prey moving under the sand.</p> </article>navlist:<li><a href="#fennec-fox">Fennec fox</a></li> - In
index.html, add this button just above the.factsdiv:<button class="surprise">Animal of the night</button> - Create a new file named
animals.js, and inindex.html, load it right before</body>:<script src="animals.js"></script> - In
animals.js, find the button and all the cards:const button = document.querySelector(".surprise"); const facts = document.querySelectorAll(".fact"); - When the button is clicked, remove the
highlightclass from every card, then add it to one random card:button.addEventListener("click", () => { facts.forEach((fact) => fact.classList.remove("highlight")); const pick = facts[Math.floor(Math.random() * facts.length)]; pick.classList.add("highlight"); }); - In
styles.css, under the Animal cards marker, style the button:.surprise { margin-bottom: 1rem; padding: 0.5rem 1rem; font: inherit; cursor: pointer; } - Make the highlighted card stand out:
.fact.highlight {
    background: var(--accent);
    color: var(--bg);
}
Test it: click the button a few times.
Check Your Work
Everyone: before you push your finished feature, check that your page is valid and accessible.
Required for the project
These checks aren’t graded in this lab, but they are required for the project: every page must pass the W3C validator with no errors and must have no accessibility errors. Practice now!
- Validate your HTML with the W3C validator:
- In VS Code, open
index.html, press Ctrl+A to select everything (Cmd+A on Mac), and copy it. - On the validator’s Validate by Direct Input tab, paste your code and click Check.
- Fix any errors, and then check again until it says “Document checking completed. No errors or warnings to show.”
- In VS Code, open
-
Check accessibility with the axe DevTools extension for Chrome or Firefox:
- Open your page in your browser with Live Preview (or Live Server).
- Open DevTools, choose the axe DevTools tab, and scan the full page.
- Fix every issue it finds, and scan again until there are 0 issues.
- Switch to dark mode (see Person C’s tip) and scan again, since the colors change.
If axe reports color contrast problems, your
--accentcolor is too light to read on the background. Pick a darker one.You can use the WAVE extension instead of axe if you like. Aim for 0 errors and 0 contrast errors.
Push Your Branch
When your feature works, make sure everything is committed and pushed.
The Source Control view should list no changes, and the sync button at the bottom left should show no arrows or numbers.
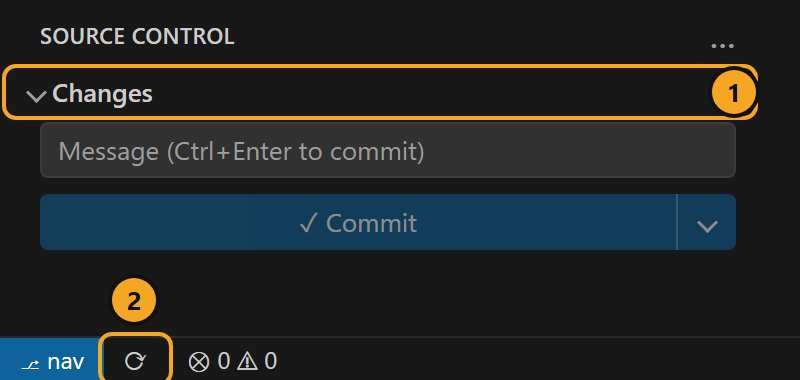
git status should say nothing to commit, working tree clean and Your branch is up to date.
Part 3: Merge, Conflicts, and Pull Requests
Now bring everyone’s work together on main.
Open Pull Requests
- Everyone: on your repository’s GitHub page, you should see a banner for your recently pushed branch. Click Compare & pull request. (Or go to the Pull requests tab and click New pull request.)
- The base branch should be
mainand the compare branch should be yours. - Give your pull request a clear title, then Create pull request.
- The base branch should be
- Wait until everyone’s pull requests are open. Don’t merge yet.
- Look at each other’s Files changed tabs. GitHub shows you the exact lines that each branch changed.
Merge the First One
Person A: click Merge pull request and then Confirm merge on your pull request.
It merges cleanly, because main hasn’t changed since you branched from it.
Resolve Conflicts
Now look at Person B’s pull request. 😬 You should see:
This branch has conflicts that must be resolved
Why? Everyone changed the same two lines (the footer name and --accent), and git doesn’t know whose to keep. Your CSS sections didn’t conflict, because you changed different lines.
To fix it, you bring the latest main into your branch, fix the conflicts on your computer, and push.
Persons B, C, and D, one at a time (wait until the previous person’s pull request is merged before you start):
-
Make sure your work is committed and pushed. Then switch to your branch and pull
maininto it:-
Switch to your branch: click the branch name at the bottom left and choose your branch.
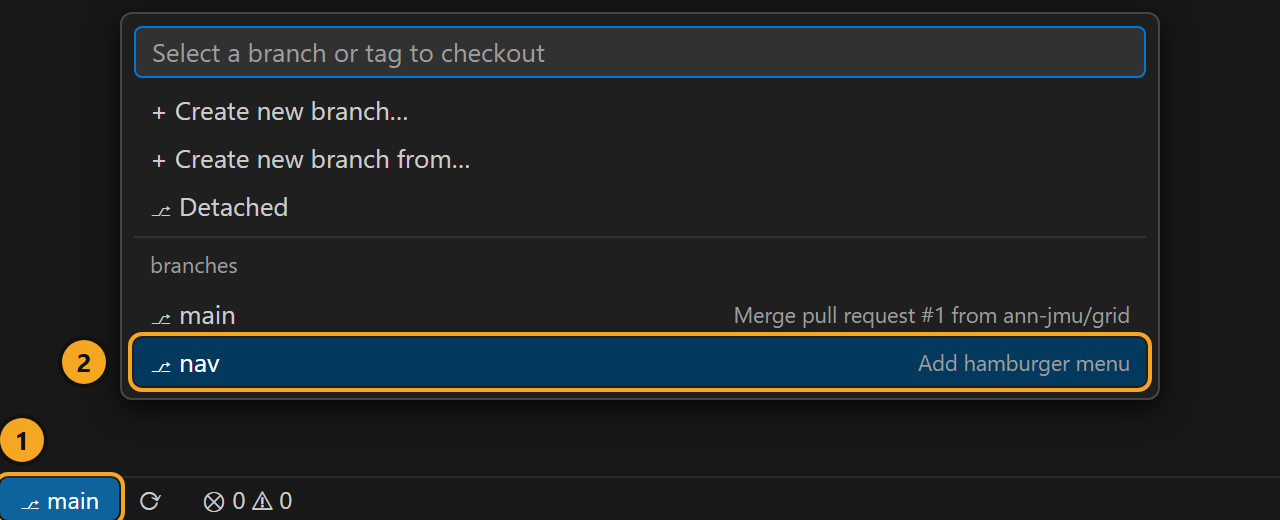
-
In Source Control, hover over the Changes heading and click the … menu that appears at the right.
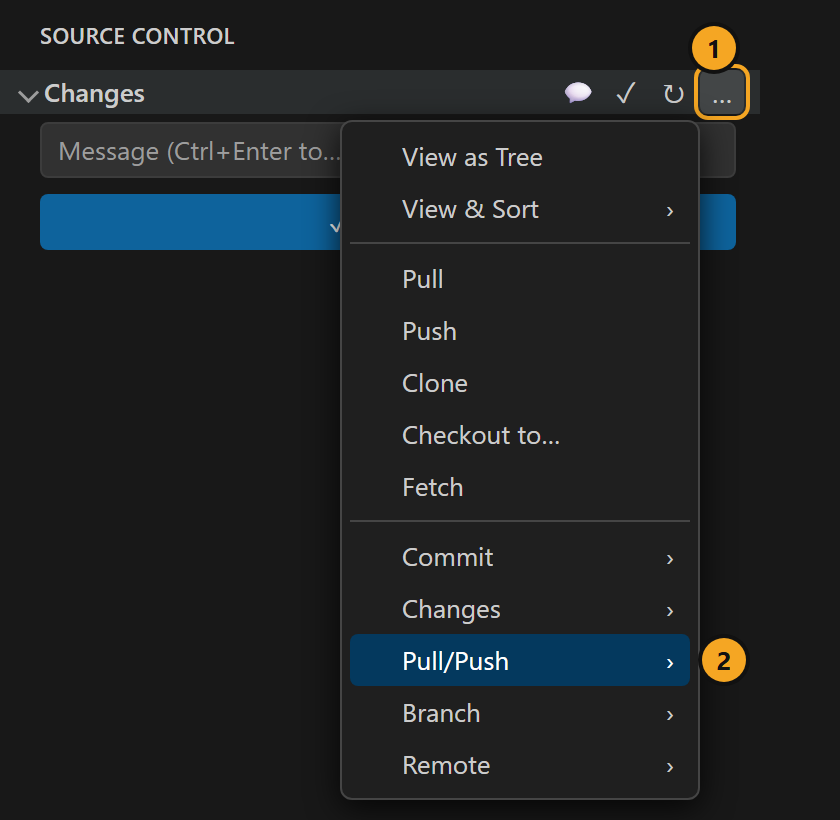
-
Choose Pull/Push → Pull from…, then pick
originand thenmain.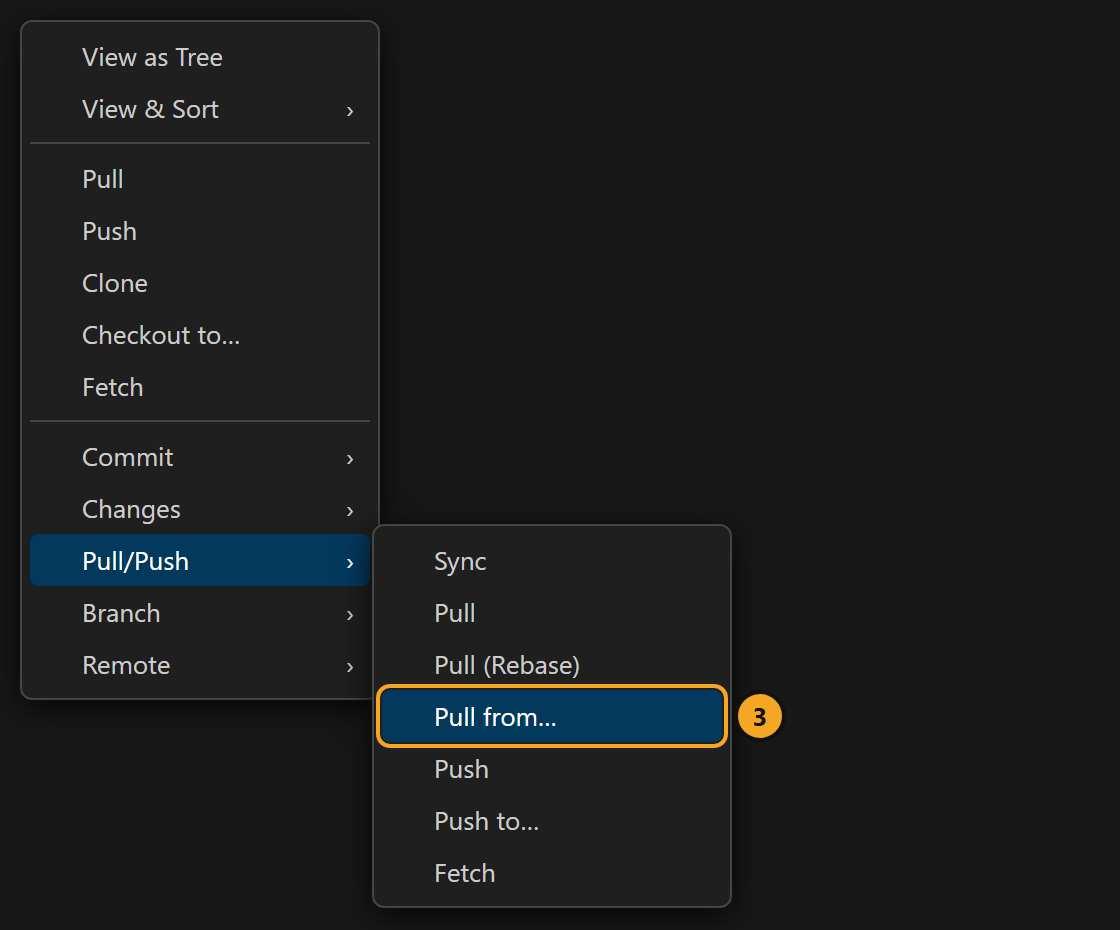
Replace
navwith your branch name:git switch nav git pull origin mainGit reports conflicts in
index.htmlandstyles.css. -
-
Open each file. Git has marked each conflict like this:
<<<<<<< HEAD
...what's in your branch...
=======
...what's coming from main...
>>>>>>> 1a2b3c4d...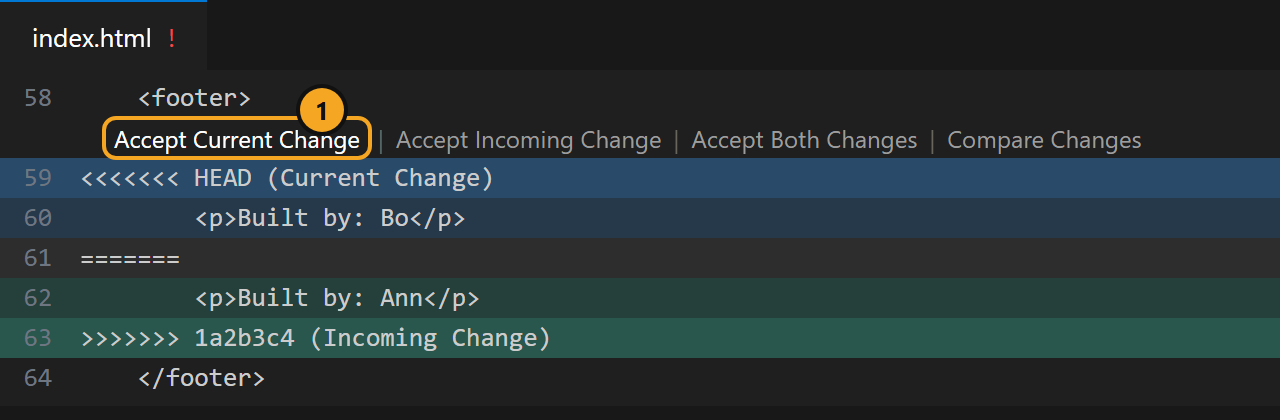
-
Edit the text so it says what you want, and delete the three marker lines (
<<<<<<<,=======,>>>>>>>). Decide together as a team:- Footer: list everyone’s names so far, for example:
<p class="credits">Built by: Ann and Bo</p> --accent: pick one color for your site.- Person D only: your
animals.jsscript tag will also conflict with Person B’snav.jsscript tag. Keep both of them!
- Footer: list everyone’s names so far, for example:
-
Save the files, then commit and push:
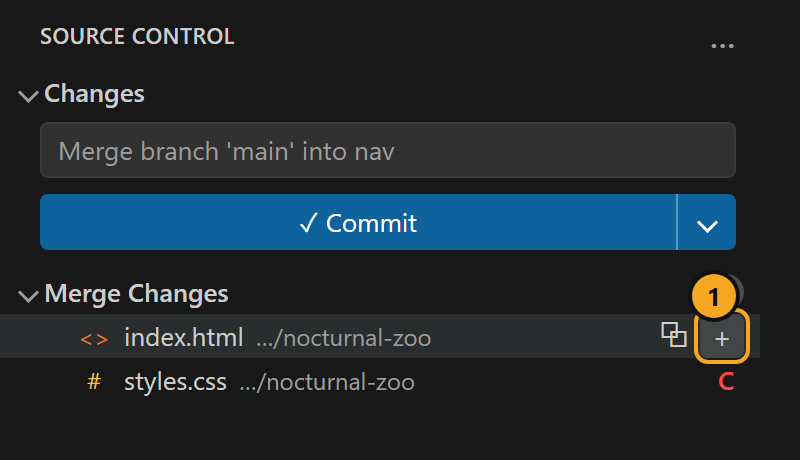
In Source Control, click the + next to each file under Merge Changes, then click Commit and Sync Changes.
git add . git commit -m "Merge main" git push -
Go back to your pull request on GitHub. The conflict message is gone. Merge the pull request.
Made a mess?
You can undo the merge and get back to where you were before you pulled. Then try again.
Press Ctrl+Shift+P (Cmd+Shift+P on Mac) to open the Command Palette, type abort merge, and choose Git: Abort Merge.

git merge --abort
Update Your Local main
Everyone: now that every pull request is merged on GitHub, update your own computer:
-
Click the branch name at the bottom left and choose
main.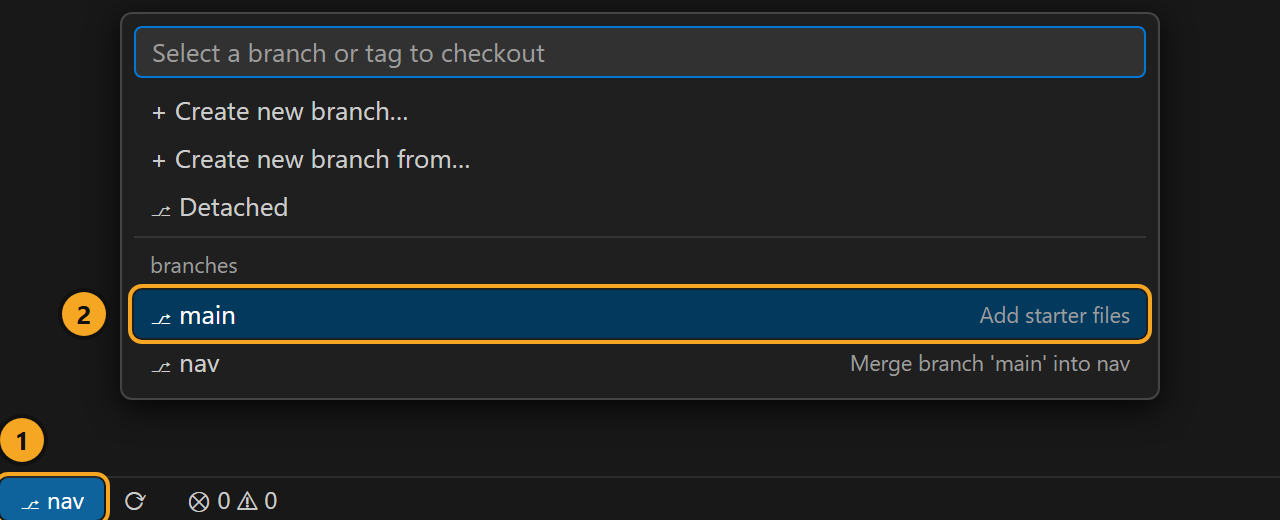
-
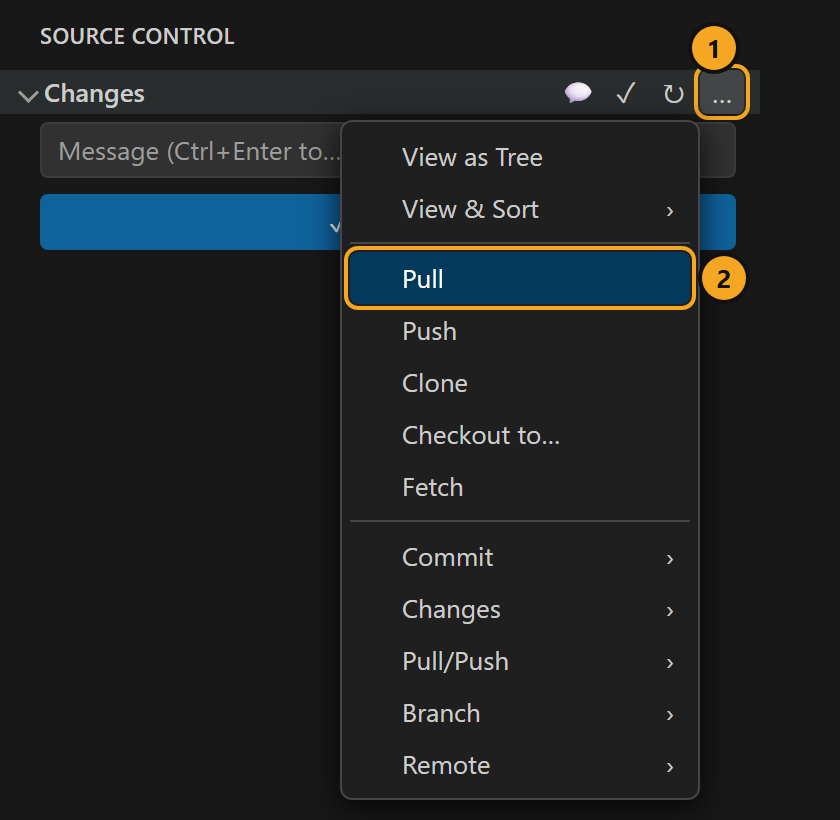
In Source Control, hover over the Changes heading, click the … menu that appears at the right, and choose Pull.
git switch main
git pull
Open index.html with Live Preview and check that all the features work together.
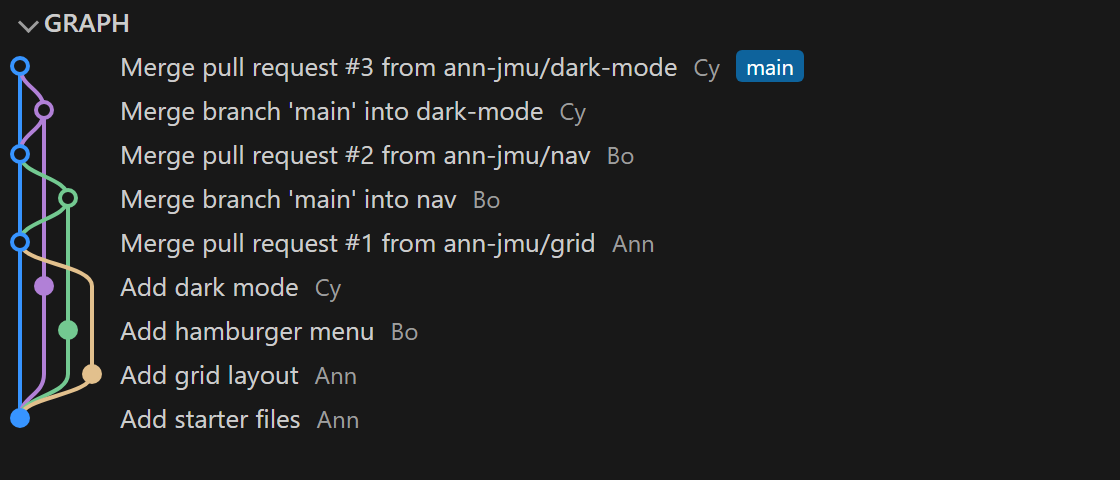
Then look at the Graph at the bottom of VS Code’s Source Control view. You should see commits from every teammate, plus a merge commit for each pull request. Each colored line is a branch, and you can see where it split off from main and where it merged back in.
Part 4: Deploy to GitHub Pages
Person A (the owner of the repository):
- On the repository’s GitHub page, go to Settings → Pages.
- Under Build and deployment, set Source to Deploy from a branch.
- Choose branch main and folder / (root), then Save.
- Wait a minute or so and reload the Pages settings. A message at the top will say Your site is live at
https://YOUR-USERNAME.github.io/nocturnal-zoo/.
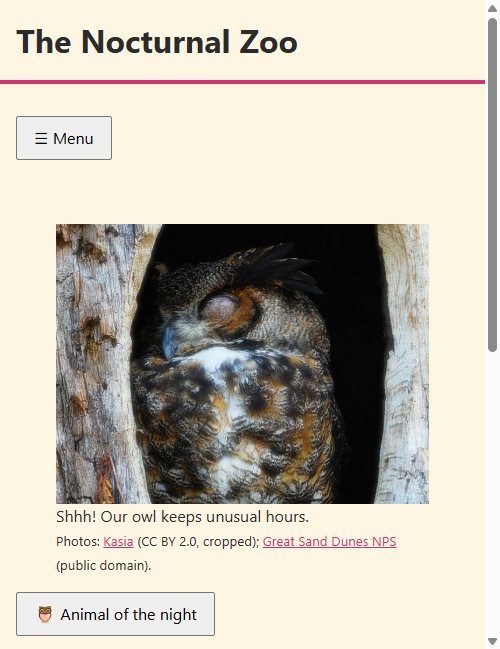
Everyone: visit the site on your own computer and your phone. Switch your OS (or DevTools) between light and dark mode. Does the owl wake up? 🦉
Everyone: check the live site the same way you checked your branch. Merging can break things (a leftover <<<<<<< line, for example), so don’t skip it!
- On the W3C validator’s Validate by URI tab, paste your site’s URL and click Check. It should show no errors.
- Open your live site and run axe DevTools (or WAVE) in both light and dark mode. It should show 0 issues.
If you find a problem, fix it on a branch, open a pull request, and merge it. Pages will redeploy the fixed site.
GitHub Pages redeploys every time main changes, and it’s free for public repositories. You can also use it to host a personal portfolio or a class project.
Check Your Understanding
Talk these over as a team (you don’t need to submit anything):
- Person A’s pull request merged cleanly, but Person B’s didn’t. Why?
- Everyone edited
styles.css, but the changes in your marked sections never conflicted. Why not?
Submission
Create a text file named url.txt that contains only the URL of your GitHub Pages site, for example:
https://ann-jmu.github.io/nocturnal-zoo/
Every teammate should submit url.txt to Gradescope.
The autograder takes a light look at your work: that you submitted a URL, that the site loads, and that your repository’s history shows commits from more than one person and a merge. If something is missing, the autograder tells you what it was looking for.