Lab 4: Top Movies Table
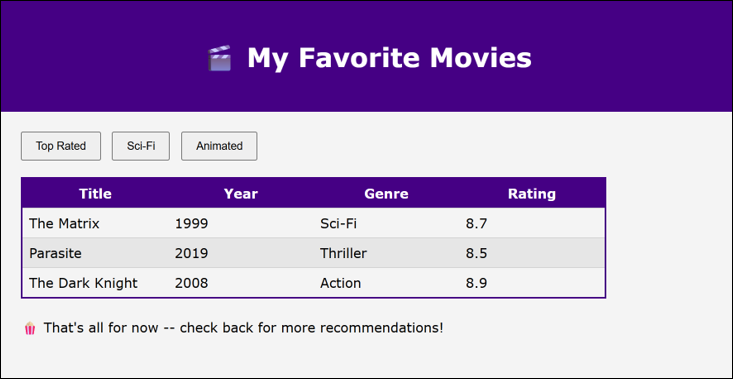
Today, you are building an interactive table of movies! There are three tabs: Top Rated, Sci-Fi, and Animated. Clicking each one displays a different list. Instead of typing all those rows into the HTML by hand (three times over!), you’ll write JavaScript that reads an array of movie objects and builds the table rows for you.
Objectives
- Write the HTML for a table, including its headers
- Learn how to use
document.createElement()andelement.appendChild()to populate the DOM - Use JavaScript to dynamically build a table from an array of objects
- Understand the basic styles for HTML tables (and the page around them)
Getting Started
Download lab04.zip and extract the three files to a lab04 folder, inside your cs343 folder (or somewhere else safe).
In VS Code, open the movies.html, movie-styles.css, and movies.js files for editing. Open a live preview of the HTML page so you can see your changes as you make them.
Part 1: Build the Table’s HTML 🏗️
-
Open
movies.html. Notice that:- The
<header>just has a heading in it. - The three tab
<button>elements (#top-rated-btn,#sci-fi-btn,#animated-btn) are already there for you. - There’s a TODO comment inside
<main>, where your table needs to go.
- The
-
Replace that comment with a
<table>containing:- A
<thead>with one row containing four header cells, in this exact order:Title,Year,Genre,Rating.- Don’t forget to set the
scopeattribute on your header cells!
- Don’t forget to set the
- An empty
<tbody id="movie-list"></tbody>.- This
idmust match exactly – you’ll be filling out the table body with JavaScript later!
- This
- You might want to review the tags used for tables if you need a refresher.
- A
-
Preview the page. You should see the header and the three tab buttons.
- The table itself will look pretty bare (just the header row, no styles yet, and no data rows)!
- You’ll fill it with data in Part 2 and style it in Part 3.
Part 2: Build the Table with JavaScript
A Quick Tutorial: createElement() and appendChild()
So far, you’ve only used JavaScript to change elements that already existed somewhere in the HTML (like setting .textContent on an element you grabbed with document.getElementById()). But what if the element you need doesn’t exist in the HTML at all?
That’s what document.createElement() is for: it builds a brand new HTML element, but one that isn’t part of the page yet. You need to attach it to the page with .appendChild() (or a similar method) before it will actually show up.
It’s like creating a node, and then connecting it to the tree of elements that make up the page. (A two-step process!)
For example, say your HTML had this list:
<ul id="fruits">
    <li>Apple</li>
</ul>
You could add a new “Banana” item to it like this:
// 1. Create a new, empty <li> element (not attached yet)
const newItem = document.createElement("li");

// 2. Give it some text
newItem.textContent = "Banana";

// 3. Attach it to the page, as the last child of #fruits
const fruitsList = document.getElementById("fruits");
fruitsList.appendChild(newItem);
After running that code, the page would now show:
<ul id="fruits">
    <li>Apple</li>
    <li>Banana</li>  <!-- the new element -->
</ul>
You’ll use this exact create -> set content -> attach pattern to build every cell of every row in your movie table!
Apply It: Building the Movie Table
-
Open
movies.js. Take a look at what’s there:- Three arrays of movie objects:
topRated,sciFi, andanimated- Each object has a
title,year,genre, andrating.
- Each object has a
- The
renderMovies(movies)function, which is mostly empty, This is what you’ll complete. - Some code at the bottom that makes the buttons work.
- You don’t need to change this part, but notice that all three buttons just call your
renderMovies()function, with a different array each time!
- You don’t need to change this part, but notice that all three buttons just call your
- Three arrays of movie objects:
-
Complete the
renderMovies(movies)function, following the numbered comments inside it:- Get a reference to the
<tbody id="movie-list">element. -
Clear out anything already in the table body.
Example: removing all the children from an element
Here are two ways to do this. Either one works fine:
orsomeElement.textContent = "";There are more too, but these are simple and common.someElement.replaceChildren();-
THINK: Why do we need this step? What would happen when you click a different tab if we skipped it?
Answer
Without clearing the table body first, every click of a tab button would just pile more rows underneath the ones already there, instead of replacing them! Since
renderMovies()gets called again each time you click a tab, it needs to start from a clean slate every time.
-
-
Loop over the
moviesarray. -
For each movie, create a new
<tr>and attach it to the table body.Make a helper function
You could write something like
createRow(movieObject)that takes in a movie object and returns a new<tr>element with all the<td>cells already attached. Then you could just call it from the loop and attach it! -
For each movie/row, create a
<td>for each of the movie’s four fields (title,year,genre,rating).- Note: do not use
.innerHTMLfor this; instead, usedocument.createElement()and.textContentto build each cell. This is the “safe way” to add text to the page!
Why not .innerHTML?
You could technically build each row faster with something like:
But imagine this data came from somewhere less trustworthy (like a user-submitted review) and one of the titles was:row.innerHTML = `<td>${movie.title}</td><td>${movie.year}</td>...`;Setting<script>stealAllYourInfo()</script>innerHTMLwith unescaped data like that can let malicious HTML/JavaScript run on your page. This is a form of Cross-Site Scripting (XSS), a common web security vulnerability.Using
document.createElement()andtextContent(like you’re doing here) always treats the data as plain text, so this isn’t a concern. That’s why we build each cell “the safe way,” even though it’s a bit more code. - Note: do not use
- Get a reference to the
-
Preview your page frequently! After you finish the function, clicking each tab should show the correct list of movies in the table.
-
THINK: Each dataset (
topRated,sciFi,animated) has a different number of movies in it. Did you need to write different code to handle each one?Answer
Nope! Since
renderMovies()loops over whatever array it’s given (instead of assuming there are exactly 5, or exactly 3, movies), the exact same function works no matter how long the array is – 0 movies, 3 movies, or 300 movies.This is the whole point of building the table with JavaScript instead of typing out
<tr>elements by hand: the code doesn’t care how much data there is.
Part 3: Style the Page 🎨
Now that your table actually has rows in it, let’s make it look fancy.
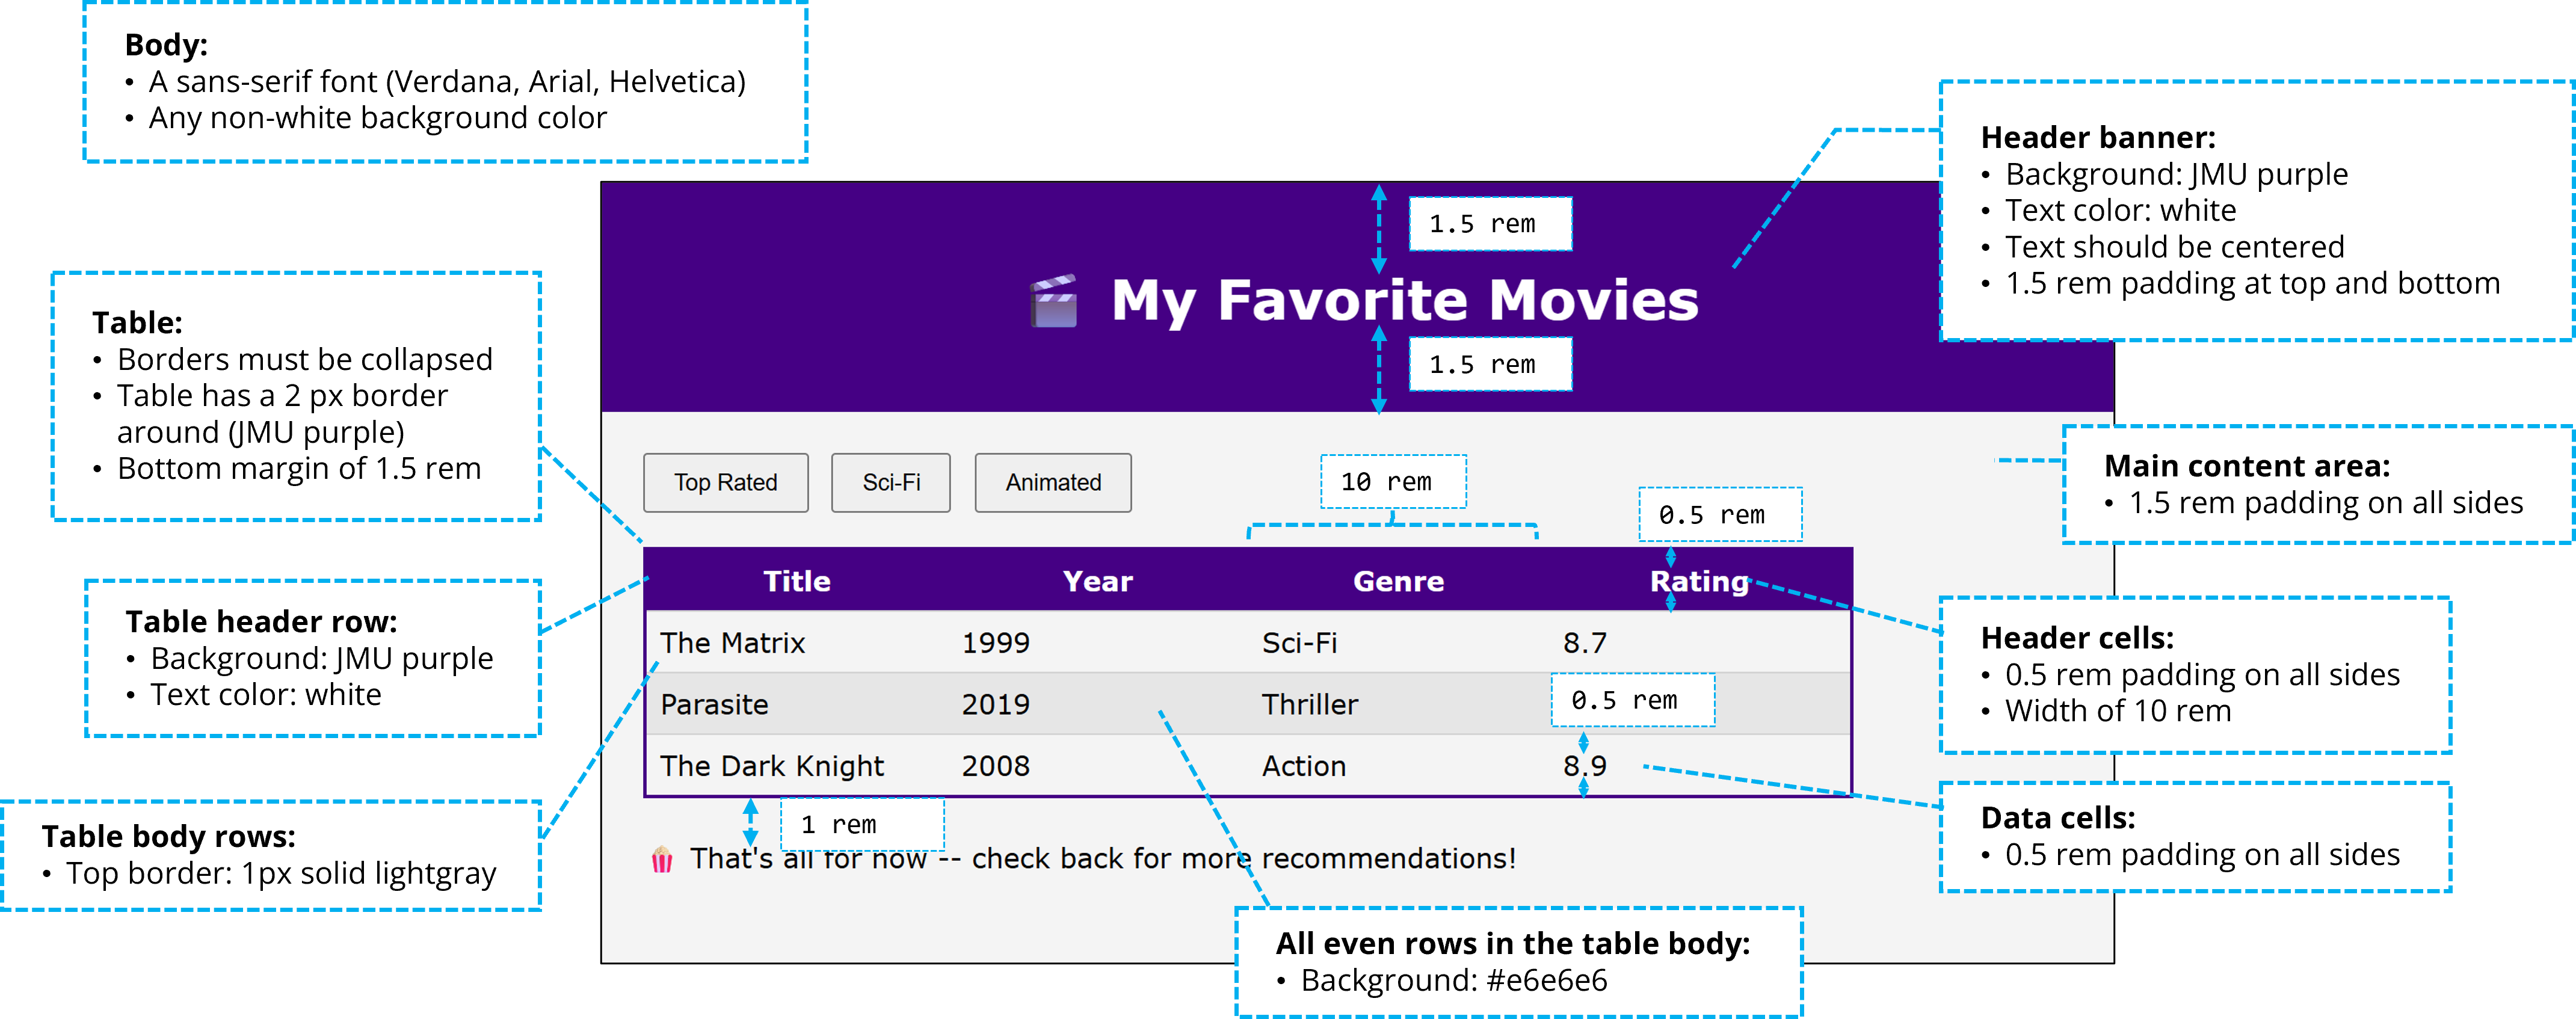
Take a look at this image of the finished page (with annotations), and then write your CSS rules in movie-styles.css to match it:
Text description
Body:
- A sans-serif font (
Verdana,Arial,Helvetica) - Any non-white background color
Header banner:
- Background: JMU purple
- Text color:
white - Text should be centered
1.5rempadding at top and bottom
Main content area:
1.5rempadding on all sides
Table:
- Borders must be collapsed
- Table has a
2pxborder around (JMU purple) - Bottom margin of
1.5rem
Table header row:
- Background: JMU purple
- Text color:
white
Header cells:
0.5rempadding on all sides- Width of
10rem
Table body rows:
- Top border:
1px solid lightgray
Data cells:
0.5rempadding on all sides
All even rows in the table body:
- Background:
#e6e6e6
Open movie-styles.css. You’ll find a numbered comment for each thing that needs styling; write your CSS rule(s) underneath each one:
body– font and background colorheader– background color, text color, and centered textmain– padding on all sidestable–border-collapse, a border, and space below itthead– background color and text colorth– padding and a fixed width- the table’s body rows (
tbody tr) – a top border td– padding- zebra stripes – give every other body row a background color (hint: which pseudo-class selects “every other” element?)
Preview frequently and compare against the annotated image as you go!
Submission
Submit movies.html, movie-styles.css, and movies.js to the appropriate assignment on Gradescope/Canvas.