Lab 5: The Amazing Personality Quiz
Today, you will create a personality quiz based on the classic Myers-Briggs Type Indicator (MBTI). The quiz will present 4 pairs of statements, and the user will select a statement from each pair. Based on their selections, the quiz will calculate a 4-letter personality type, display its name, and show a fun image.
The MBTI is a widely used personality assessment that categorizes people into 16 different personality types based on their preferences in four dimensions:
- Extraversion (E) vs. Introversion (I)
- Sensing (S) vs. Intuition (N)
- Thinking (T) vs. Feeling (F)
- Judging (J) vs. Perceiving (P)
The combination of these preferences results in a 4-letter code (e.g., ENTJ, ISFP) that represents a person’s personality type.
See this animated example of the quiz in action:
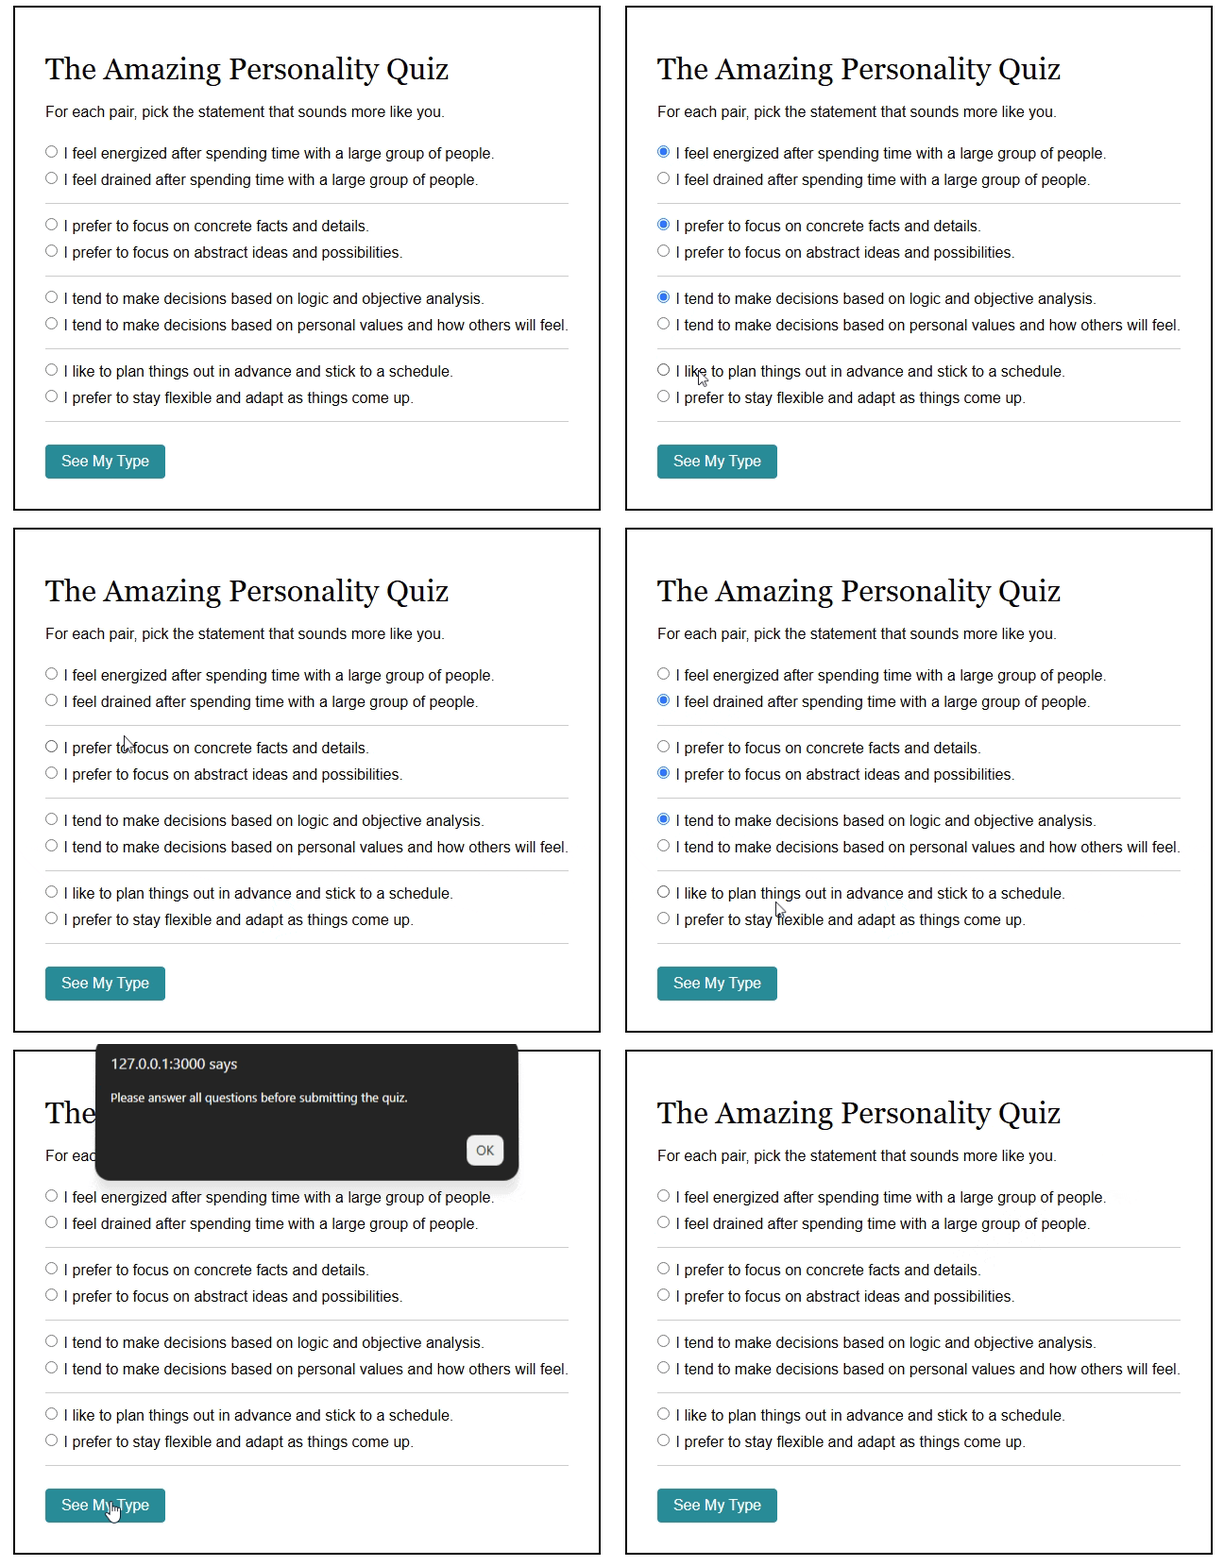
As you can see, there’s also a results page with a “Try Again” button that resets the quiz. These two “pages” are actually just two <div>s in the same HTML file, and you will show/hide them as needed.
Getting Started
- Go download the
lab05.zipstarter files and put it in a lab05 folder, in your cs343 folder (or somewhere else safe). - Open
lab05in VS Code. - Take a look at
quiz.html– most of the page is there, but#quiz-containerhas a TODO comment, andquiz.jsis mostly empty. - You will write HTML in
quiz.htmland JavaScript inquiz.js, both from scratch.
Part 1: The Quiz Questions
Do NOT modify any of the HTML or CSS already provided in quiz.html, other than filling
in #quiz-container.
Inside #quiz-container, create a <form> with a meaningful id so that you can reference it later.
Inside the form, add 4 pairs of radio buttons, one pair for each of the 4 traits. Each pair should have two radio buttons and labels, one for each choice. The user should only be able to select one choice from each pair.
Each question pair should be wrapped in a <div> with the class question. This is so that the CSS can style them nicely.
The name of each question pair and the value of each choice is below:
name |
value |
Question label |
|---|---|---|
| traitA | E |
I feel energized after spending time with a large group of people. |
I |
I feel drained after spending time with a large group of people. | |
| traitB | S |
I prefer to focus on concrete facts and details. |
N |
I prefer to focus on abstract ideas and possibilities. | |
| traitC | T |
I tend to make decisions based on logic and objective analysis. |
F |
I tend to make decisions based on personal values and how others will feel. | |
| traitD | J |
I like to plan things out in advance and stick to a schedule. |
P |
I prefer to stay flexible and adapt as things come up. |
You must use the same name for both radio buttons in a pair, and the value must match exactly what’s in the table above. For example, both the “energized” and the “drained” radio buttons must have name="traitA", and the first one must have value="E" while the second has value="I".
You will also need a <label> following each radio button, with the text inside it. There are two ways to associate a <label> with an <input>:
-
Put the
<input>inside the<label>, then put the text afterwards, like this:<label> <input type="radio" name="myFavoriteCar" value="porsche911"> I like the Porsche 911. </label>This is an easy way to do it, and the label will automatically be associated with the input. Recommended for this lab.
-
Put the
<input>and<label>as siblings, and use theforattribute on the<label>to point to theidof the<input>, like this:<input type="radio" name="myFavoriteCar" value="porsche911" id="favcar-porsche911"> <label for="favcar-porsche911">I like the Porsche 911.</label>This gives you more control over the layout, but you have to make sure the
forandidmatch up correctly (and you have to come up with a uniqueidfor each input).
Either way is fine, but each <input> must be associated with a <label>.
Make sure to add a submit button in the bottom of the form! It should be a <button> element with the type "submit" and the text "See My Type".
If you’ve done everything correctly, your quiz should look the provided example, with styling applied.
Part 2: Scoring the Quiz
Now, it’s time to actually add the code that makes the quiz work. Implement the following in quiz.js:
When the form is submitted:
- Call
event.preventDefault()so the page doesn’t reload. - Read the selected value out of each of the 4 radio groups (
traitA,traitB,traitC,traitD).FormDatais the easiest way to do this.- Alternatively, you can get each individual element and read its
valueproperty, but that is more verbose.
- If any of the 4 questions are unanswered, display an alert and do not continue.
- Call
alert("Please answer all questions before submitting the quiz.")and return from the event handler.
- Call
- Concatenate the 4 selected values together into one string, e.g.
"ENTJ". This is the user’s 4-letter personality type. - Look up that type’s full name (see the table below) and display both the 4-letter code and the name in the appropriate elements on the page.
-
Code Name ESTJ The Executive ESTP The Entrepreneur ESFJ The Consul ESFP The Entertainer ENTJ The Commander ENTP The Debater ENFJ The Protagonist ENFP The Campaigner ISTJ The Logistician ISTP The Virtuoso ISFJ The Defender ISFP The Adventurer INTJ The Architect INTP The Logician INFJ The Advocate INFP The Mediator - You’ll probably want to create a JavaScript object that maps each 4-letter code to its name, so you can look it up easily.
-
- Also display a picture for the type by changing the
srcof the appropriate element.- Set the
srcto a URL like this, with the 4-letter code in place ofXXXX:https://raw.githubusercontent.com/Amirgizz/MBTI_Avatars/main/png/XXXX.png - For example, ENTJ’s picture is at
https://raw.githubusercontent.com/Amirgizz/MBTI_Avatars/main/png/ENTJ.png.
- Set the
- Finally, hide the quiz container and show the results container.
- Use the
.hiddenproperty of an element. - Set
.hiddentotrueto hide,falseto show.
- Use the
When “Try Again” is clicked:
- Reset the form’s selections (call
.reset()on the form). - Hide the results container and show the quiz container again.
When done, test your quiz thoroughly to make sure it works as expected. Try different combinations of answers, and make sure the correct type, name, and picture are displayed.
Submission
Submit your working quiz.html and quiz.js to Gradescope.