Array Functions and APIs
In this lab, you will use JavaScript array functions (forEach,
map, and filter) to search within an array of movie
data entries.
You should consult the following references as needed.
Starting Code
Download the following files to get started:
index.html- A starter Bootstrap HTML page.funs.js- A barebones JavaScript file.data.json- A JSON file containing data from IMDb
You will only modify and submit the funs.js file. You are encouraged
to examine the data.json file to develop an understanding of the
structure of the data.
Requirements
Step 1: Initialization functions
Your first step is to populate an unordered list based on an array of
objects. The data.json file contains an array of movie objects
based on real data retrieved from IMDb.
Each entry in this array is an object that contains the following information:
id- A unique identifier for the movie
title- The name of the movie
subtitle(optional)- The movie's subtitle
series(optional)- The name of the movie's series
rating- The IMDb rating based on user votes (range from 0 to 10)
runtime- The runtime of the movie as measured in minutes
year- The year the movie was released
Note that the title, subtitle, and
series fields are nested within a name field. That
is, while you can access movie.id directly, you would need to
access movie.name.title. Similarly, the rating,
runtime, and year fields are contained within a
data field.
Your first task is to define the setTitleContent function
that modifies a movie object by copying the movie's title into a new field
called titleContent. (Later functions will modify this new
field further.) Note that this function will be used within a call to
map, so it will need to return the modified movie object.
Once you've got setTitleContent working, you will create a
self-executing initialization function where indicated. Some parts of this
code are provided for convenience. Your main task here is to use
fetch to retrieve the data from data.json.
Once you've retrieved the data and parsed it as JSON, you will use map
(on setTitleContent) and forEach (using
buildItem) to build an HTML list dynamically. Note that
buildItem relies on the movie's titleContent field that
you add in setTitleContent.
Do NOT use any form of loop (such as a for-each loop) for this lab. The purpose is to work with the array functions only.
Finally, for all steps, update the 'target-label' element to
append "N movies" to its textContent, where N is the number of
movies in the list.
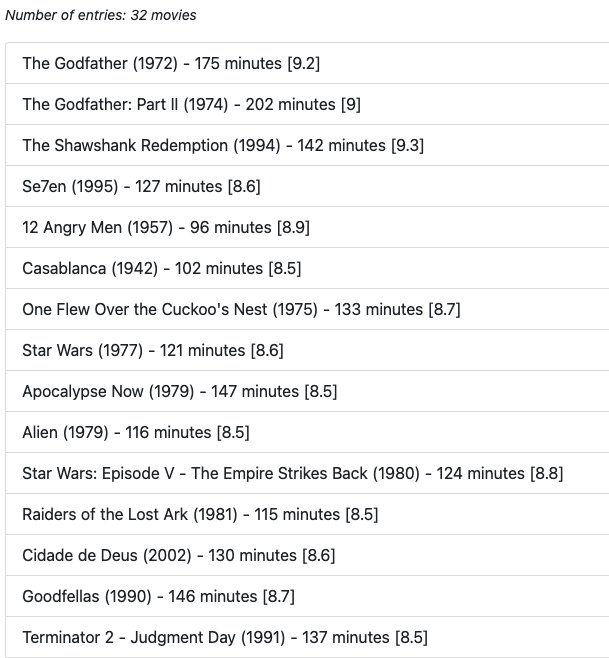
The original data set has over 100 movies in it. For this stage, you will just use the first 10 records. Your generated list should look like the one in this screenshot.
In the provided source code, there are hard-coded
hostname and url variables that your call to
fetch will use. Note that your code will not actually access the
data.json file you retrieved. CORS (a security mechanism we will
discuss in a few weeks) prevents using fetch with a local file,
so it must retrieve the data from a web server over HTTP.
Step 2: Chaining map calls
Your next task is to implement three more functions to append the year,
runtime, and rating values to the movie's titleContent field.
Extend your initialization function so that these functions are chained
together using a sequence of map calls.
A completed version of this step will produce output such as that shown in this screenshot. Note that the only observable difference here is the additional fields in the list item.
Step 3: Queries and filters
Your final task is to implement a group of functions for setting
minimum or maximum criteria to filter the data set based on particular
values. You'll start by implementing setMinRating and the
related functions. These functions will return a
closure
that will return a Boolean value (true or false) based on whether a movie
would satisfy the condition. As an example, consider the following code:
let f = setMinRating(8.0);You can then use f as a function that determines if a
movie has at least a minimum rating of 8.0. For instance, calling
f(godfather) would return true, assuming godfather
refers to the movie object for "The Godfather". On the other hand, calling
f(legend) would return false for "I Am Legend". Once you've
completed the setMinRating function, you cam
complete the others that serve similar purposes for year and runtime.
First, note that you need to use
parseInt and parseFloat on the fields that you
get from the movie objects. These fields are originally strings, so you
cannot do a basic > or < comparisons.
Also make sure that you are returning these comparisons as closures (i.e.,
return an arrow function) rather than trying to return true or false itself.
Finally, amend your initialization function to filter results. If the
query string is empty (i.e., query is undefined),
then you should continue to display the first 10 movies. However, if there
is a query, you'll need to get the appropriate minimum or maximum values.
For simplicity, the provided code splits the query string into an array
of criteria, such as minrating=8.2.
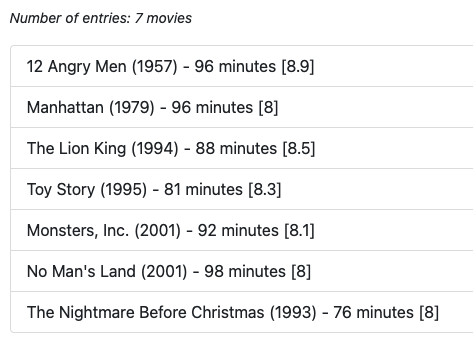
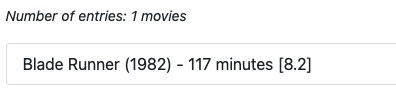
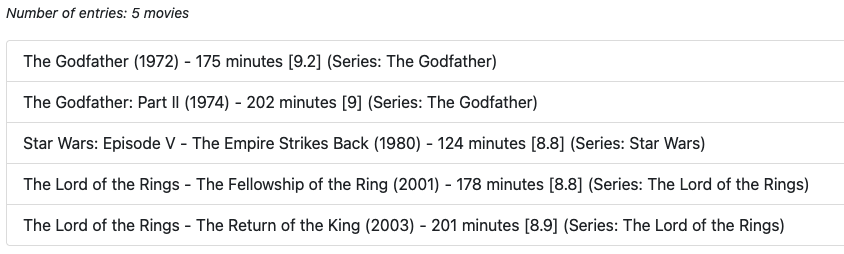
The navigation menu at the top of the page contains some embedded query strings for testing purposes. Your results should match those shown in the following screenshots:
- High Rating (rating at least 8.5 - partial list)
- 1970s (year between 1970 and 1979)
- Best Short Movies (less than 100 minutes and rating at least 8.0)
- Blade Runner (just the one movie)
Optional: One more step
All of the above examples followed the flow of using a series of calls to
filter() followed by a series of calls to map() (or
vice versa...either works). But what if you only wanted to make a call to
map() if you were doing a certain filter() but not
otherwise? That kind of logic doesn't easily end itself to just chaining
functions together.
As a specific example, the last link in the <nav> bar
selects the movies with the highest ratings, but only if they are part of
a series. If the movie fits into this criterion, append the series title to
the titleContent. The challenge, though, is that you only want
to do this if you are selecting this category. If you are clicking on the
"High Rating" link, you don't want to append the text.
As an optional last step, integrate this criterion. If the query string
includes inseries=true, only show the filtered results that
are part of a series (i.e., movie.name.series is defined).
The complete list should look like
this screenshot.
Submission
This submission will not be autograded with Gradescope. Instead,
submit just funs.js to Canvas.