psql Interactive Terminal
From psql's documentation:
psql is a terminal-based front-end to PostgreSQL. It enables you to type in queries interactively, issue them to PostgreSQL, and see the query results. Alternatively, input can be from a file or from command line arguments. In addition, psql provides a number of meta-commands and various shell-like features to facilitate writing scripts and automating a wide variety of tasks.
Step 0. Add psql to your PATH (if needed)
psql comes with pgAdmin.
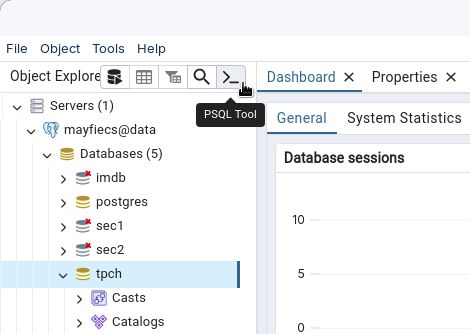
In fact, you can run "PSQL Tool" directly from pgAdmin:
Ideally, you should be able to run pqsl from the command line.
Open a terminal for your operating system, and type psql.
If that command doesn't work, you need to update your PATH.
-
On Linux, you might need to install the package:
sudo apt install postgresql-client -
On macOS, add the following line to your
~/.zshrcfile (or~/.bash_profileif you have an older Mac from before 2021). Then quit and restart the Terminal app.export PATH=${PATH}:/Applications/pgAdmin\ 4.app/Contents/SharedSupport -
On Windows, search for
envin the start menu and click "Edit the system environment variables." Then click the Environment Variables button, click "Path", and click "Edit…" Add the following path to the list:C:\Users\USERNAME\AppData\Local\Programs\pgAdmin 4\runtime # replace USERNAME
Step 1. psql with command-line arguments
By default, psql assumes you are running directly on the server.
Use the following command to connect our our course server instead.
Replace username with your JMU username.
The last argument is the database name.
psql -h data.cs.jmu.edu -U username tpch
When you are off campus, you will need to set up an SSH tunnel. Run the following commands in two different terminals:
ssh -L 5432:data.cs.jmu.edu:5432 username@stu.cs.jmu.edu

psql -h localhost -U username tpch
Once you are connected, try running a query:
SELECT * FROM region;
If the results are too large to fit on one screen, psql automatically runs less.
If you are unfamiliar with less, skim the Wikipedia article.
Basically, you can use the arrow keys to scroll up and down.
Press the Q key to quit less and return to the psql prompt.
Step 2. Set optional environment variables
To save you typing, PostgreSQL can be configured with environment variables. For example, you can set the following variables in your terminal:
export PGHOST=data.cs.jmu.edu
export PGDATABASE=tpch
export PGUSER=jmu_username
export PGPASSWORD=student_number
- On Windows, use
setinstead ofexport. - See the instructions for Step 0 if you would like to make these variables permanent.
Once these variables are set, you can simply run psql without any arguments.
And you won't need to type your password (student number) every time.
This is the ideal setup for running psql on Homework 5.
Step 3. Explore psql and meta-commands
psql allows you to write SQL interactively, with tab completion, on the terminal.
In addition, you can run "meta-commands" to perform other tasks.
All meta-commands begin with a backslash.
Try running the following commands:
| Command | Meaning |
|---|---|
\? |
help on psql commands |
\h |
help on SQL syntax |
\i |
run .sql script file |
\q |
quit psql |
\d |
list tables, views, etc. |
\d NAME |
describe table, view, etc. |
Note also that you can press Ctrl+C to cancel the currently running query.
Step 4. Install meld and add to PATH
Homework 5 asks you to run the following command:
psql -q < hw5.sql 2>&1 | tee hw5.txt
Here is what this command means:
| Command | Meaning |
|---|---|
psql -q |
run psql in "quiet mode" (no extra output) |
< hw5.sql |
redirect the hw5.sql file to standard input |
2>&1 |
redirect standard error to standard output |
| |
pipe output from psql to the tee command |
tee hw5.txt |
display output and save in the hw5.txt file |
The tee command might not work on Windows.
In that case, you can use > hw5.txt at the end instead of | tee hw5.txt.
The final command (on Homework 5) compares the solution's output with your hw5.txt output.
The & means to open meld in the background, which allows you to keep using the terminal.
meld hw5-sol.txt hw5.txt &
Meld is a visual file (and directory) comparison tool.
Click the link (in the previous sentence) to install meld for your OS.
- On Linux, you can install the
meldpackage. - On macOS, you can use a third-party binary, Homebrew, MacPorts, or Fink.
- On Windows, use the .msi installer. Meld should be on your PATH automatically.