pgAdmin – PostgreSQL Tools
From pgAdmin's documentation:
pgAdmin is the leading Open Source management tool for Postgres, the world’s most advanced Open Source database.
Step 1. Install pgAdmin
Visit the Download page and download the installer for your operating system. pgAdmin runs both in "desktop" and "server" mode; you need only the desktop mode. If you installed pgAdmin for another course, update it; our server runs PostgreSQL 18, which older versions of pgAdmin do not support.
Step 2. Register server
Once you have pgAdmin up and running, right-click the Servers icon and select Register > Server…
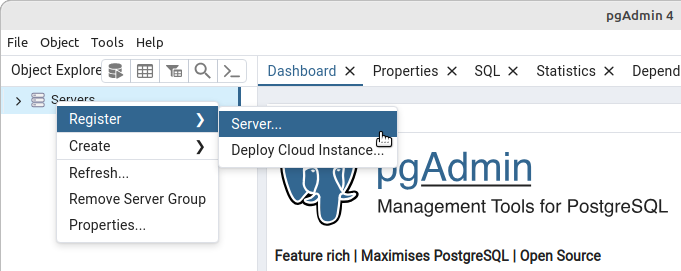
Enter the following information in the dialog box:
- On the General tab:
- Enter a Name for the server (can be anything).
- For example:
CS374orusername@data.
- On the Connection tab:
- Enter
localhostfor the Host, which works through your SSH tunnel. - (If you changed the tunnel to port 5433, change the Port too.)
- Enter
sec1for the Maintenance database. - Enter your Username (your JMU e-ID) instead of
postgres. - Enter your Password (your student number).
- Click Save password if you would like.
- Enter
Is ssh stu running?
Connecting to localhost works only while the tunnel is open.
If pgAdmin says connection refused, open a terminal and run ssh stu first.
On campus, you can instead enter data.cs.jmu.edu for the Host and skip the tunnel.
Step 3. Explore the server
Expand the server in the tree on the left, then expand Databases. You will see several databases; two of them matter today:
sec1is where your own tables go. Expand sec1 > Schemas, and find the schema with your username. Only you can create tables there, and anything you create insec1lands there by default.jmudbis read-only. Its tables are in thepublicschema.
Click an object in the tree, then click through the tabs on the right (Properties, SQL, Statistics, Dependencies).
The SQL tab shows the CREATE statement for whatever you selected, which is a quick way to see how a table was defined.
Step 4. Practice queries
Click on the jmudb database to establish a connection to that database.
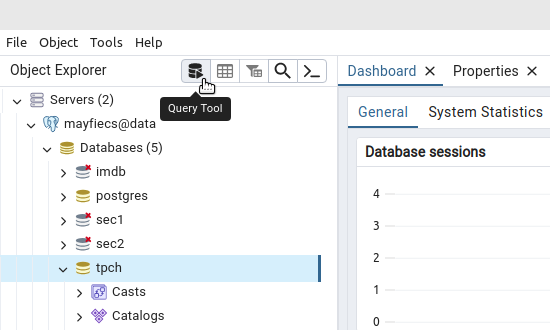
Then click the Query Tool icon on the toolbar.
A new tab will open with an SQL editor.
About the data
jmudb is based on historical enrollment data.
There is only one table: enrollment.
Most columns are self-explanatory, except:
-
termis a four-digit number. The first digit is always 1. The next two digits are the year. The last digit is the month (1=Spring, 5=Summer, 8=Fall). So the value1251means Spring 2025. -
nbris the five-digit class number from MyMadison. Use bothtermandnbrto uniquely identify a section of a course. But a section with two instructors, or two meeting times, has one row for each, so the sametermandnbrcan appear on more than one row. -
numberandsuffixare the course number split apart, so CS 374 isnumber = 374, and a lab section like CHEM 131L hassuffix = 'L'.
Before you start, click enrollment in the tree and look at its SQL tab.
Which columns are integer, and which are text?
Run SELECT days, beg_time, end_time FROM enrollment LIMIT 5; – what type should the time columns be?
jmudb Warmup Queries
- List each term in the table and how many sections it has, oldest first.
- Show all CS and IT sections offered in the most recent spring term.
- Find the 10 sections with the most students enrolled (list each section only once).
- List all unique classrooms in King Hall, in ascending order.
If time permits, write a fifth query of your choice about CS courses.
Hint for #4
Look at a few rows first to see how rooms are written.
Unlike SQLite, LIKE in PostgreSQL is case sensitive; use ILIKE for a case-insensitive match.