Homework 8: Duck-Man

Learning Objectives
After completing this homework, you should be able to:
- Interpret UML diagrams that include inheritance, abstract classes, and interfaces
- Use inheritance and polymorphism to reduce code duplication and simplify implementation
- Create abstract classes and subclasses that implement abstract methods
- Create, implement, and use interfaces
This assignment must be completed individually. Your work must comply with the JMU Honor Code. Authorized help is limited to general discussion on Piazza, the lab assistants assigned to CS 159, and the instructor. Copying code from someone else, including the use of generative AI, is prohibited and will be grounds for a reduced or failing grade in the course.
Introduction
Your best friend has recently gotten into retro video games and you want to surprise them with a special gift (and practice your coding skills)! You have decided to implement the Pac-Man arcade game (you can play a version of it here).
However, to make it JMU CS themed (and avoid copyright infringement 😉), you will be calling your version "Duck-Man". The goal of the game is to move Duck-Man around the maze and eat all the dots. But watch out! There are enemies lurking around… every Java programmer's worst fears – missing semicolons, brackets, parentheses, and more! Fortunately, if Duck-Man collects a magic egg, then it will be able to eat the enemies for a short time. Can you navigate the maze and avoid the enemies?
For this assignment, we have given you a number of starting resources. We've created a simple game engine using StdDraw, and it should take care of the difficult things (collision detection, the level map, etc.).
Download Provided Files
Download and unzip the provided code (and move into your src/hws/ folder):
Important: UPDATED StdDraw! Please download and move the following JAR file into your lib folder, replacing the existing one:
You shouldn't need to use StdDraw directly for this assignment, but if you want context, feel free to review the documentation here and the notes from the previous HW here.
UML Diagram
The UML Diagram below describes the class hierarchy. (Note: To simplify the diagram, most associations and aggregations are not pictured. Some included classes are also omitted.)
Attributes and methods for each class are described later in this assignment. You can click on each class in the diagram below and it will take you to the details for that class.
Provided classes that are outlined in red below should not be edited.
classDiagram
direction BT

class Updatable {
    <<Interface>>
}
class Drawable {
    <<Interface>>
}
class Actor {
    <<Abstract>>
}
class NumericDisplay
class Player
class Dot
class MagicEgg
class Enemy {
    <<Abstract>>
}
class WallEnemy
class WanderEnemy
class ChaseEnemy

Actor ..|> Updatable
Actor ..|> Drawable
NumericDisplay ..|> Drawable
Dot ..|> Drawable
MagicEgg --|> Dot
Player --|> Actor
Enemy --|> Actor
WallEnemy --|> Enemy
WanderEnemy --|> Enemy
ChaseEnemy --|> Enemy

click Updatable href "#create-the-interfaces"
click Drawable href "#create-the-interfaces"
click Actor href "#the-actor-class"
click NumericDisplay href "#numericdisplay"
click Dot href "#dotjava"
click MagicEgg href "#magiceggjava"
click Player href "#playerjava"
click Enemy href "#enemyjava"
click WallEnemy href "#wallenemyjava"
click WanderEnemy href "#wanderenemyjava"
click ChaseEnemy href "#chaseenemyjava"

style Actor stroke:#f00,line:#f00,fill:#aaaaaa22
style NumericDisplay stroke:#f00,line:#f00,fill:#aaaaaa22
A full, combined version of the UML diagram is available here, if you wish to reference it.
Game Mechanics
What is a game? A game is just a loop that follows the following principles:
while (gameIsRunning) {
    updateAll();
    drawAll();
}
Each iteration of the loop is called a frame. On every frame, every single object in the game is updated, then every single object in the game is drawn to the screen. This happens really fast to give the illusion that objects are moving around.
The update defines the behavior of this object at any given point in time (it's like controlling a robot!). For example, a player object would typically check if the user has pressed a key and then move itself by a very tiny amount (our game will run at 30 frames per second, which means that "update" will be called 30 times in a second). Because this update gets called over-and-over again, the player will appear to move when the user presses keys on the keyboard.
We have given you the following classes to help manage the game loop and provide common game functionality.
GameDriver and DuckManGame
classDiagram
direction RL
class Playable {
<<Interface>>
+startGame()*
+updateAll()*
+drawAll()*
}
class DuckManGame {
+GRID_SIZE: int = 32$
+PLAYER_SPAWN: Point = Point(...)$
+ENEMY_SPAWN: Point = Point(...)$
-running: boolean
-levelMap: Level
-drawables: ArrayList<Drawable>
-updatables: ArrayList<Updatable>
-dots: ArrayList<Dot>
-enemies: ArrayList<Enemy>
-score: NumericDisplay
-lives: NumericDisplay
-player: Player
+DuckManGame()
+drawImage(position: Point, imagePath: String)$
+addDot(dot: Dot)
+addEnemy(enemy: Enemy)
+handlePlayerCollisions()
+spawnNewDots()
+spawnNewPlayer()
+spawnNewEnemies()
+startGame()
+updateAll()
+drawAll()
}
class GameDriver {
+main(args: String[])$
%% +picture(center: Point, gridSize: int, filename: String)$
+upPressed() boolean$
+downPressed() boolean$
+leftPressed() boolean$
+rightPressed() boolean$
}
DuckManGame ..|> Playable
GameDriver -- DuckManGame
style Playable stroke:#f00,line:#f00,fill:#aaaaaa22
style GameDriver stroke:#f00,line:#f00,fill:#aaaaaa22Our basic game engine uses the GameDriver class, which contains the main method and initializes a Playable game. GameDriver contains the main game loop and it also has static methods you should call to check if the user is pressing the arrow keys on the keyboard. You can run GameDriver to play your game.
DuckManGame implements the Playable interface and is responsible for keeping track of all the objects in the game, telling them to update their state, telling them to draw themselves, managing the level, collisions, points, lives, etc. We have provided some of the functionality in DuckManGame. You will need to add additional attributes and fill in the methods as you progress through the assignment.
Level Map
The game's level is represented by the following 17 x 20 map. The Level class contains the level's data and helpful methods you can use to check if specific tiles are walls, dots, etc. We have marked key locations you should know about, like Duck-Man's spawn point, the enemy spawn (denoted by the red semicolon monster), and the four magic eggs:
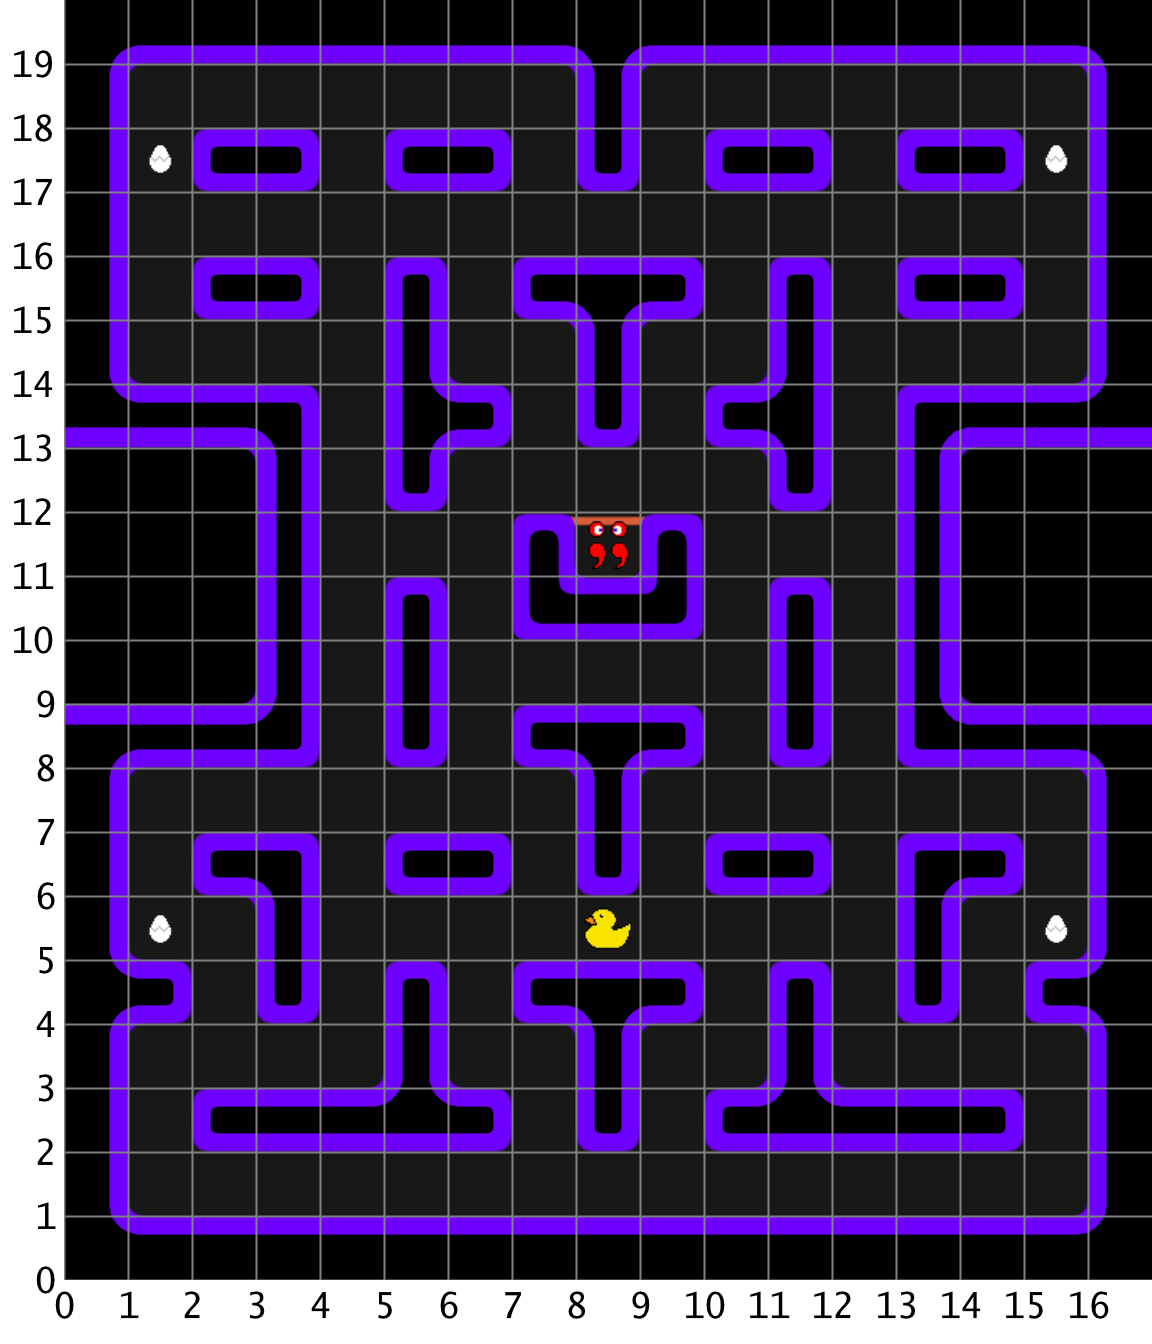
In the game engine, the (0, 0) position is represented by the lower-left corner. The X-axis runs left-to-right, and the Y-axis runs bottom-to-top. The upper-right corner is represented by the (x, y) coordinates (17, 20).
Elements in the game are positioned based on their center. Thus, based on the map above, Duck-Man's spawn/starting location is centered at level coordinates (8.5, 5.5). Can you figure out the coordinates of the other elements?
Point and Direction
We have given you two classes, Point and Direction to represent 2D coordinates and up/down/left/right directions. You can look through the code to understand how they work. These classes also have methods that can be helpful to you (such as moving a point, turning a direction randomly left or right, getting the opposite direction, etc.).
Direction is a special type that only has four possible values: Direction.UP, Direction.DOWN, Direction.LEFT, and Direction.RIGHT. You can use them like static constants. For example:
Direction d1 = Direction.LEFT;
Direction d2 = d1.getRandomTurn();
player.setDesiredDirection(Direction.DOWN);
player.setDesiredDirection(d1.getOpposite());
Direction and Enums
Direction is called an "enum type". You can read more about them here. An enum works like a regular class, except instead of being able to create instances, you are restricted to only the four possibilities that have been predefined (UP, DOWN, LEFT, RIGHT). You are still able to call methods, etc.
The Actor Class
classDiagram

class Actor {
    <<Abstract>>
    #levelData: Level
    #currentPosition: Point
    #desiredDirection: Direction
    +Actor(levelData: Level, startPosition: Point, startDirection: Direction, movementSpeed: double)
    +isStopped() boolean
    +getCurrentDirection() Direction
    +getDesiredDirection() Direction
    +setDesiredDirection(direction: Direction)
    +getCurrentPosition() Point
    +collidesWith(other: Actor) boolean
    +update()
    #reset()
    #isTouchingWall(direction: Direction) boolean
    #isCenteredOnGrid() boolean
    #canMove() boolean
}
style Actor stroke:#f00,line:#f00,fill:#aaaaaa22
The Actor class describes an object that can move in the game (aka the player and all enemies). This class is abstract and cannot be instantiated.
An Actor has a position, a current direction it's moving in, a desired direction, and a movement speed. By default, an Actor will continue to move in its current direction until it hits a wall, at which point it will stop. You can call the setDesiredDirection to tell it to move in a specific direction as soon as there isn't a wall in that direction.
Note: The Actor class contains other attributes and methods that are private that are omitted from the UML diagram.
Drawing on the Screen
We have given you sprites (images) of each game element to use. You should call the DuckManGame.drawImage() static method to draw a specific image to the screen, centered at a given location. You should not directly call any methods from StdDraw for this assignment.
Make sure your paths start with hws/hw8/img/. For example:
Point position = new Point(2, 3.5);
String imagePath = "hws/hw8/img/duck_left.png";
DuckManGame.drawImage(position, imagePath);
NumericDisplay
classDiagram

class NumericDisplay {
    -position: Point
    -text: String
    -value: int
    +NumericDisplay(position: Point, text: String, initialValue: int)
    +getValue() int
    +setValue(value: int)
    +draw()
}

style NumericDisplay stroke:#f00,line:#f00,fill:#aaaaaa22
We've given you a basic class to use for keeping track of the score and the lives. You should use the setValue() and getValue() methods when modifying the score or current lives.
Part A
Using the UML diagrams and the details provided, implement the first part of the Duck-Man game. At the end of this part, you should have a maze with dots and have a player that you can move around the maze! We recommend that you follow the steps below in the order given.
Create the Interfaces
classDiagram
class Updatable {
    <<Interface>>
    +update()*
}
classDiagram
class Drawable {
<<Interface>>
+draw()*
}Write the two interfaces, Updatable and Drawable. Afterwards, you should be able to run GameDriver and see the level and text on the screen.
Create Collectables
First, let's fill the level with dots and magic eggs so that the player will have something to collect. This will give you some experience with implementing Drawable and using DuckManGame.
Dot.java
classDiagram

class Dot {
    +POINTS: int = 10$
    #position: Point
    +Dot(position: Point)
    +getPosition() Point
    +draw()
}
A Dot simply has a position, and will draw itself if the draw() method is called.
The Dot is represented by the dot.png image, which should be drawn centered at that position. Make sure to follow the instructions in Drawing on the Screen, and not use StdDraw.
MagicEgg.java
classDiagram

class MagicEgg {
    +POINTS: int = 50$
    +MagicEgg(position: Point)
    +draw()
}
A MagicEgg is a Dot that draws a different image and has a larger point value. MagicEgg is represented by the egg.png image.
Modify DuckManGame.java
First, we need an ArrayList to hold all the Dots (and MagicEggs) in the game. Add a new private instance variable called dots to DuckManGame and make sure you initialize it to an empty ArrayList in the constructor.
Next, implement the addDot() method. This method should add the given dot to both the dots list and the drawables list. Everything added to the drawables list will be drawn in the game.
Now, write the spawnNewDots() method. This method gets called by startGame() and its purpose is to iterate through every tile in the level map and create Dots and MagicEggs. Here are some guidelines:
- You will need a nested loop to access every possible tile in the map.
- The tile in the lower-left is specified by coordinate
(0, 0). - The
levelMapattribute (of typeLevel) has methods to get the height/width of the map, and check if a tile at the given (x, y) coordinates is a wall/dot/egg. - If a tile is a dot, create a new
Dotinstance in the center of the tile and use theaddDot()method to add it to the game. - If a tile is an egg, create a new
MagicEgginstance and also add it withaddDot()
Run GameDriver to test your game. Do all the dots (and eggs) show up in the correct locations?
Create Player
Now, let's make your game interactive by adding the player (Duck-Man). Then you can move around and explore the maze.
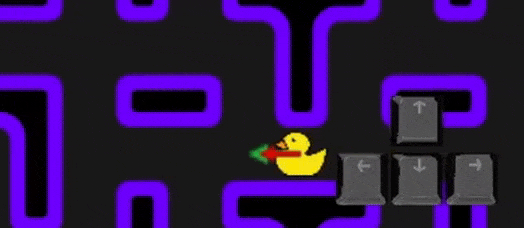
The player's movement is unique. If you press a key to make the player move in a specific direction, they won't turn if that direction is blocked! Instead, the arrow keys set the player's desired direction. The player will continue to move in their current direction until their desired direction is clear.
See this gif that shows the difference between the player's desired (red) and current (green) directions:
Player.java
classDiagram

class Player {
    +PLAYER_SPEED: double = 0.07$
    +Player(level: Level, spawnLocation: Point)
    +update()
    +draw()
    +collidesWith(dot: Dot) boolean
}
The Player class is an Actor, which in turn is both Updatable and Drawable. Start by declaring the class and creating the static constant based on the UML.
The constructor should take in a reference to the Level, and a Point describing the player's start position. This constructor should only need to call the superclass's constructor. The player's initial direction should be LEFT and the speed should be set to PLAYER_SPEED.
In the update() method, you will need to do two things:
- Check if the user is pressing an arrow key on the keyboard and then set the player's desired direction to the corresponding direction.
GameDriverhas static methods (upPressed(),downPressed(), etc.) that return a boolean based on if the key is pressed.
- After setting the direction, you should call the
update()method from the base implementation.
The draw() method should draw one of four images (duck_up.png, duck_down.png, duck_left.png, duck_right.png) corresponding to the player's current direction. Remember to use the drawImage() method.
The collidesWith() method will check if the player collides with a dot. If the distance between the player's current position and the dot's position is less than 0.5, this method should return true. Otherwise, it should return false.
Modify DuckManGame.java
Now that we have our first Actor, we need to be able to add it to our game and have it update every frame.
First, create the updatables attribute according to the UML diagram. Make sure that you initialize it in the constructor, just like the drawables and dots lists.
Also declare the player attribute in the class. It will be initialized by the spawnNewPlayer() method.
Next, implement the spawnNewPlayer() method, which should create a new Player centered at PLAYER_SPAWN and add it to both the drawables and updatables lists. You will also need to edit the value of the PLAYER_SPAWN constant so that the player is in the correct starting position. Use the grid in the Level Map section to guide you.
Finally, in updateAll(), write code to update every single Updatable object in the list of updatables.
Run GameDriver to test your game! You should be able to move Duck-Man around the entire maze.
Please comment out addEnemy()
If you are getting a compiler error about missing Enemy, please comment out the addEnemy() method in DuckManGame. This was left in by mistake. You will need it later for Part B.
Part B
Now, let's add the enemies and game logic to make everything work together. At the end of this part, you should be able to run GameDriver.java and play the full game!
Create Enemies
We will have 3 types of enemies in Duck-Man (to make the game easier to implement). They all extend the abstract Enemy class. The Enemy class represents the common attributes and default behavior for an enemy in the Duck-Man game.
All enemies start off in the "enemy spawn", which is the box near the center of the level map. They remain there for a number of frames (the number of times update() is called), after which they exit from the top. The timeUntilReleased attribute tracks how many frames are left before the enemy can roam freely.
An enemy can also be put into a vulnerable state with the makeEdible() method. This makes the enemy edible for the next 300 frames (specified by EDIBLE_DURATION). The timeUntilNormal attribute tracks how many frames are left before the enemy returns to normal and is no longer edible.
Enemy.java
classDiagram

class Enemy {
    <<Abstract>>
    +ENEMY_SPEED: double = 0.06$
    +EDIBLE_DURATION: int = 300$
    +POINTS: int = 200$
    #timeUntilReleased: int
    #timeUntilNormal: int
    +Enemy(levelData: Level, spawnLocation: Point, timeUntilReleased: int)
    +makeEdible()
    +isEdible() boolean
    +reset()
    +update()
}
The constructor should call the superclass's constructor using the given parameters. An Enemy should start facing up and have a movement speed specified by the ENEMY_SPEED constant. The timeUntilNormal attribute should be initialized to 0. Other attributes should be initialized based on the parameters.
The makeEdible() method should set the timeUntilNormal attribute to the value specified by EDIBLE_DURATION. The method should also reverse the direction the enemy is facing (so it tries to run the other way). However, if the enemy is still waiting to be released, this method should do nothing.
The isEdible() method should return true if the timeUntilNormal is greater than 0, otherwise it should return false.
The reset() method should do everything that the base reset() implementation does, but also set the timeUntilNormal to 0.
The update() method should check and do a few things:
- If the enemy is not yet released (the
timeUntilReleasedis greater than 0), this method should decrementtimeUntilReleasedby one and not do anything else. - Otherwise, you should check if the enemy is currently edible. If so, decrement
timeUntilNormalby one. - You should also check if the enemy is currently stopped. If so, the enemy should randomly turn either left or right (there is a method in
Directionthat could be useful here!). - After all of these checks, call the base
update()implementation at the end of the method.
WallEnemy.java
classDiagram

class WallEnemy {
    +RELEASE_TIME: int = 360$
    +WallEnemy(levelData: Level, spawnLocation: Point)
    +draw()
}
The WallEnemy is represented by a pair of parentheses. This enemy is simple. It simply follows the default Enemy behavior, where if it runs into a wall and stops, it randomly turns 90 degrees to the left or the right.
The constructor should be straightforward. Call the superclass's constructor using the given parameters and the RELEASE_TIME constant.
The draw() method should draw the enemy at its current position. The enemy is normally represented by the parentheses.png image. However, if the enemy is currently edible, then the parentheses_scared.png should be drawn instead.
WanderEnemy.java
classDiagram

class WanderEnemy {
    +RELEASE_TIME: int = 180$
    +WanderEnemy(levelData: Level, spawnLocation: Point)
    +update()
    +draw()
}
The WanderEnemy is represented by a pair of square brackets. It will wander around the maze randomly.
For update(), it should do everything that the base update() implementation does, except before you call super.update(), you should perform a check: if the enemy is centered on the grid (there is a method from Actor you can use), it should randomly turn 90 degrees to the left or the right.
The draw() method should draw the enemy, just like WallEnemy. This enemy is represented by brackets.png and brackets_scared.png.
ChaseEnemy.java
classDiagram

class ChaseEnemy {
    +RELEASE_TIME: int = 0$
    -player: Player
    +ChaseEnemy(levelData: Level, spawnLocation: Point, player: Player)
    +update()
    +draw()
}
The ChaseEnemy is the most dangerous, and is represented by a pair of semicolons. This enemy will attempt to chase the player down no matter where they go!
Thus, it requires knowledge of where the player is. The constructor should set the attribute to the Player instance specified by the player parameter.
The update() method should be similar to WanderEnemy. If the enemy is centered on the grid, it will make a decision on which direction to go. This decision should follow these rules:
- If the enemy is currently traveling vertically (there is a method in
Directionto help you):- If the player is to the left of the enemy, the enemy should set its desired direction to go left.
- If the player is to the right, the enemy should set its direction to go right.
- Otherwise, the enemy should continue in its current direction.
- If the enemy is currently traveling horizontally:
- If the player is above, the enemy should go up.
- If the player is below, the enemy should go down.
- Otherwise, the enemy should continue in its current direction.
Don't forget to call the base update() implementation at the end of the method!
The draw() method should be straightforward. This enemy uses semicolons.png and semicolons_scared.png.
Modify DuckManGame.java
Now that you've created these three enemies, it's time to add them to the game! First, modify ENEMY_SPAWN so that it contains the correct coordinates. Then, create the enemies attribute, just like you did for dots.
Next, create an addEnemy() method in DuckManGame (reference the UML diagram!), which should add the given enemy to all appropriate lists. (Think about what an Enemy is… Is it a dot? Is it drawable?)
Write the spawnNewEnemies() method, which creates an instance of each enemy type and adds it using addEnemy(). You should have three enemies total.
Now, test your game by running GameDriver. Do the enemies move appropriately? Are they released one at a time (first ChaseEnemy, then WanderEnemy, then WallEnemy)? Does ChaseEnemy follow the player around?
Finish DuckManGame
Time for the final stretch! You have all the pieces in place, but they don't interact with each other yet. For instance, Duck-Man isn't able to eat any dots. Our goal is to handle the "collisions" for the game. Basically, we will check if the player collides with any dots or enemies and do something if that is the case.
Eating Dots
In handlePlayerCollisions(), first create a new variable called toRemove that is an ArrayList which stores Dots. This will store the dots that we want to remove from the list.
Write a loop to iterate over all the dots. For each one, check if the player is colliding with it. If so, you will need to do a few things:
- If the dot that was eaten was a regular
Dot, you should add the point value fromDot.POINTSto the current score. - If the dot was a
MagicEgg, you should instead add the point value fromMagicEgg.POINTS.- You should also make all enemies edible!
- Add the dot to the
toRemovelist, so that we can remove it later.
Why use toRemove?
So if we tried to remove the dot from the list while looping over it, Java could throw a ConcurrentModificationException. This occurs when we modify a list's contents while iterating. There are other ways of overcoming this, by either using a regular for loop and iterating backwards, or by using an Iterator and calling it's remove method. Instead, we will use this toRemove list to simplify our implementation.
Afterwards, you will need to loop through the toRemove list and remove each one of those items from all the other lists that contain it.
Once you've finished removing, you will need to check if the dots list is empty. If it is, you've won! In this case, set running to false to end the game.
Run GameDriver to test the game. Collect all the dots and make sure that the game ends (which looks like it freezes in-place).
Add Enemy Collisions
Finally, in handlePlayerCollisions, you should also loop through all the enemies and check if they collide with the player.
If the enemy is edible, you should increase the score by the value of Enemy.POINTS, and reset that enemy (make it go back to its spawn point).
If the enemy is not edible, uh-oh! You should decrease the lives by one and reset the player instead. If the number of lives left is less than or equal to 0, then the game ends. You should set running to false in this case to end the game.
Finally, run GameDriver again and test your completed game. Does colliding with an enemy make you lose a life and respawn? If the enemy is edible, does it add points? Does the game end when all lives are lost?
If everything works, congratulations, you have fully created the Duck-Man game!
Submission
You will submit this assignment in two parts:
Part A
Submit to Gradescope:
Drawable.javaUpdatable.javaDot.javaMagicEgg.javaPlayer.java
(You do not need to submit DuckManGame.java at this point.)
You have 10 submissions for Part A. To receive full credit, your classes must follow the relationships and interfaces described in the UML diagram.
Part B
Submit to Gradescope:
Enemy.javaWallEnemy.javaWanderEnemy.javaChaseEnemy.javaDuckManGame.java
You have 10 submissions for Part B. To receive full credit, you must correctly make use of the inheritance hierarchy to prevent code duplication.
Grading Criteria
Your code will first be graded by Gradescope and then by the professor. The grade you receive from Gradescope is the maximum grade that you can receive on the assignment.
You do not need to submit unit tests for this assignment; however, you should be continually testing your code by running GameDriver and verifying that the game's behavior matches what is expected.
Your code must compile with the official tests and pass a Checkstyle audit for you to receive any points. Gradescope will provide you with hints but might not completely identify the defects in your submission.
After the due date, the professor may manually review your code. At that time, points may be deducted for inelegant code, inappropriate variable names, bad comments, etc.
Part A
| Criterion | Points | Details |
|---|---|---|
| Compile | 0 pts | Success Required |
| CompileOfficialTests | 0 pts | Success Required |
| Style | 0 pts | Success Required |
| OfficialTests | 40 pts | Partial Credit Possible |
Part B
| Criterion | Points | Details |
|---|---|---|
| Compile | 0 pts | Success Required |
| CompileOfficialTests | 0 pts | Success Required |
| Style | 0 pts | Success Required |
| OfficialTests | 60 pts | Partial Credit Possible |