Troubleshooting
If you're having issues with Java, VS Code, running your files, or running unit tests, try the steps below and make sure you have everything correct!
Clean Java Workspace
First, try cleaning the Java workspace. This clears your projects and restarts VS Code.
Open the Command Palette with F1 or Ctrl+Shift+P (Cmd+Shift+P on Mac) and search for clean java. You'll want to select the Java: Clean Java Language Server Workspace option:

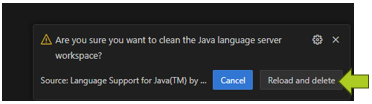
Next, in the lower-right corner, click Reload and delete:
Common Issues
-
Make sure the
CS159folder is open in VS Code- In VS Code, use the top menu to go to
File > Open Folder...and then select the CS159 folder that you downloaded in Installing Java, VS Code. -
You should see a single
CS159folder at the top of the explorer pane: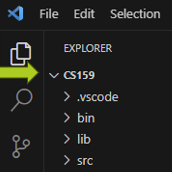
-
There should be four folders underneath,
.vscode,bin,lib, andsrc.
- In VS Code, use the top menu to go to
-
Make sure your code is placed in appropriate folders under the
srcfolder- Homework should go in individual
hw1-hw8folders inside thehwsfolder - Labs should go into
labs, etc.
- Homework should go in individual
-
Make sure your package statement matches the folder structure
-
e.g., if you have
ExactChange.javainsrc/hws/hw2, the package should behws.hw2.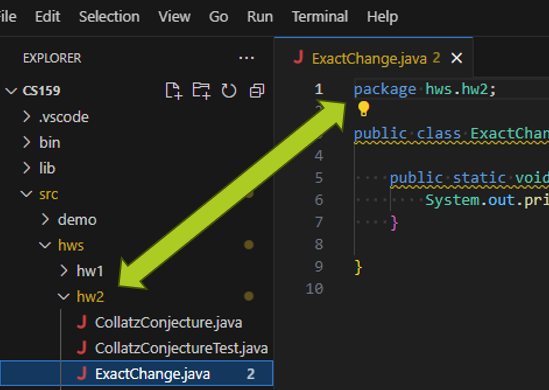
-
Usually VS Code automatically inserts this line for you, but if you move files around, it could be incorrect.
-
-
If you are unable to run a file, make sure that it is something you can run!

- You can't "run" a file that doesn't contain a
mainmethod. - Don't create a main method unless the assignment asks for it. (Gradescope may not be happy if you do so)
- Instead, you should be running your unit tests to check if your code works.
- You can't "run" a file that doesn't contain a
-
If you get an error saying that the
Update jacoco.xmltask failed, or you are unable to display coverage:- Please check your Java version and make sure JDK 17 is installed (see section below)!
Uninstalling JDK
Check the version of Java you're on by opening a terminal or command prompt and running the command java -version.

If this shows a major version of 17 like in the screenshot above, you're good to go!
If this shows any other version (like 21), then you will need to uninstall the current JDK and install version 17.
-
On Windows:
-
In your Start Menu, open "Add or remove programs" or "Apps and features", then search for
Temurin,JDK, orJava.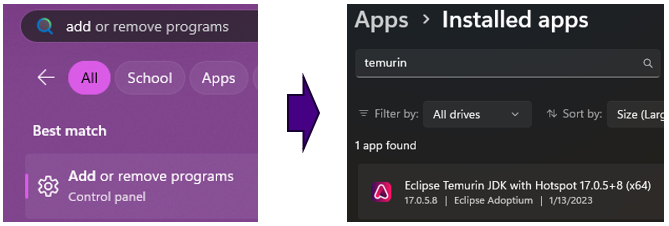
-
Uninstall anything that is not version 17.
-
-
On Mac:
- Open the Finder, then go to
Macintosh HD>Library>Java>JavaVirtualMachines. - Delete any folders that are not version 17 (like
temurin-21.jdk).
- Open the Finder, then go to
Next, follow the steps in Installing Java, VS Code to install version 17 of the JDK.
Important!
Afterwards, open VS Code and clean the Java workspace. You may have to wait a while for VS Code to re-open your projects and work with the new JDK version.