Checking Code with Ruff
In the previous labs you set up git, organized your work into weekly folders, and wrote your first programs that read input and printed a result. Today you'll finish setting up Thonny so it can check your code for style, and practice fixing style problems in a real program. You'll also meet the third kind of problem that the previous lab promised you: code that runs correctly and is still wrong.
Do the setup on both machines
Most of this lab is settings that live only on the machine you're using: the color setting, the virtual environment, and the installed ruff tool.
Do those steps once on the Linux desktop in the computer lab, and again on your own laptop.
The one exception is the program you clean up in Step 7.
Because that work is tracked by git, you do it once and git pull it onto your other machine, rather than repeating it by hand.
What you already have
Your ~/CS149 folder already contains a file named ruff.toml.
That file is the configuration for ruff: it lists which rules ruff should enforce.
You don't need to create or edit it; you just need to install the tool that reads it.
Step 1: View files in Thonny
Open Thonny. Click the View menu at the top and click Files. Doing this will open a file browser on the left side of Thonny.
Use that file browser to navigate into your ~/CS149 folder.
At this point, the file you're sure to see is ruff.toml, as shown in the screenshot below, alongside your Week01 and Week02 folders and the other files you committed in the previous labs.
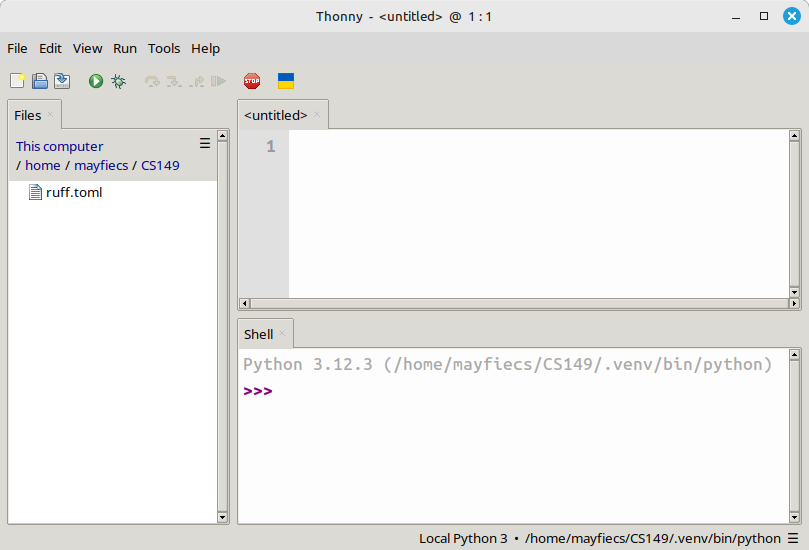
Keeping this panel open lets you see your files without leaving Thonny; you'll use it throughout the course.
Step 2: Force color in Thonny
Tools like ruff display their output in color, which makes the output easier to read.
However, when running in Thonny, tools often can't detect whether color is supported, so the output comes out plain.
Turn this on now, before you install or run anything, so all the output in the steps below appears in color.
In Thonny, click the Tools menu at the top and click Options.
Click the General tab and enter the environment variable FORCE_COLOR=1 in the Environment variables (one KEY=VALUE per line) box, as shown in the screenshot below.
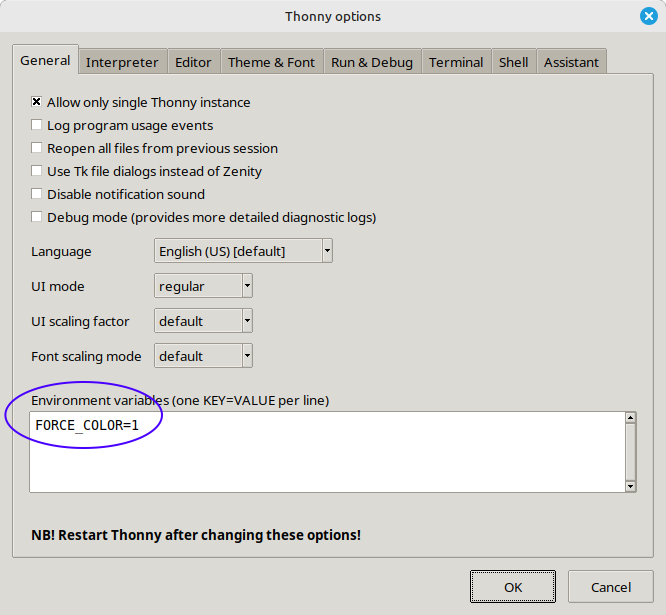
As the dialog reminds you, close and reopen Thonny for the change to take effect.
Step 3: Understand why you need a virtual environment
To check your code, you'll install ruff (the tool) into Thonny.
Installing a Python tool writes it into a location that Python knows to look in.
On the lab desktops that location is shared and system-wide, and you don't have permission to change it, so the install would fail.
On your laptop it would succeed, but it would install ruff for your whole computer, which can cause problems if different projects ever need different versions of the same tool.
A virtual environment (or venv) solves both problems.
A venv is a folder for installing Python tools and packages for a specific project.
It acts like its own private Python setup, with its own packages, separate from the rest of the machine.
Because the venv folder belongs to your project, you can install tools into it, and your projects stay organized and independent.
You'll create one venv for CS 149 and install ruff into it.
One venv per machine, reused all semester
You create the venv once on each machine (once in the lab, once on your laptop). After that, Thonny will keep using it automatically on that machine.
Step 4: Create the virtual environment
In Thonny, click the Tools menu at the top and click Options. Click the Interpreter tab, and click the New virtual environment link (bottom right).
A file dialog opens, asking where to put the venv.
Navigate into your ~/CS149 folder, then create a new folder inside it named .venv (the dot makes the folder hidden, just like .gitignore from the first lab).
Select that .venv folder.
Press OK to select CS149/.venv as your virtual environment.
Thonny will take a moment to set it up.
When it's done, the Shell at the bottom of the window shows a Python path that includes CS149/.venv, which confirms the venv is active.
Why this folder is not committed
A venv is specific to one machine, so it shouldn't be shared through git.
The .gitignore file you downloaded in the first lab already lists .venv, so git will leave it alone.
Step 5: Install ruff in Thonny
Ruff is a linter and code formatter for Python. A linter is a tool that checks for style defects and common programming mistakes. Ruff will help you learn to write clean and professional code.
To install Ruff, type the following command in the Shell (at the bottom of Thonny) and press Enter:
Note
The leading ! tells Thonny to run this as a shell command rather than as Python code.
If you were to run this command from the terminal, you would just type pip install ruff.
pip is Python's tool for installing packages.
You'll see several lines of output as it downloads and installs; the last line should confirm it installed ruff successfully.
Because your venv is active, ruff installs into your .venv folder, where you have permission to write.
Step 6: Run ruff on your code
ruff reads your ruff.toml and checks your code against the rules listed there.
When you run Ruff anywhere under ~/CS149, that ruff.toml file is used to know what rules to enforce.
Anything it flags is called a style violation: code that runs fine but doesn't follow the conventions professional Python programmers expect.
Before you run it, point the Shell at the right folder.
In the Files panel from Step 1, click CS149 in the path across the top.
A line like %cd /home/yourname/CS149 appears in the Shell, which is Thonny telling you the folder that Shell commands will run in.
Now run this command in the Shell:
Because you ran it from inside ~/CS149, ruff checks every Python file in the folder, including the ones in Week01 and Week02.
If your code is clean, ruff prints a message saying it found no issues.
If it finds a style violation, it prints one line per issue, telling you the file, the location, and what rule was broken.
Reading a ruff location
A line like Week01/hello.py:4:18 means "line 4, character 18, of that file."
That's where ruff wants you to look.
Running a program moves the Shell
When you run a program, Thonny first switches the Shell into that program's folder, printing another %cd line to say so.
That is handy: after you run a program, the Shell is already in the right folder, so you can hand its plain file name to ruff with no folder in front of it.
That is what the rest of this lab does, and it is why you should run a program before you check it.
If ruff ever reports that it cannot find a file, look at the last %cd line to see where the Shell actually is.
The word violation is doing real work there.
In the previous lab, every problem you met stopped your program.
A SyntaxError kept Python from starting at all, and a ZeroDivisionError or a ValueError stopped the program partway through.
Both of those kinds announced themselves with a traceback, and both left you with no output or incomplete output to show for the run.
A style violation is different in kind, not merely in severity.
Nothing stops, there is no traceback, and the program produces exactly the right answer.
The only way to learn about a style violation is to ask a tool like ruff, because Python itself has no complaint to make.
That is why style violations get a category of their own: the first two kinds are Python telling you that it cannot do what you asked, and the third kind is ruff telling you that other programmers will struggle to read what you wrote.
Step 7: Fix style in a real program
Now practice fixing style violations in a program that has many of them.
Download payroll.py and move it into the Week02 folder you made in the previous lab.
Open payroll.py in Thonny and run it first, before you run ruff on it.
Watch what happens: the program starts, asks its questions, prints its results, and finishes.
There is no traceback, there is no error message, and the numbers it reports are correct.
By everything the previous lab taught you to look for, this program is fine.
Running it put the Shell in Week02, so now check the program with ruff:
You should see several lines of output, one per violation.
Every one of those lines is describing a program that just ran correctly and gave you the right answer, which is exactly what makes a style violation its own kind of problem.
Recall that a location like payroll.py:4:18 means "line 4, character 18."
Correct each issue, one by one, in the editor.
After each fix, rerun ruff by pressing Up+Enter in the Shell (up-arrow recalls your last command) and watch the list get shorter.
Your goal is to get ruff check payroll.py to report no remaining issues.
Fix these by hand
Don't run ruff format on payroll.py.
That command would fix most of these violations automatically, and the point of this exercise is for you to recognize and correct them yourself.
If you finish early
Try introducing your own style defects and see whether ruff catches them.
The Rules page lists what ruff can flag, with examples.
When payroll.py is clean, commit it to your Week02 folder.
From inside ~/CS149:
On your other machine, just pull
As with the folder moves in the previous lab, don't redo this work on your other machine.
A git pull in ~/CS149 brings down your corrected payroll.py.
Step 8: Reformat with ruff
You just fixed style by hand, which is how you learn the conventions.
But ruff can also fix many formatting issues for you, and it's worth seeing that in action.
Open your hello.py (in the Week01 folder) and deliberately mess up its formatting.
For example, add extra spaces around an operator, remove a needed space, or split a line where it shouldn't be.
Save the file and run it: it still does exactly what it did before, because formatting is not what makes a program work.
(If it no longer runs, you changed more than the spacing; undo that part.)
Running it also put the Shell in Week01.
Then check what ruff thinks:
Now let ruff fix the formatting for you:
Open hello.py again and see how ruff cleaned up the spacing and layout.
Run !ruff check hello.py once more to confirm the formatting issues are gone.
Use ruff format to clean up quickly on your own programs, but always read what changed: the point of the course is for you to learn the conventions, not to lean on the tool.
Those changes to hello.py were just for practice, so let's throw them away.
First, see that git noticed them.
From inside ~/CS149:
Git lists hello.py as modified.
To discard your changes and restore the last committed version of the file:
The modification is gone, and your working tree is clean again.
Open hello.py in Thonny to confirm it's back to its original contents.
Restore, or keep?
git restore throws away uncommitted changes to a file, which is what you want here.
If you ever make changes you do want to keep, don't restore them; stage and commit them instead, with the git add, git commit, git push loop from the previous labs.
A GUI for git, if you want one
Everything this course asks of git is the handful of commands you have been typing, and typing them is how they stick.
But git also has graphical clients, which lay your changes out on screen instead of asking you to read git status.
GitComet is a free, open source app that runs on Linux, macOS, and Windows and needs no account.
You can use GitComet to review changes, line by line, before you decide whether to keep them or throw them away.
Step 9: Sort the three kinds
Quiz 1 will ask you to tell the three kinds of problems apart, so finish this lab by practicing the sorting rather than the fixing.
For each item below, decide three things before you run anything:
- Does Python start the program at all?
- Does the program produce the right answer?
- Does
ruffhave anything to say about it?
The answers to those three questions are what determine the kind. A problem caught before the code runs fails the first question. A problem that happens while the code runs fails the second question. A style violation passes the first two questions and fails only the third.
Write down your classification of all six items first, then check your answers.
To check them, work in a single scratch file named sorting.py in your Week02 folder, replacing the contents of sorting.py as you move from one item to the next.
Run the file, then run !ruff check sorting.py, and see whether you were right.
(a)
(b)
(c) This program, when the person running it types 0:
(d) The same program as item (c), when the person running it types zero.
(e)
import math

width = float(input("Width: "))
height = float(input("Height: "))
print("Area:", width * height)
(f) payroll.py, as you first downloaded it at the start of Step 7.
The one people get wrong
Item (e) is worth sitting with, because everything about it looks right.
Python starts the program, the program finishes, and the area it prints is correct.
Read what ruff says about the first line, then ask yourself what a person reading that program would wrongly conclude about it.
Delete sorting.py when you have finished, since scratch work is not worth keeping.
Then click CS149 in the Files panel once more and run !ruff check with no file name, to confirm there are no issues left anywhere in ~/CS149, and commit if anything changed.
Summary
At the end of this lab, a clean payroll.py is committed alongside the rest of your Week02 work, so it's the same on every machine.
And on each machine you work on (the Linux desktop in the computer lab and your laptop), you've done the local setup that git doesn't carry:
- color output turned on so
ruff's reports are easy to read, - a virtual environment (
~/CS149/.venv) that belongs to your project, and ruffinstalled into that venv.
You can also now name three different kinds of problems: code that Python refuses to start, code that starts and then fails partway through, and code that runs correctly and still needs work. The first two kinds announce themselves. The third kind is the one you have to go looking for.
From now on, before you submit a program to Gradescope, run !ruff check and clean up any style violations it reports.