CS 149 Intro to Programming
Fall 2020
Program Testing with JUnit
Learning Objectives
This lab is designed with the following learning
objectives:
- Introduce the idea of unit testing
- Install, configure, and use JUnit
Actions/Deliverables
At the end of this lab, you need to complete these tasks (all
of which are explained in the later sections of the lab):
- Download the required JUnit files and configure jGRASP to use them (the JUnit icons should appear)
- Write unit tests for BasicMath.java and submit your tests to Autolab (collaboration allowed, but all must submit).
Using JUnit for Testing
The basic JUnit pattern is simple:
- For every class X there is a companion class named XTest that is responsible for testing the class.
- For every method m there is at least one companion method testM that is responsible for testing the method.
Part 1 - Install/Configure JUnit
- Down the junit5 jar file
- Once you have downloaded the files listed above, open jGRASP and select: Tools -> JUnit -> Configure, for "JUnit Home", select the directory where you stored the .jar file.
Part 2 - Using JUnit
Create 2 Java Files
Create a new java class named BasicMath.java and copy/paste in the following code.public class BasicMath {
public static double add(double x, double y) {
double sum;
sum = x + y;
return sum;
}
public static double subtract(double x, double y) {
double diff;
diff = x - y;
return diff;
}
}import org.junit.Assert;
import org.junit.Test;
public class BasicMathTest {
@Test public void testAdd() {
double expected;
double actual;
expected = 15.5;
actual = BasicMath.add(7.2, 8.3);
Assert.assertEquals(expected, actual, .00001);
}
@Test public void testSubtract() {
double expected;
double actual;
expected = 2.2;
actual = BasicMath.subtract(3.5, 1.3);
Assert.assertEquals(expected, actual, .00001);
}
}- Each test is preceded by @Test. This is referred to as an annotation. In this case, the @Test annotation tells JUnit to treat the labeled method as a test method.
- Test methods are not static. They are void and take no parameters. However, they can be as complex as you like.
- Each test method establishes an expected value and runs the corresponding method to get the actual value.
- Finally, test methods use Assert.assertEquals (or other assert methods provided by JUnit) to verify correctness.
- Normally, Assert.assertEquals takes two arguments: the first is the expected result, the second is the actual result. When assertEquals is used on floating point results, it takes a third argument that specifies an acceptable degree of error. The test above will pass as long as the actual value is within .00001 of the expected value. (It usually doesn't make sense to test floating point values for exact equality. We want to ignore tiny rounding errors.)
Compile and Run your JUnit tests
Follow these steps to compile and run your JUnit tests:- Make sure BasicMath.java is compiled
- Compile and run your JUnit tests by pressing the JUnit Run
button
 .
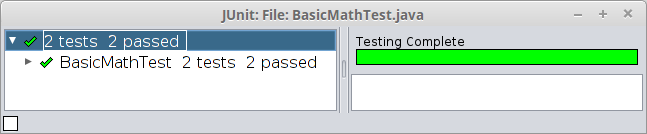
You should get a window like the one below showing that
all your tests have passed.
.
You should get a window like the one below showing that
all your tests have passed.
- Now let's introduce an error into the BasicMath.add method. Change the return statement so it reads return sum + 1;
- Compile the BasicAdd file and rerun the JUnit test (
press the button).
What happens?
Part 3 - Writing Basic Test Methods
Add 2 new methods to your BasicMath.class:
- public static double multiply(double x, double y)
- public static double divide(double x, double y)
- Now write the corresponding test methods in BasicMathTest. Use the same pattern as in testAdd and testSubtract: establish an expected result and an actual result, then compare the two with an assertion.
- Run your new tests to validate the new methods. Then introduce errors into the new methods, just as you did before with the add method, and run the tests again to see if they are really working.
- Add the following test cases to the testAdd method. (Copy and paste the last three lines of testAdd for each case below. For readability, separate each one with a blank line.)
- case 1: x = 0.0, y = 0.0
- case 2: x = -5.0, y = 3.5
- Add two additional test cases to each of the other three test methods. Determine your own expected values for these methods.
- Write an appropriate Javadoc comment for your BasicMathTest class, including @author and @version tags.
- Create a .zip file (named lab8.zip) containing both both BasicMath.java and BasicMathTest.java. See the JMU CS Student Wiki if you need help creating a zip file
- Submit your zip file to Autolab (labs, Lab 8 - JUnit Lab)
Autolab will evaluate both files: it will evaluate BasicMath.java on the basis of correctness, and it will evaluate BasicMathTest.java on the basis of coverage. Your submission will only get full credit if every method in BasicMath.java is covered by one of your tests in BasicMathTest.java.
To pass all the tests, you will need to add the following code to your BasicMathTest.java file.
/**
 * Main test.
 */
    @Test public void testBasicMath() {
        new BasicMath();
    }
This lab is a modified version of the one developed by Professor Alvin Chao.