Command Line Lab
This lab serves as an introduction to using a command-line interface and compiling C programs, as well as a guide to starting work on Project 0.
To complete this lab, you will need a terminal connected to stu, the CS department student server. If your local machine runs Linux or Mac OS X, you can simply open the appropriate terminal application (gnome-terminal on Linux and Terminal.app on Mac OS X) and use the following command to connect (make sure you replace <eid> with your JMU e-ID!):
ssh <eid>@stu.cs.jmu.edu
For example, I (Dr. Lam) would use the following command:
ssh lam2mo@stu.cs.jmu.edu
If your local machine runs Windows 10, you can use PowerShell and the commands above. If you're running an older version of Windows, you may need to use a third-party SSH client like Putty or MobaXterm. Doing this is beyond the scope of the lab--please come to office hours if you encounter problems.
1. Shell programs facilitate a command/response conversation with a computer system
In this course, you will use a "shell" program as the primary method of communicating with the computer. A "shell" is a piece of systems software that interprets your commands.
Shell-based command interpretation is a fundamental computational paradigm. Although you may be more familiar with graphical interfaces, the essense of all computational interaction can be expressed as commands and responses (i.e., a conversation). Using a command line interface removes graphical distractions and complications, simplifying your "conversation" with the computer. The shell will run programs in response to your commands and show you the outputs of those programs.
TODO: Issue the simple command "date" by typing the command and pressing enter. Your shell will run the "date" program and display the results for you.
TODO: Try other commands: hostname, uname, uptime. What do they do?
Q1: What is the output of the above programs?
2. Conversations have context (current file system location)
All conversations have some context; the bare minimum is the location where the conversation is taking place. Shells also have a notion of conversational context: the "working directory." This is your current location in the file system. It's like browsing in Finder on OS X or Explorer in Windows except that you type commands to move around rather than clicking.
Linux has a standard tree-based directory structure, called the standard hierarchy. The hierarchy starts at the "root" (denoted simply by a slash, or "/"). Generally, you begin a shell session in your "home" directory. To find out where you are in relation to the overall file system, use the pwd (print working directory) command, and to see which files are in the working directory, use the ls (list) command.
TODO: Run "pwd"; where are you? Run "ls"; what files do you see?
Q2: What is the result of running "pwd"?
Here are other commands that you can use to navigate and modify the files on the computer:
pwd                     "print working directory;" essentially "where am I?"
ls                      list the files in the current working directory
cd <dir>                "change directory" to the given directory name
cd ..                   change to the parent of the current directory
cd                      change to your home directory
less <file>             view a long file one screen at a time
cp <src> <dest>         copy a file from "src" to "dest"
mv <src> <dest>         move a file from "src" to "dest"; essentially "rename a file"
rm <file>               remove a file
mkdir <dir>             create a new directory
rmdir <dir>             remove a directory (it must be empty first!)
nano <file>             open a file in the Nano text editor
There are a couple of path shortcuts: "~" is your home directory, "." is the current working directory, and ".." is the parent of the current working directory.
TODO: Create a new directory called "cs261" and change directory into it.
3. Reading and understanding documentation is important
If you forget how a command works, you can look up the manual for that command using the "man" command.
TODO: Use the command "man cp" to see the manual page for the "copy files" command.
Q3: For the "cp" command, which parameter goes first, the source or the destination?
TODO: Use the cp command to copy the P0 distribution file to the current directory (recall that "." is a shortcut for the current directory). Here is the location of the distribution file on stu:
/cs/students/cs261/f20/p0-intro.tar.gz
4. Information = Bits + Context
Now you have the project files, but they are compressed into a file called a "tarball." If you open the file with a text editor such as nano (try it!), you will see garbage. This is because your text editor cannot interpret the bits of the file; they are in the wrong format. This file must be extracted before you can begin work.
TODO: Use the following command to extract the tarball, then use cd to move into the newly-created p0-intro directory.
tar -xvf p0-intro.tar.gz
Q4: List the files already present in the new "p0-intro" directory after extracting the tarball.
5. C build process: source files -> preprocessor -> compiler -> assembler -> linker -> executable
The C build process is described in Section 1.2 of your textbook. Basically, it is a series of steps that transform source code files to an executable binary file (note that executables have no extension in Linux, whereas in Windows they are ".exe"). In between are four main steps: preprocessing, compiling, assembling, and linking. Thankfully, the GNU C Compiler ("gcc") can handle all four steps, so we don't need to do them independently at first.
TODO: Compile the program with this command: "gcc -o intro main.c". Run the resulting program with this command: "./intro".
Q5: What is the output of the program?
6. Command-line parameters change a program's behavior
It is standard to use command-line parameters or "switches" to change the behavior of a program. These switches consist of a dash and a letter (or multiple letters) after the command. To see which switches or options a command accepts, look up that command's manpage using the "man" command.
Q6a: Try passing "-m" to the uname command--what is the new output?
Q6b: Try omitting the "-o intro" part from the
gcc command you used in the last step; what did it do now?
(Hint: do a file listing before and after and see what changes!)
7. Header files (.h) declare interfaces, code files (.c) define implementations
One common practice in C that is different from Java is that it is standard to separate the declaration of a function (its interface) from the definition of that function (its implementation; i.e., its code). In C, a declaration of a function is simply its return type, name, and function parameters followed by a semicolon.
TODO: Open p0-intro.h in a text editor to see a list of declared functions, then open p0-intro.c to see their (incomplete) definitions.
Q7: List three of the functions declared in p0-intro.h.
8. One code file = one module (includes header, compiles to one object)
Because P0 has two .c files (main.c and p0-intro.c), we can compile them separately. To compile a single module, use the "-c" (compile only) switch. For instance, you can compile only the p0-intro module using the following command:
gcc -c p0-intro.c
TODO: Compile both modules (p0-intro.c and main.c) using the "-c" switch.
Q8a: Which new files are created?
Q8b: Are they executable? (Hint: try running them like you did for the output of step 5!)
9. Multiple objects (.o) link into one executable
To build an executable file, we "link" together all of the compiled modules (which have file extension ".o" and are called "objects"). Here is a graphical illustration of the entire workflow:
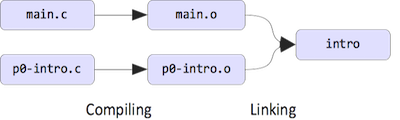
Allowing multiple objects to link into one final executable file facilitates modularity and code re-use, and allows the build process to be parallelized. To link multiple .o files, pass them all as command-line arguments to the gcc command.
TODO: Link both compiled object files into a single output executable called "intro". Remember to use the "-o" switch! Run the resulting executable to make sure it works.
10. Makefile build automation: dependencies -> build commands -> targets
Source code changes require us to re-build parts of the project, but not necessarily all of it. For instance, if we modify main.c, we will need to re-compile that module but not p0-intro.c. For large projects, figuring out which parts need to be re-built is very tedious.
Thankfully, programs called "build managers" can do this for us. The build manager we will use in this course is called Make. To use Make, you create a file called "Makefile" (note the capital "M" at the beginning) that describes how to build the program, and then run the "make" command.
A Makefile consists of a list of rules. Here is the general form of a rule:
target: dependencies
    build command
WARNING: The build commands MUST be indented using a single tab character, not spaces!
To build a target, Make will check the modification times for all of its associated dependencies, recursively rebuilding them if necessary. Once that is complete, it will execute the provided build commands to rebuild the target.
TODO: Examine the provided Makefile for P0, and test it by running make.
Don't worry if you don't completely understand the P0 makefile right now--it uses some Make features we haven't discussed here. If you're interested in learning more, read the latter sections of CS 240 Lab 1, beginning at the "Compiler Flags" section.
TODO: Make a change to either main.c or p0-intro.c (but not both!). How many commands are necessary to re-build the final executable? Re-run "make" and examine the output to verify your estimate.
Q10: How many commands must Make run (when you run "make") to rebuild the executable?
Conclusion
You should now have a basic understanding of how to interact with the command line and how to compile and run C programs. Please read the complete project guide for further information about the CS 261 project framework. You should now be able to complete Project 0. When you are done, submit the project as described in the project guide using a command like the following:
/cs/students/cs261/f20/submit.sh p0