Using C and Make
The goal of this lab is to introduce you to the main tools you will use throughout this course to produce executables from C source files.
Learning Objectives
By the end of this lab, you should be able to:
- Interact with the command line using a terminal.
- Write a simple "Hello, World" application in C.
- Compile a C source file using gcc.
- Understand the difference between:
- header files and source files,
- object files and executables,
- compiling and linking,
- declarations and definitions.
- Write a simple makefile to help automate compilation.
- Understand how the course's project makefiles work and how to edit them.
Launching and Using the Command Line
All steps of this lab will be done using the command line in a terminal window.
DO THIS IN THE LINUX LAB (ISAT 250): Press ALT-F2, type in "gnome-terminal" and press ENTER. Alternatively, just click this button at the bottom of the screen:

Gnome Terminal
DO THIS IN THE MAC LAB (ISAT 248): Press COMMAND-SPACE, type in "terminal" and press ENTER.
The terminal functions as an intermediary between you and the computer system, allowing you to have a "conversation" of sorts with the programs on the system. Using the terminal, you will execute commands by typing them and pressing ENTER, and the system will respond with any output in the same window. Try this now:
DO THIS: Execute the following line in your terminal window:
# dateQuestion: What is the output? If you run the command again, does the output change?
Here is a quick reference to common terminal commands on Unix-based systems (e.g., Ubuntu/Mint Linux or Mac OS X):
pwd                     "print working directory;" essentially "where am I?"
ls                      list the files in the current working directory
cd <dir>                "change directory" to the given directory name
cd ..                   change to the parent of the current directory
cd                      change to your home directory
cat <file>              "concatenate" a file; essentially "print this file to the screen"
cp <src> <dest>         copy a file from "src" to "dest"
mv <src> <dest>         move a file from "src" to "dest"; essentially "rename a file"
rm <file>               remove a file
mkdir <dir>             create a new directory
rmdir <dir>             remove a directory (it must be empty first!)
man <command>           read the "manual" page for the given command
If you are interested in becoming more skilled with command-line interaction, you could work through this tutorial or this online class.
You-Probably-Knew-It-Was-Coming: Hello World
Open a text editor to create a new C file called hello.c in nano by executing the following line in a terminal window:
# nano hello.cType the following program, save your code (CTRL+O then ENTER) and exit nano (CTRL+X).
#include <stdio.h>

int main()
{
    puts("Hello world!");
    return 0;
}
Congratulations! You have typed your first C program. For reference, this is essentially the same as the following Java program:
public class Hello
{
    public static void main(String[] args)
    {
        System.out.println("Hello world!");
    }
}
Take a moment to note some of the similaries and differences betweeen the Java version and the C version.
Now let's compile your hello.c file.
DO THIS: From the command line:
# gcc -o hello hello.cIf you typed the code exactly as it appears above then it should compile. This replaces the command you would have used in Java: ("javac Hello.java"). The command above has several parts:
- The program we are invoking ("
gcc", the GNU C Compiler) - The program options ("
-o hello", which tells the compiler to produce a file calledhelloas output) - The file to compile ("
hello.c")
Let's see what this produced.
DO THIS: List the contents of the current folder:
# lsIf all has gone according to plan you should now have a file called hello. Furthermore, this file is executable, and can be run via:
# ./helloAt this point the immortal words Hello world! should appear on your terminal. Success!
Question: What happens if you don't compile with the -o hello flag? (try it and see!)
Question: Can you get gcc to compile hello.c as a binary called hw instead of hello?
Makefiles
When you are compiling one file like we did above (gcc -o hello hello.c), it may not feel that tedious, but most programming projects require that you compile more than one file. We'll see later exactly how this works, but for now let's assume that each source file (called a module) is compiled independently into an intermediate file called an object file and then all the object files are combined into a single executable file.
This is somewhat similar to the Java process of compiling a bunch of .java files into .class files, and then combining them all into a single .jar file. In earlier classes, you probably used an integrated development environment (IDE) such as JGrasp or Eclipse to manage the compilation process. While IDEs exist for the C language, the C build process is simple enough that we do not need one in this course.
To more easily handle compiling large projects we will use a tool called make. The purpose of make is to automate the process of compiling and recompiling multiple files. To use make we need to create a special file, called a makefile, which tells make how to make our program. Do:
# nano MakefileNote the capitalization of the filename. It is necessary to capitalize the filename, but it is customary not to capitalize it in other contexts.
Type in the following simple makefile:
helloworld: hello.c
    gcc -o helloworld hello.c
clean:
    rm -f helloworld
Pitfall Alert: In makefiles, whitespace is very important! The first and third lines of the above example should have no space before helloworld and clean, while the second and fourth line should have exactly one tab (not four or eight spaces!) at the beginning of the line.
Now, let's use the makefile by running make. Go ahead and close nano. (Remember: CTRL-O and ENTER to save, CTRL-X to exit.)
DO THIS:
# makeYou should see that make builds the helloworld executable using gcc -o helloworld hello.c.
DO THIS: Why don't you try running it again? Type:
# makeThis time you should get a message back, make: 'helloworld' is up to date.
OK. So what is going on? The basic idea is that a makefile is a series of build targets followed by the commands to build the target. A particular build target may depend on other build targets or files (listed after the colon). If there is a change in a dependency, make will run the target. So let's dissect the first build target helloworld.
helloworld: hello.c
    gcc -o helloworld hello.c
The first part, helloworld: is telling make that the build target for the coming list of commands is to build a file called helloworld. The string after the colon tells make exactly which other files this depends on. Here building helloworld only depends on the source file hello.c. Then the next line tells make how to build the helloworld file, namely by running the compiler.
The first time you called make, it looked at the first build target in your make file, which is helloworld. It then checked the file system to see if a helloworld file already existed. Next it checked the dependency list, and found that indeed a hello.c file does exist. Since the build target did not exist, but all of its dependencies did exist, make ran the commands we placed there (i.e. gcc -o helloworld hello.c) which produced the helloworld file.
The second time you ran make however, when make checked the file system to see whether a helloworld file existed it found one! Since one already existed, there was no reason to run the compiler again, and so make told you everything was up to date.
"But wait!" you say, "what if I had modified the hello.c file after calling make?" This is where the dependency list comes in. make is not only checking that helloworld exists, but it is also checking to make sure that helloworld is newer than its dependency hello.c. To see this, let's make a change to hello.c and run make again.
DO THIS: Add a new line to your hello.c file:
...
puts("Hello world!");
puts("Hello make!");
...
DO THIS: run make:
# makeYou'll see that this time make does run the compiler. This is because your file hello.c is now newer than the helloworld file, and make realizes that it needs to rebuild helloworld since something has changed.
So far, so good. However, there is a second build target: clean. By default make will use the first build target it comes across; however, you can also specify a build target by passing it as a command line argument to make.
DO THIS:
# make cleanThis tells make to use the clean target. Note that this doesn't actually "build" anything, instead it just deletes the helloworld file. This is an important point: you can put whatever commands you want in a build target.
DO THIS: For instance, add the following after the clean target:
gettime:
    date
Then call make again using the gettime target. What happened?
Larger Projects
As your program grows much beyond the basic "Hello world." example, you are going to need to break it up into separate files for manageability.
The C language lets you "embed" one file into another using the #include directive. If you look back at hello.c, you'll see that the first line reads:
#include <stdio.h>This tells the C compiler to include the stdio.h file at this point in the program. You can think of this as a copy/paste--the compiler basically reads the contents of the stdio.h file and copies them into your hello.c program exactly where you put the #include directive. This is similar to Java's import statement, but is closer to a literal copy-and-paste.
There are two ways to include a file, using either angle brackets ('<' and '>') or quote marks:
#include <stdio.h>or
#include "helloprinter.h"The difference is that angle brackets are used for library files that are part of the standard (system-wide) C library, while quotes are used for local files. In other words, you will use #include "somefile.h" to include your files, and #include <somefile.h> to include library files.
C comes with many standard library files. The stdio.h file is a particularly handy one that you will use a lot. We included it above because that is where the puts function is defined. That function prints a simple string to the screen with a newline at the end; it is roughly equivalent to System.out.println() in Java.
DO THIS: Create a file called helloprinter.h and put the following in it:
#include <stdio.h>

void helloprinter()
{
    puts("Hello from another file.");
}
DO THIS: Edit your hello.c by adding the appropriate #include statement to include your helloprinter.h file.
DO THIS: Edit the main() function in hello.c so that it calls helloprinter() instead of calling puts.
DO THIS: Recompile everything using make.
Question: Should we edit our makefile at this point? If so, how?
Question: What happens if you #include your helloprinter.h file twice in hello.c?
Separate Your API from Your Code
One common practice in C that is a little different from Java is that we often separate the declaration of a function (its interface) from the definition of that function (its implementation; i.e., its code). In C, the declaration of a function is simply its return type, name, and function parameters followed by a semicolon. Thus, a declaration for the helloprinter() function would look like this:
void helloprinter();Somewhere else we would put the definition:
void helloprinter()
{
    // code goes here
}
You can think of the declaration as a promise to or a contract with the compiler: void helloprinter(); says to the compiler, "Hey, I'm going to define a function with signature void helloprinter() somewhere down the line, I promise."
This can be useful, for instance, if a function calls another function that is defined below it. For instance, the following will not compile:
void call_helloprinter()
{
    helloprinter(); // this will cause an error, since helloprinter has not yet been defined
}

void helloprinter()
{
    ...
but the following will compile:
void helloprinter(); // we promise to define a helloprinter() function

void call_helloprinter()
{
    helloprinter(); // no error this time, since the compiler is taking us at our word, for now
}

void helloprinter()
{
    // code goes here
}
This highlights an important difference between C compilers and the Java compiler: a C compiler looks through source code in order, so you can only use a function if it has already been declared. The Java compiler does multiple passes over the code; it uses one pass to read off all of the functions and find where they are defined, then it uses a second pass to actually compile things.
Header Files vs. Source Files
The other reason to use forward declarations is to separate your code into header files and source files. You can think of header files as the public interface to your code, or rather the part of your code that some other programmer might need to see, while the source files are the private part of your code, which contains implementations. Above we just defined the helloprinter() function in the header file, but now we are going to break it into two pieces, a header file containing only the declaration of the helloprinter() function, and a source file containing the actual definition.
DO THIS: Create the following two files if you haven't already:
File 1 - helloprinter.h:
void helloprinter();File 2 - helloprinter.c:
void helloprinter()
{
    puts("Hello world.");
}
This way someone using the code only needs to look through the helloprinter.h file to see what functions are available and how to use it. The header file is sort of like an index to a book, it gives you a guide for what is there, but doesn't give you the actual content.
Question: What happens when you call make now?
Creating Object Files
Now that we've split our little hello printer library into a header file and a source file, we need to start compiling a little differently. The reason make now fails is that hello.c only #includes the helloprinter.h file, but it does not include the helloprinter.c file anywhere. So when the compiler tried to compile, it saw in helloprinter.h that we promised we would define the helloprinter() function somewhere, but we never made good on that promise (at least not according to the compiler). When the compiler is building the final executable, it has to check that we made good on all of our promises, otherwise the executable would not know what to do when the helloprinter() function was called!
To handle this situation, we will begin using a kind of intermediate file called an object file. An object file contains compiled code from a single source code file (as you will recall, source code files are also sometimes called modules).
Thus, we will separate compilation into two processes. The first step is to compile all modules into object files. At this point, the compiler does not yet check that we've made good on all of our promises. Then, in a second step called linking, the compiler will take all of our object files and link (combine) them into one executable. Only then will it "connect the dots" and check that we've actually made good on our promises.
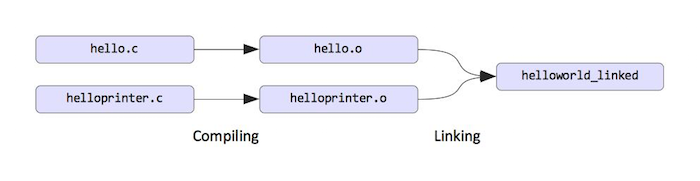
Compilation and Linking
So now we have two source files, helloprinter.c and hello.c. For a second, let's ignore the makefile and compile them by hand again. The -c flag tells the compiler to compile to an object file (i.e., only perform the first step of compilation). When we compile a file called xyz.c, the compiler will automatically produce an object file called xyz.o. Thus, there is no need to specify output using the -o flag like we did before.
DO THIS:
# gcc -c helloprinter.c
# gcc -c hello.c
# ls
You should now see that the compiler has produced helloprinter.o and hello.o object files. However, attempting to run either of these will not work:
# ./hello.oIt's not executable yet, since it doesn't know where to find things like helloprinter(). These ".o" files are the object files. They are the output of the first step of compilation (actual "compiling") and the input to the second step of compilation ("linking").
Linking Object Files
The final step, then, is to link all of our object files together into an executable. This time the compiler will check that we have actually defined all of the function that we declared and used. The command looks very similar to the command we were using before, except that we call it on the object files instead of the source files:
DO THIS:
# gcc -o helloworld_linked hello.o helloprinter.oThis time, all should be well and you should have a brand new helloworld_linked binary to run.
Makefiles Revisited
Now the compilation is getting more complicated--we're both compiling files to object code and linking them. Let's see how to handle this in the makefile.
Question: How many build targets do we need now? What are they?
DO THIS: Modify the makefile in order to correctly build the helloworld_linked binary.
Hint: You are going to need build targets for each of the files you want to build: hello.o, helloprinter.o, and helloworld_linked. Think about what other files each one depends on when you are designing your makefile. You will probably also want to add "*.o" to the clean target to remove any compiled object files.
In future labs, we will be providing default makefiles. For the programming assignments, you will need to download and modify the generic makefiles that we have provided on Piazza.
Review of file types:
| Extension | Description |
|---|---|
| .c | C source code file |
| .h | C header file |
| .o | object file (created by compiling a .c file) |
| (none) | executable file (created by linking .o files) |
Compiler Flags
One quick side note: throughout this exercise, we've been compiling and linking without any special flags sent to gcc. However, the gcc compiler has a lot of useful options, some of which we will use in this course. Typically, we will use the following flags:
-g -O0 -Wall --std=c99 -pedantic-gTells the compiler to compile with additional debug information so that when you use a debugger it can tell you things like what line number the program crashed on (similar to the stack traces from Java). This is very useful.-O0(Note that is an Oh-Zero, not two Os or two 0s) Tells the compiler not to do any code optimization. GCC can do lots of optimizations to make your code run faster, which is great, but it often makes debugging a lot more difficult. Thus, when you are in development, its best to use-O0to ensure no optimization is done.--std=c99Tells the compiler we want to use the C99 version of the C language standard. This allows us to incorporate some useful features that were added after the original ANSI C standard (C90). There is an even newer version of the language standard (C11), but we will not use any of its features in this class.-WallAs with Java, in addition to errors the compiler can also warn you about various potential problems with the code. Warnings come at different severity levels and-Walltells the compiler to show you any warning no matter how slight. This may frustrate you at times, but it will save you time in the long run by catching mistakes earlier.-pedanticThis one is like-Wallbut essentially tells the compiler to be even pickier and complain about things that it normally would not complain about. This will also help you a lot with debugging.
Thus, a compilation step will usually look like:
# gcc -c -g -O0 -Wall --std=c99 -pedantic some_file.cSimilarly, when linking we will pass the -g and -O0 flags:
# gcc -g -O0 -o my_shiny_new_binary all.o of.o my.o object.o files.o to.o link.oHopefully now you can see how useful makefiles are. Those are really long commands; you don't want to have to type all of that out every time you want to compile your code!
(Optional) Other Useful Makefile Things: Variables
Two other useful things to know for building makefiles are variables and patterns. This is useful, for instance, in specifying what flags you use in compiling.
For instance, you might have:
file1.o: file1.c
    gcc -g -O0 -Wall --std=c99 -pedantic file1.c
file2.o: file2.c
    gcc -g -O0 -Wall --std=c99 -pedantic file2.c
Now assume you decide to stop using the -O0 flag. You'd have to edit the file in two places. Instead, you could use a variable:
CFLAGS=-g -O0 -Wall --std=c99 -pedantic

file1.o: file1.c
    gcc $(CFLAGS) file1.c
file2.o: file2.c
    gcc $(CFLAGS) file2.c
The variable (note it is in all caps) is called CFLAGS and you refer to it using $(CFLAGS). Now we can update the CFLAGS variable (in one place) and it will change the flags we use in all of the compilation steps.
Maybe you even want to play around with which compiler to use (and not necessarily use gcc). That can be done using a variable as well:
CC=gcc
CFLAGS=-g -O0 -Wall --std=c99 -pedantic

file1.o: file1.c
    $(CC) $(CFLAGS) file1.c
file2.o: file2.c
    $(CC) $(CFLAGS) file2.c
There are also special variables. For instance, the $< variable refers to the first dependency in the dependency list. We can modify our makefile to use this as follows:
CC=gcc
CFLAGS=-g -O0 -Wall --std=c99 -pedantic

file1.o: file1.c
    $(CC) $(CFLAGS) $<
file2.o: file2.c
    $(CC) $(CFLAGS) $<
(Optional) Other Useful Makefile Things: Patterns
As you see above, using variables can help us make our makefile more maintainable. Another nice feature of makefiles is the ability to do pattern matching. Notice that the following two rules are essentially the same:
file1.o: file1.c
    $(CC) $(CFLAGS) $<
file2.o: file2.c
    $(CC) $(CFLAGS) $<
We can replace this with a single rule:
%.o: %.c
    $(CC) $(CFLAGS) $<
This rule essentially uses % as a wild card. Thus, it will match both file1.o and file2.o. In the first case it will use file1.c as a dependency (and compile it thanks to the $< variable), and in the second will compile file2.c.
The makefile system is very powerful, and we have only scratched the surface in this tutorial. Makefiles allow many other time-saving tricks. There is also a platform-independent system for generating makefiles called autotools, as well as more modern implementations such as CMake. Such systems are outside the scope of this course, but if you are interested we encourage you to join your local Unix Users Group.
(Challenge Problem) Add another code module
Create two new files, name_printer.h and name_printer.c. Add a function called print_name() to your new name_printer module that prints out your name. You should declare print_name() in the header file (.h) and define print_name() in the source file (.c).
Then, add a call to print_name() in the main() function in main.c. Make sure that your code compiles and runs. This will require making changes to the makefile in order to compile the name_printer module.