Setting up an SSH tunnel
SSH, which stands for Secure Shell, is a network protocol that enables remote login.
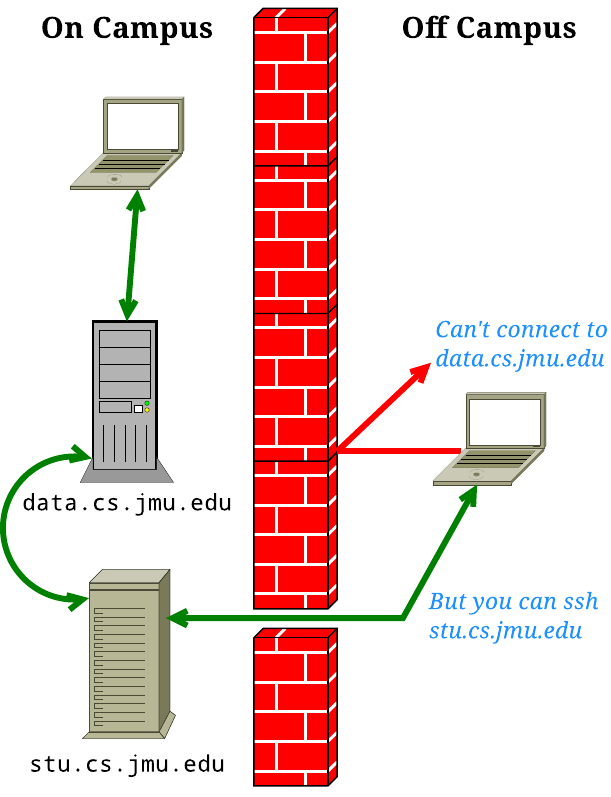
In the CS department, we have an SSH server named stu (which is short for student).
The stu server allows you to access CS department resources from off campus.
For example, when you are on campus, you can connect directly to the data.cs.jmu.edu server.
However, this server is behind the JMU firewall, which blocks connections from off campus.
SSH allows you to create a "tunnel" that forwards network connections to the database server.

Step 1: Configuration
For convenience, you can set up configuration files for SSH.
Go to the hidden folder named .ssh in your home directory.
If the folder doesn't exist, you should create the folder.
Follow the instructions below to edit (or create) the following files.
The config file
Open (or create) the file named config in your .ssh folder.
Paste the contents below into the file.
If you already have an entry for Host stu, then copy only the lines you don't have.
Replace username with your JMU username (the one you log into Canvas with).
Host stu
Hostname stu.cs.jmu.edu
User username  # CHANGE TO YOUR E-ID!!
LocalForward 3306 data.cs.jmu.edu:3306
LocalForward 5432 data.cs.jmu.edu:5432
ServerAliveInterval 60
ServerAliveCountMax 5
This configuration does the following:
- A host named "stu" is defined. That way, you can simply type
ssh stuinstead ofssh username@stu.cs.jmu.eduon the command line. - Two SSH tunnels are defined. Local connections to port 3306 (MySQL) or port 5432 (PostgreSQL) will be forwarded to the
data.cs.jmu.eduserver. - The SSH connection will be kept alive by sending a packet every 60 seconds. If this fails 5 times, the connection will be considered closed.
known_hosts file
Open (or create) the file named known_hosts in your .ssh folder.
Paste the contents below into the file.
If you already have an entry for stu.cs.jmu.edu, then copy only the parts you don't have.
stu.cs.jmu.edu,134.126.141.221 ecdsa-sha2-nistp256 AAAAE2VjZHNhLXNoYTItbmlzdHAyNTYAAAAIbmlzdHAyNTYAAABBBPcm1mzS2xJyjaMZXtEN0JvFw7bbLyPjPLwXj6AJm2Y9/c06Y4bNnT3AaK/Xnl013fOPmcgDFirAZ+jdMK11lZM=
This line defines the "public key" of the stu server, so that when you connect, you can be sure it's really the stu server and not a hacker posing as the stu server. Establishing identity is important, given that passwords and other sensitive information might be sent over the connection.
id_rsa and id_rsa.pub
By default, the stu server will ask you for your JMU password (the one you log into Canvas with).
However, you can avoid having to type your password by creating a public/private key pair.
If you don't already have id_rsa and id_rsa.pub files, run the following command to create them:
ssh-keygen
Press enter to accept the default options.
When prompted, enter a passphrase that you can remember.
The passphrase will be used to "unlock" your private key.
Without a passphrase, someone could steal your id_rsa file and log in as you.
After the ssk-keygen command finishes, run the following command to authorize your key on the stu server:
ssh-copy-id stu
Step 2: Connect to stu
At this point, you should be able to type ssh stu on the command line to connect to the stu server.
In addition to having a command line on stu, you also have local tunnels running in the background.
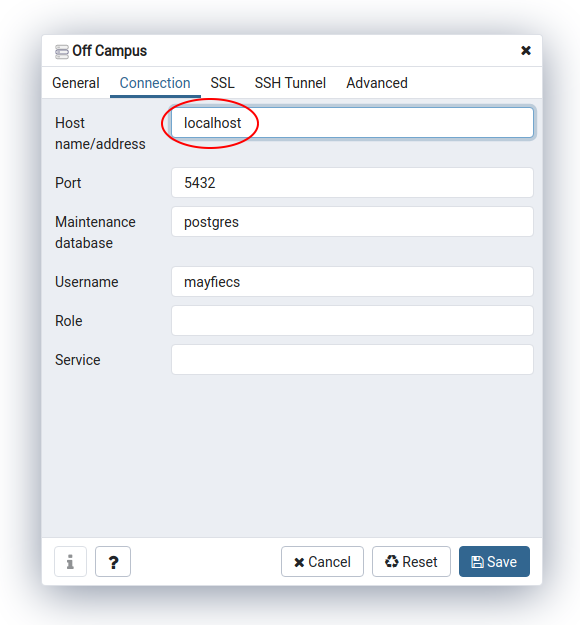
When using MySQL Workbench, pgPadmin, or Python scripts, you can now connect to localhost (instead of data.cs.jmu.edu).
Connecting to localhost should work regardless whether you are on campus or off campus, as long as you have ssh running.
