Installing Java and Eclipse
Categories:
12 minute read

Throughout the course, we will use Eclipse as our primary development environment. This page shows you how to install and configure Eclipse on your own computer.
⚠️ Note
Often there all small differences between semesters 🗓️ for how the professors wish you to configure your IDE 🙃. It’s not for funsies 😆 that we make these changes but in response to issues we see students encounter in previous offerings, and in anticipation of issues we expect you may otherwise encounter with assignments we have planned. If you have previously configured Eclipse from a different semester, please make time to run through this semester’s documentation to ensure you have the correct configuration for this semester.Step 0: Prerequisite File Hierarchy 👑
Step 0 is optional, but recommended. Unlike some other languages and their tools, Java and the popular Java Development Kit tools like the complier (javac) have default expectations about the relative names and locations of your source code. A good Integrated Development Environment (IDE) like Eclipse (more to follow below) will help you manage some of these files and their locations, but establishing some defaults that you follow to keep yourself organized will also help.
- make a directory (also called a “folder” 📂) somewhere on your computer for this course (don’t forget where you put it). Consider putting it under your “Documents” directory. Call this directory
CS159(notice the lack of a space character anywhere in that directory name). - in that directory, make 3 subdirectories (still just “folders” 📂, but the “subdirectory” term indicates that these folders are inside of some other folder) named:
downloadsprovidedCS159-workspace
Step 1: Install Java ☕️
🛑 Warning
Skip this step if you’re on a CS lab machine; Java is already installed. Proceed to Step 3In order to compile Java programs on your computer, you will first need to install the Java Development Kit (JDK). The JDK we recommend is OpenJDK, an open source implementation of Java SE (Standard Edition).
We recommend different steps for installing Java depending on what Operating System (OS) your have on your computer:
Linux (Ubuntu/Mint):
Simply run the command: sudo apt install openjdk-17-jdk openjdk-17-source
Windows and macOS:
Visit Adoptium.net and download Temurin 17 for your operating system (Figure 1). Run the installer, and follow the instructions (Figure 2). To verify the installation, open a Terminal and type java -version (Figure 3). Your version might be slightly newer than the images below.


Step 2: Install Eclipse
🛑 Warning
Skip this step if you’re on a CS lab machine; Eclipse is already installed. Proceed to Step 3Eclipse is an IDE for building applications based on Java, C/C++, Python, and many other languages. It’s Free and Open Source Software (FOSS), and it’s widely used by professionals around the world.
Download and run the installer for your operating system (Figure 4). The current version is 2023-06 (the lab machines have version 2022-06, and you can use that version too if you wish , but likely the most current version would have no incompatibilities.). When asked, select the “Eclipse IDE for Java Developers” package (Figure 5). The installation might take several minutes.


Step 3: Create Workspace
🍿Video going through this and later steps
In case any of these steps is leaving you 😖, you can watch a video of the professor going through these steps on his own computer. The video is about 10 minutes long, and it’s not required viewing, but it might help you if you’re having trouble with any of these steps.
When you run Eclipse, it will prompt you to select a workspace location. The default location is a directory named eclipse-workspace. If you completed Step 0, choose the CS159-workspace folder you created already. Otherwise, change the name to CS159 (with no space between CS and 159), as shown in Figure 6.
Notice that /cs/home/stu/username is the location of your home directory on the CS lab machines. This location will likely be different on your own computer. (Also, on machines where you’re using Windows as the operating system, you will notice that the path separator is \ rather than / as explained above and illustrated in the corresponding image. That’s no problem. 💁)
An Eclipse “workspace” is a folder (or “directory”) that contains projects and settings. Typically students create a separate workspace for each course and a separate project for each assignment.
😖 Warning 🙅
Also typically, students who do not create a separate Java Project for each assignment end up having problems building their code randomly due to conflicts between assignments (yes really, it’s like 2 clicks, this is the easy part of the course, enjoy! make a new java project FOR EACH lab, PA, etc.).
Step 4: Install Checkstyle
🛑 Warning
Skip this step if you’re on a CS lab machine; Checkstyle is already installed. Proceed to Step 5Checkstyle is a tool that can be used to determine if your source code follows a set of style rules. More importantly, it also checks for common programming mistakes, such as empty statements and accidental assignment.
Go to Help > Install New Software... in the Eclipse menu. For “work with”, enter the URL
https://checkstyle.org/eclipse-cs-update-site
and press Enter. Check the box to install Checkstyle and click Next, as shown in Figure 7.
The installation will take a minute or two. Accept the license terms, and click “Finish”. When given the security warning, click “Install anyway”. Then click “Restart Now” to apply the changes.

Step 5: Set up Checkstyle
- Download the configuration file CS159_F23_Checkstyle.xml (right-click and “Save link as…”), and save it under your
CS159workspace folder (not your Downloads folder). - Then in Eclipse, go to the
Window > Preferencesmenu (orEclipse > Preferenceson a Mac, FYI on macOS in pretty much any app you can press command + , to go to that app’s settings). - Click “Checkstyle” on the left, and then click “New…” on the right. Enter the following information shown in Figure 8 below:
- Type:
External Configuration File - Name:
CS159 - Location: (choose the file you just saved to your workspace folder)
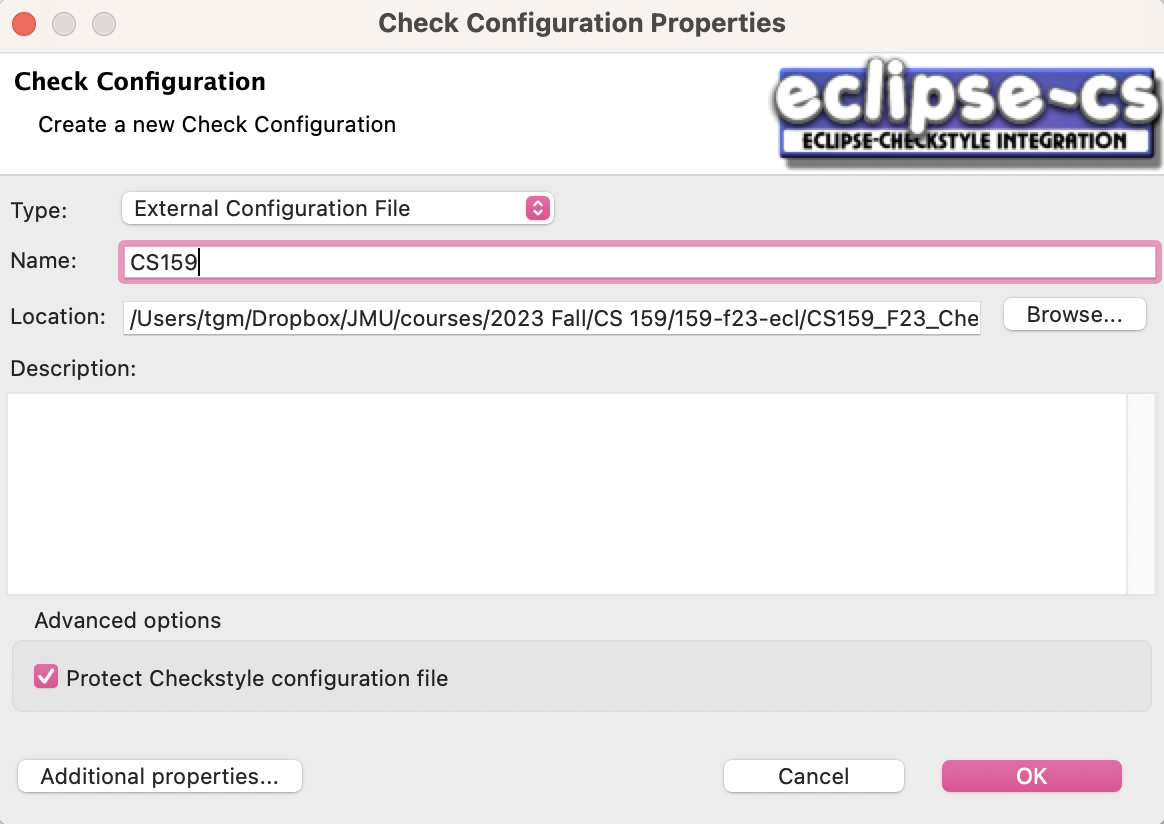 Figure 8
- Type:
- After you click the
OKbutton, selectCS159in the list and then clickSet as Default, as shown in Figure 9 below. There should be a green check mark to the right of the CS159 configuration.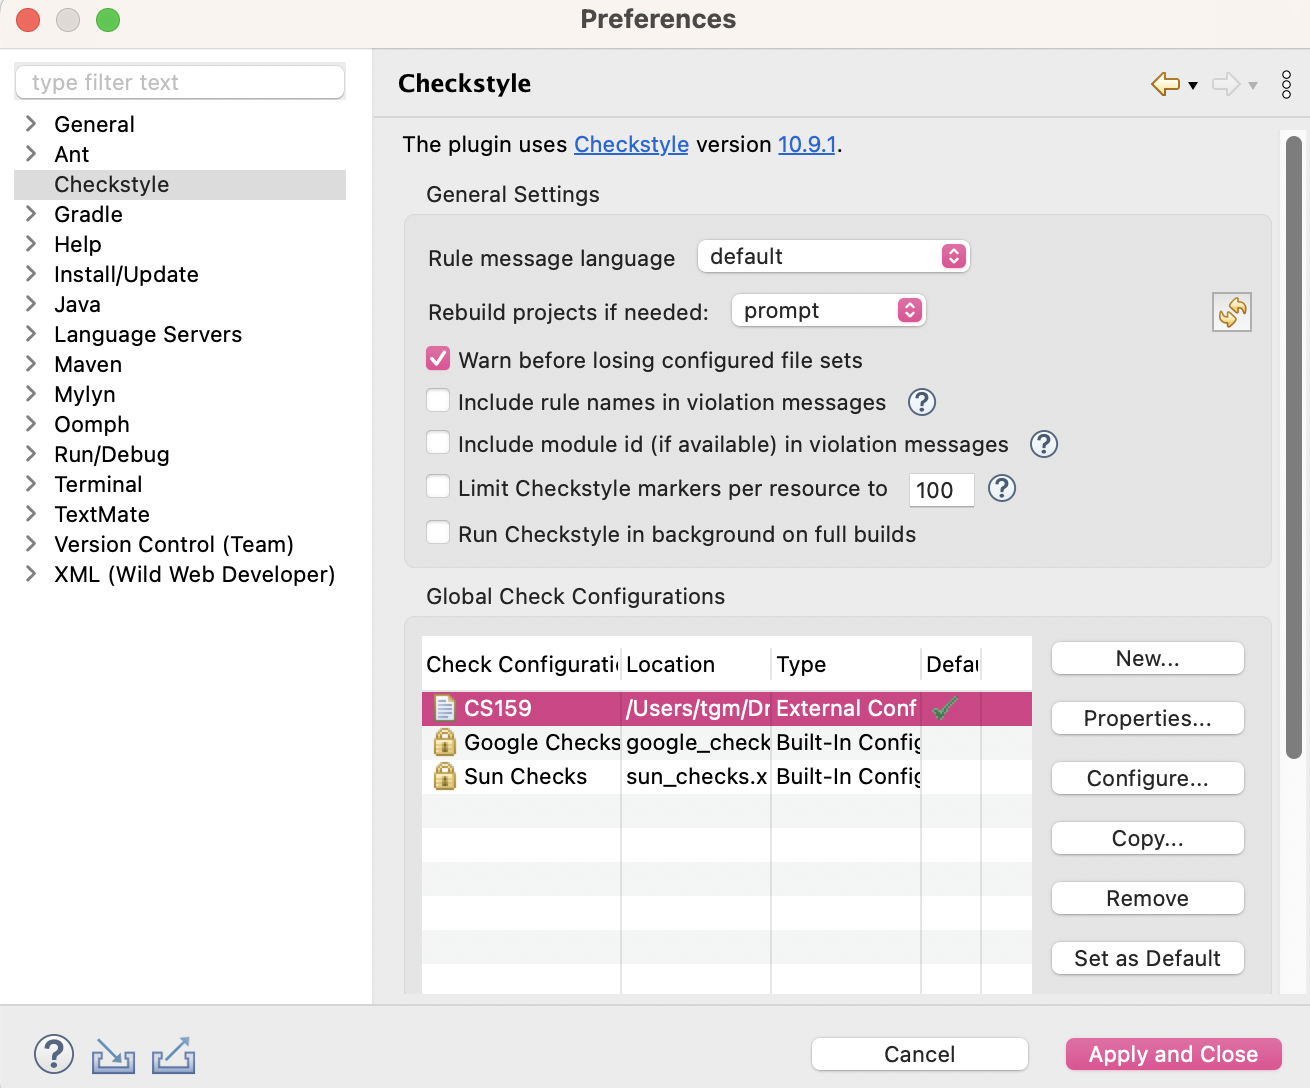 Figure 9
 - Finally, click
Apply and Close.
Step 6: Set up automated 🤖 Code Style Formatter 💅 and Cleaner-Upper 🧹
These Eclipse tools will automatically fix most style errors in your programs! 🙌
- Download the configuration files (right-click and “Save link as…”), and save them under your
CS159-workspacefolder (not your downloads folder):- Formatter.xml updated 4:10PM Sept 6
- Go back to the
Window > Preferencesmenu (orEclipse > Preferenceson a Mac). Search for the wordformatter, and clickFormatterunderJava > Code Style. Then click theImport...button, and navigate to theFormatter.xmlfile.- When finished, you should have
CS159_F23as the active profile, as shown in Figure 10a below.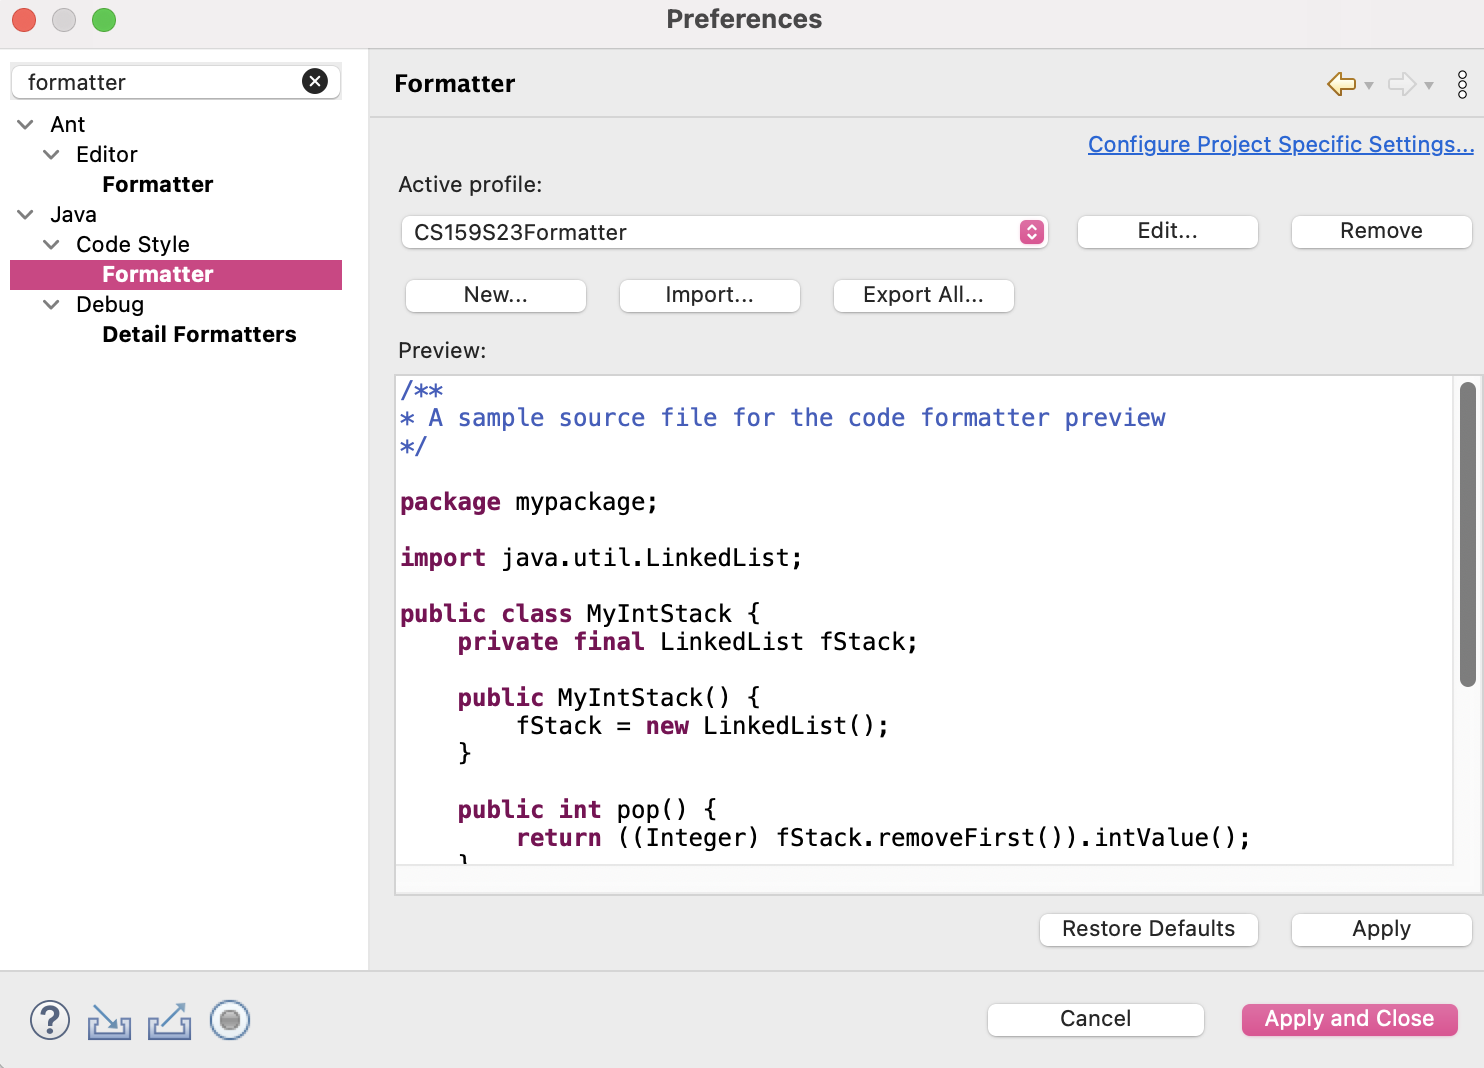 Figure 10a
- When finished, you should have
- Click
Apply and Closeto save your progress.
Step 7: Other Settings
The following settings are recommended, based on the work we’ll be doing in CS 159. They are all found under Window > Preferences (or Eclipse > Preferences on a Mac).
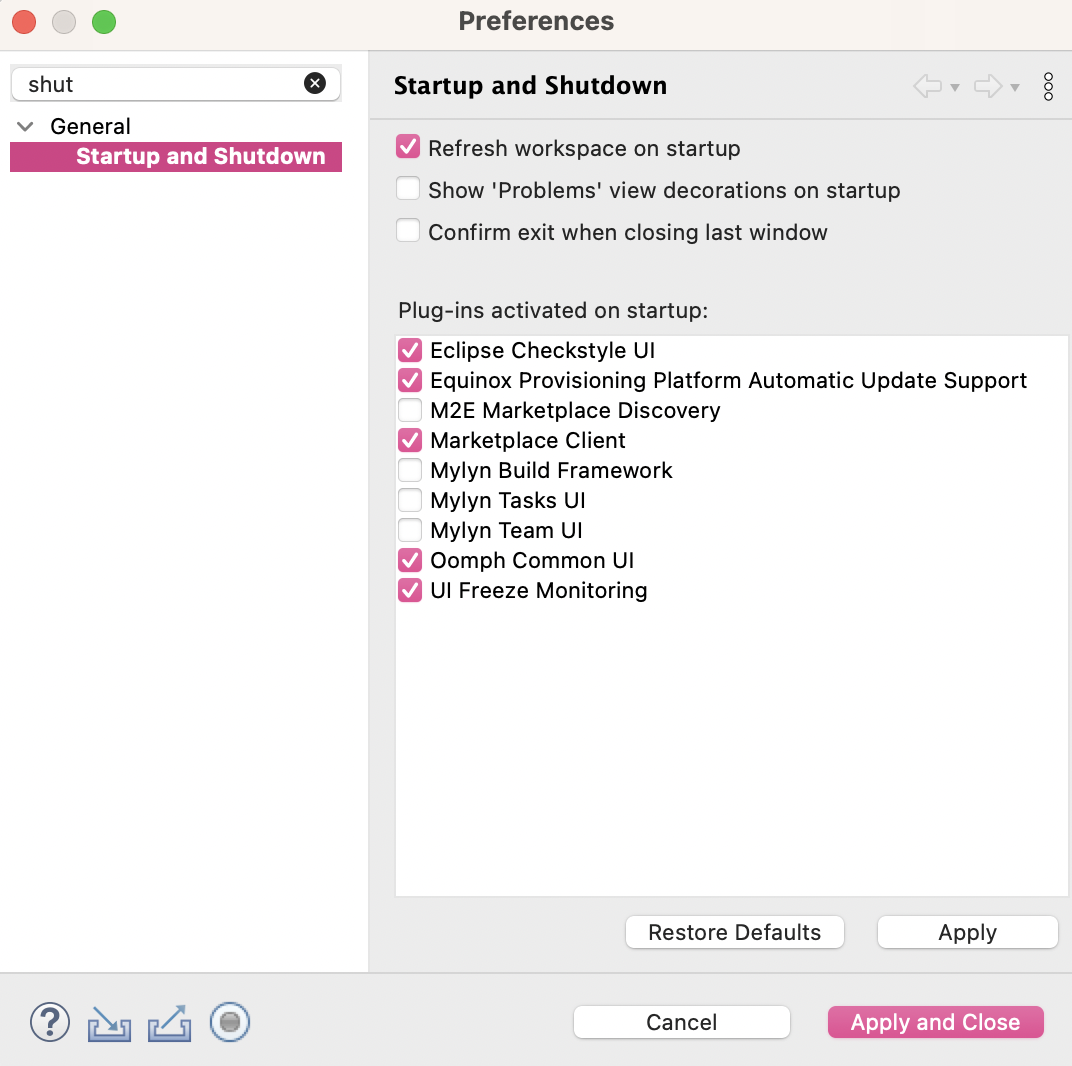
- Refresh workspace on startup.
- some folks also like to be asked for confirmation before quitting Eclipse, but I do not 😆. Ensure this setting reflects your preference.
- Click
Apply and Close.
- some folks also like to be asked for confirmation before quitting Eclipse, but I do not 😆. Ensure this setting reflects your preference.
- Ensure that the ‘Welcome’ tab of Eclipse has been closed or else the
Problems Viewwon’t be shown.
- Configure the
Problemsview to Show only problems with the current project (as pictured in the figure below) and not to group problems (in the other part of the context menu pictured in this figure, but not explicitly shown).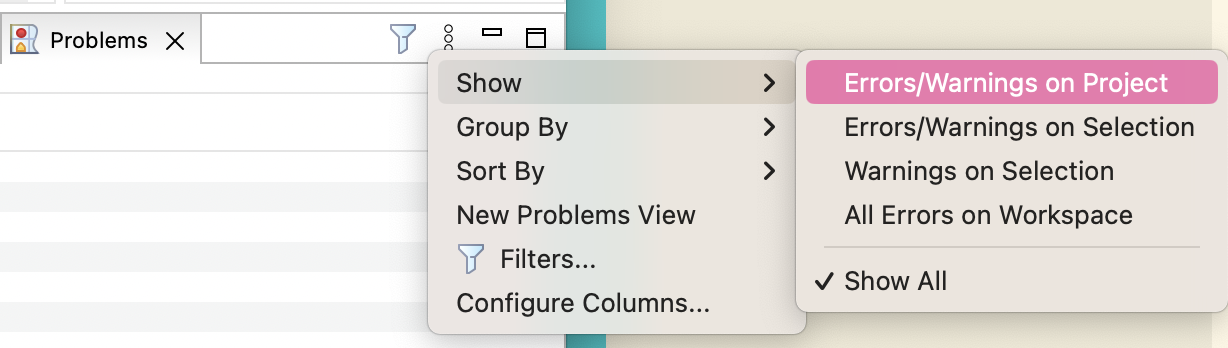
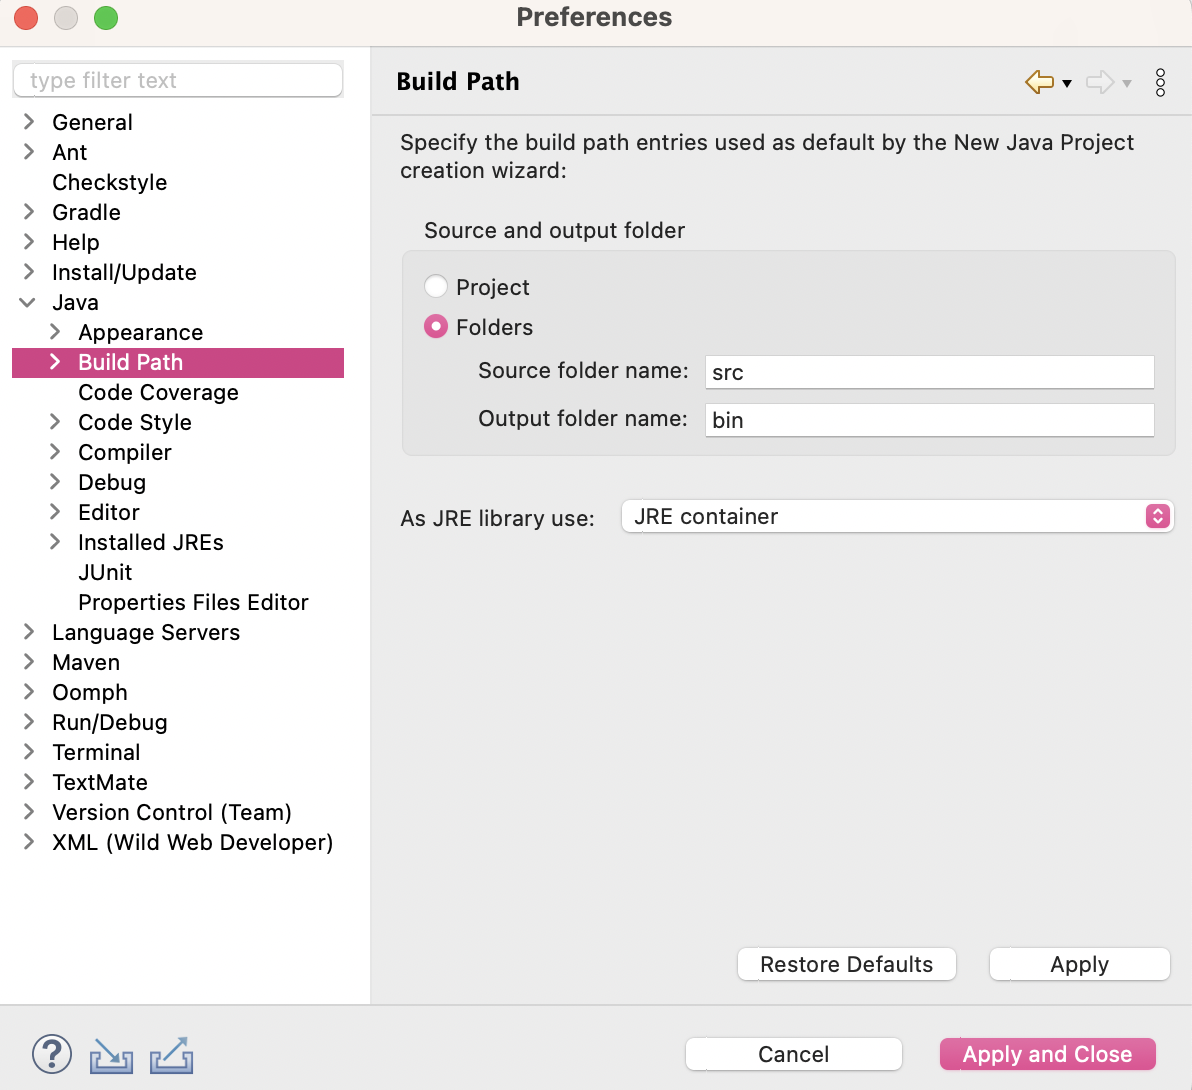
Java Build Path
Ensure the Java Build Path used by default for New Java Projects is the original Eclipse default, which is such that the source and output are separate folders named ‘src’ and ‘bin’, respectively.
Other Java Settings
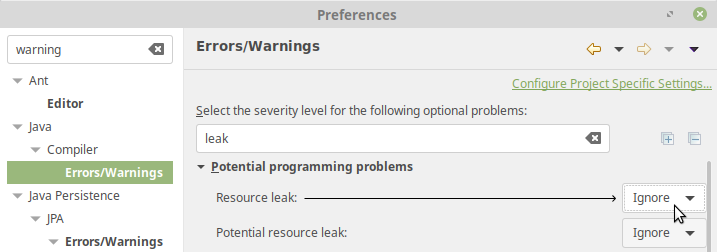
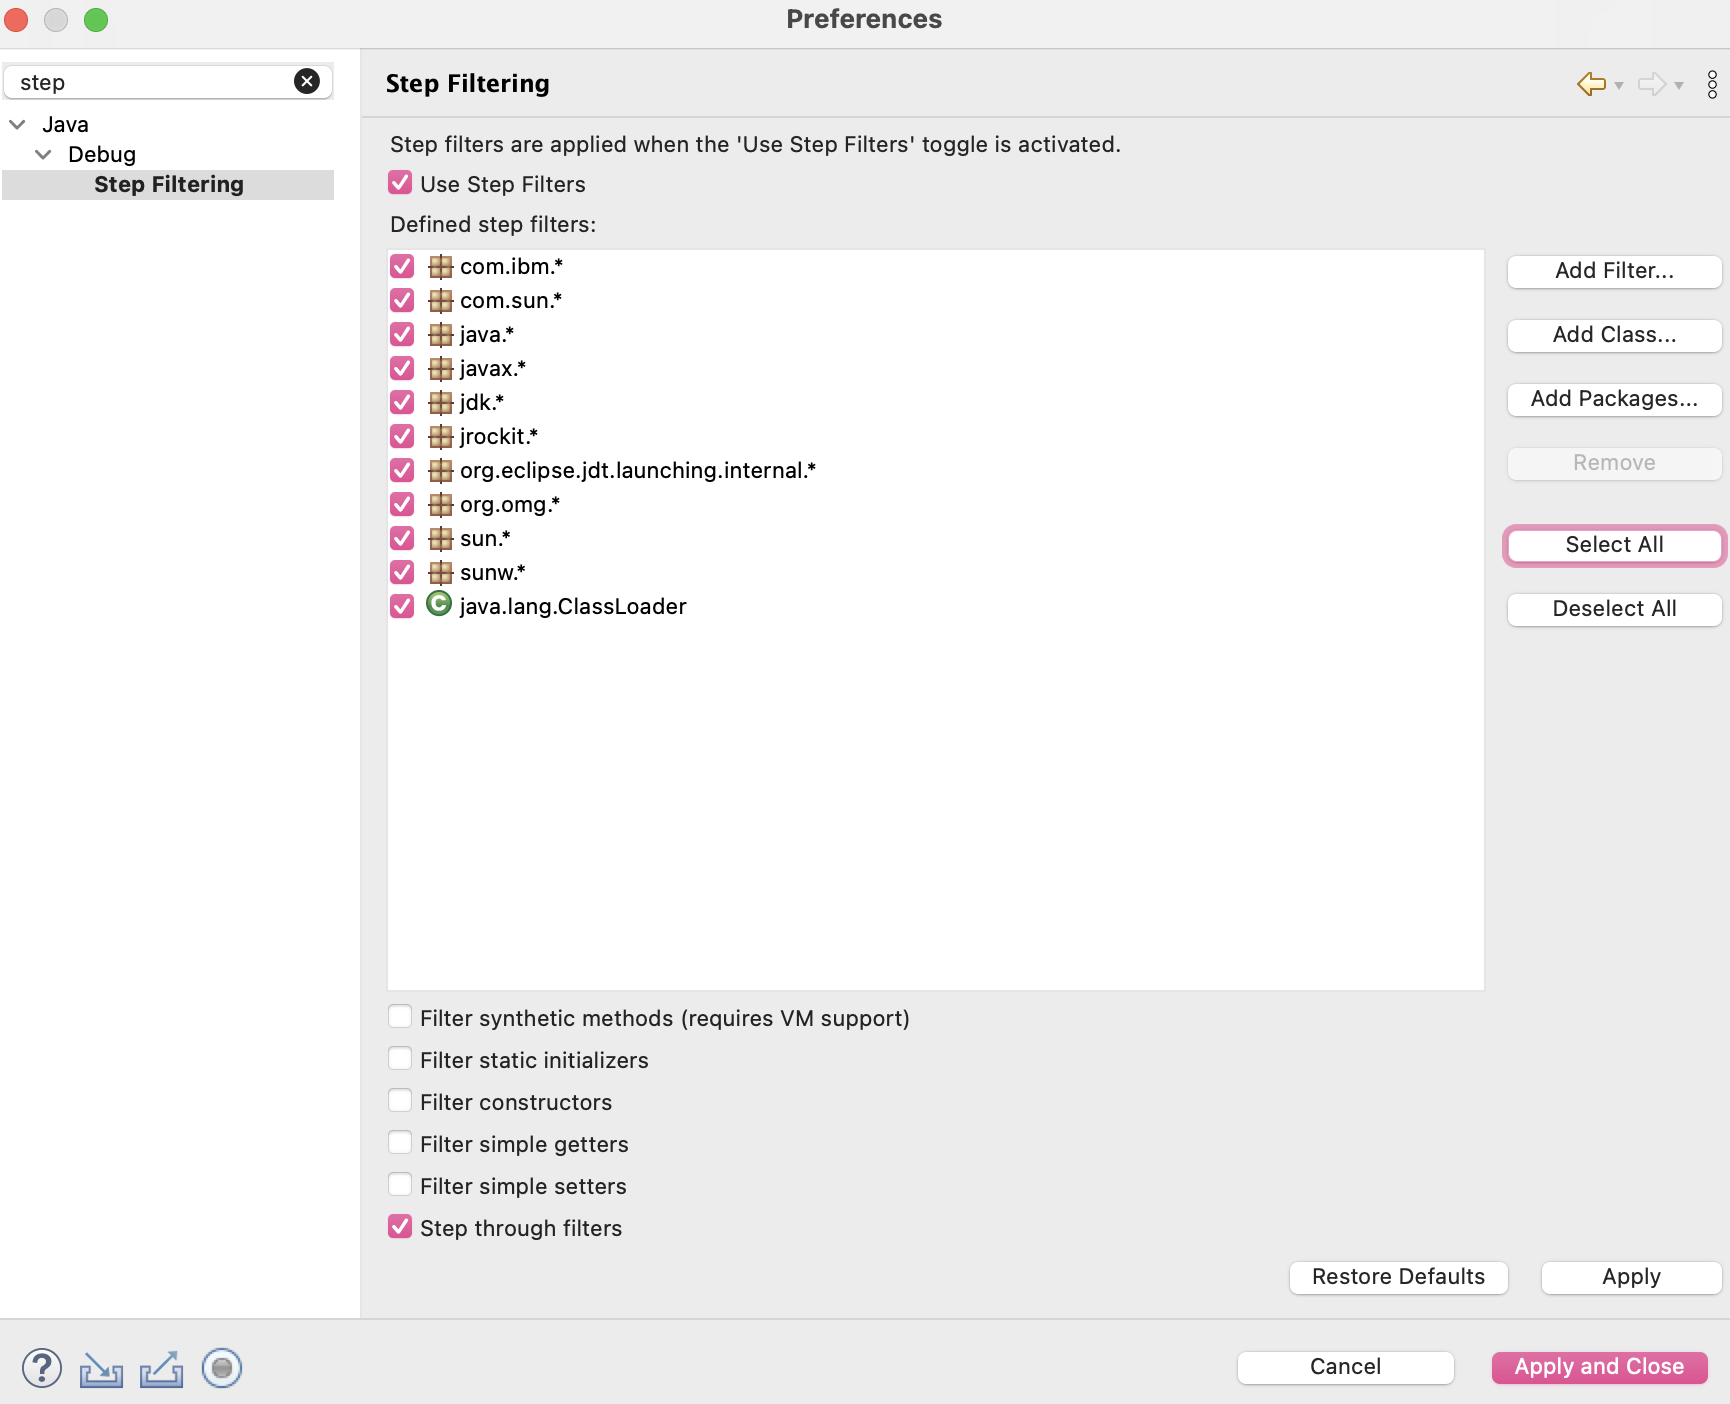
- Ignore resource leaks (this “feature” 🙄 is unfortunately a bug in Eclipse).
- Configure your debugger so that it will not attempt to step through code that you didn’t write. Note: the ‘Select All’ button on the side of this pane is useful to get most of it ready quickly.
- When we get to code coverage in our unit testing unit, you may find that the default annotation styles make it difficult to read the code. Consider going to the
Annotationssection of the preferences under Text Editors and finding each of theAnnotation typesthat are aboutCoverage(i.e.Full Coverage,No Coverage, andPartial Coverageand changing theText asdropdown fromHighlightedto something gentler likeDashed Box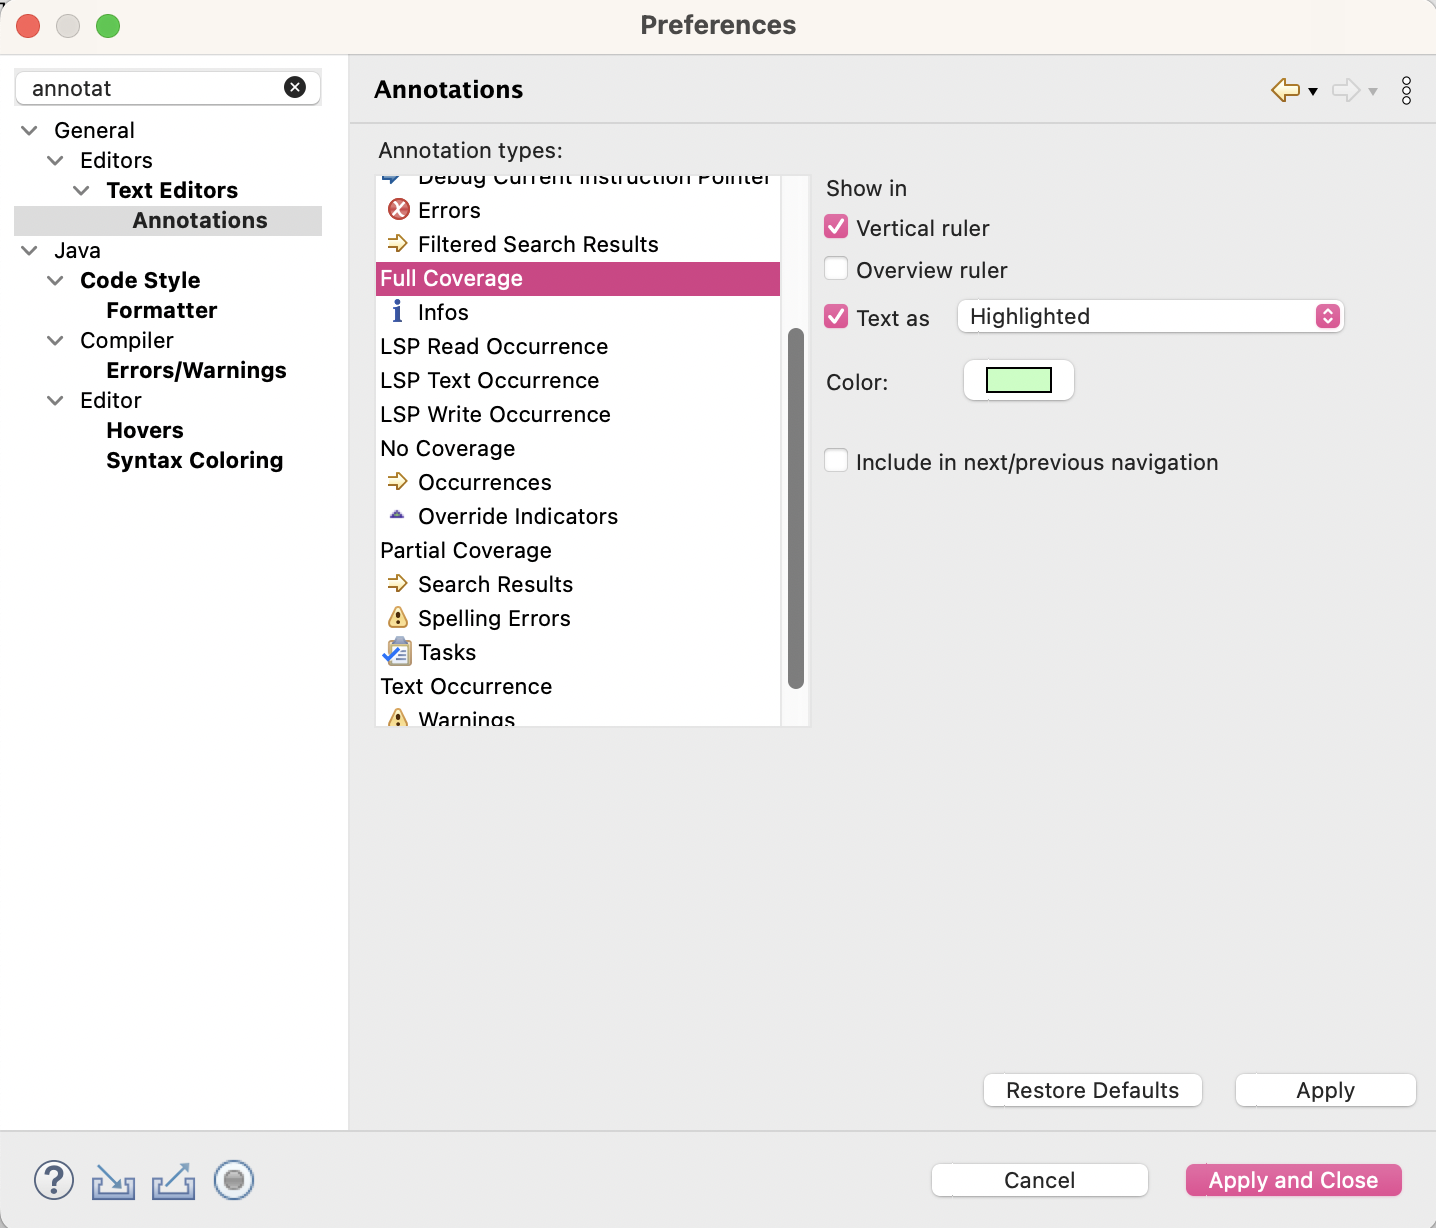
- Consider enabling more than the default Save Actions.
Format source codein particular is really helpful.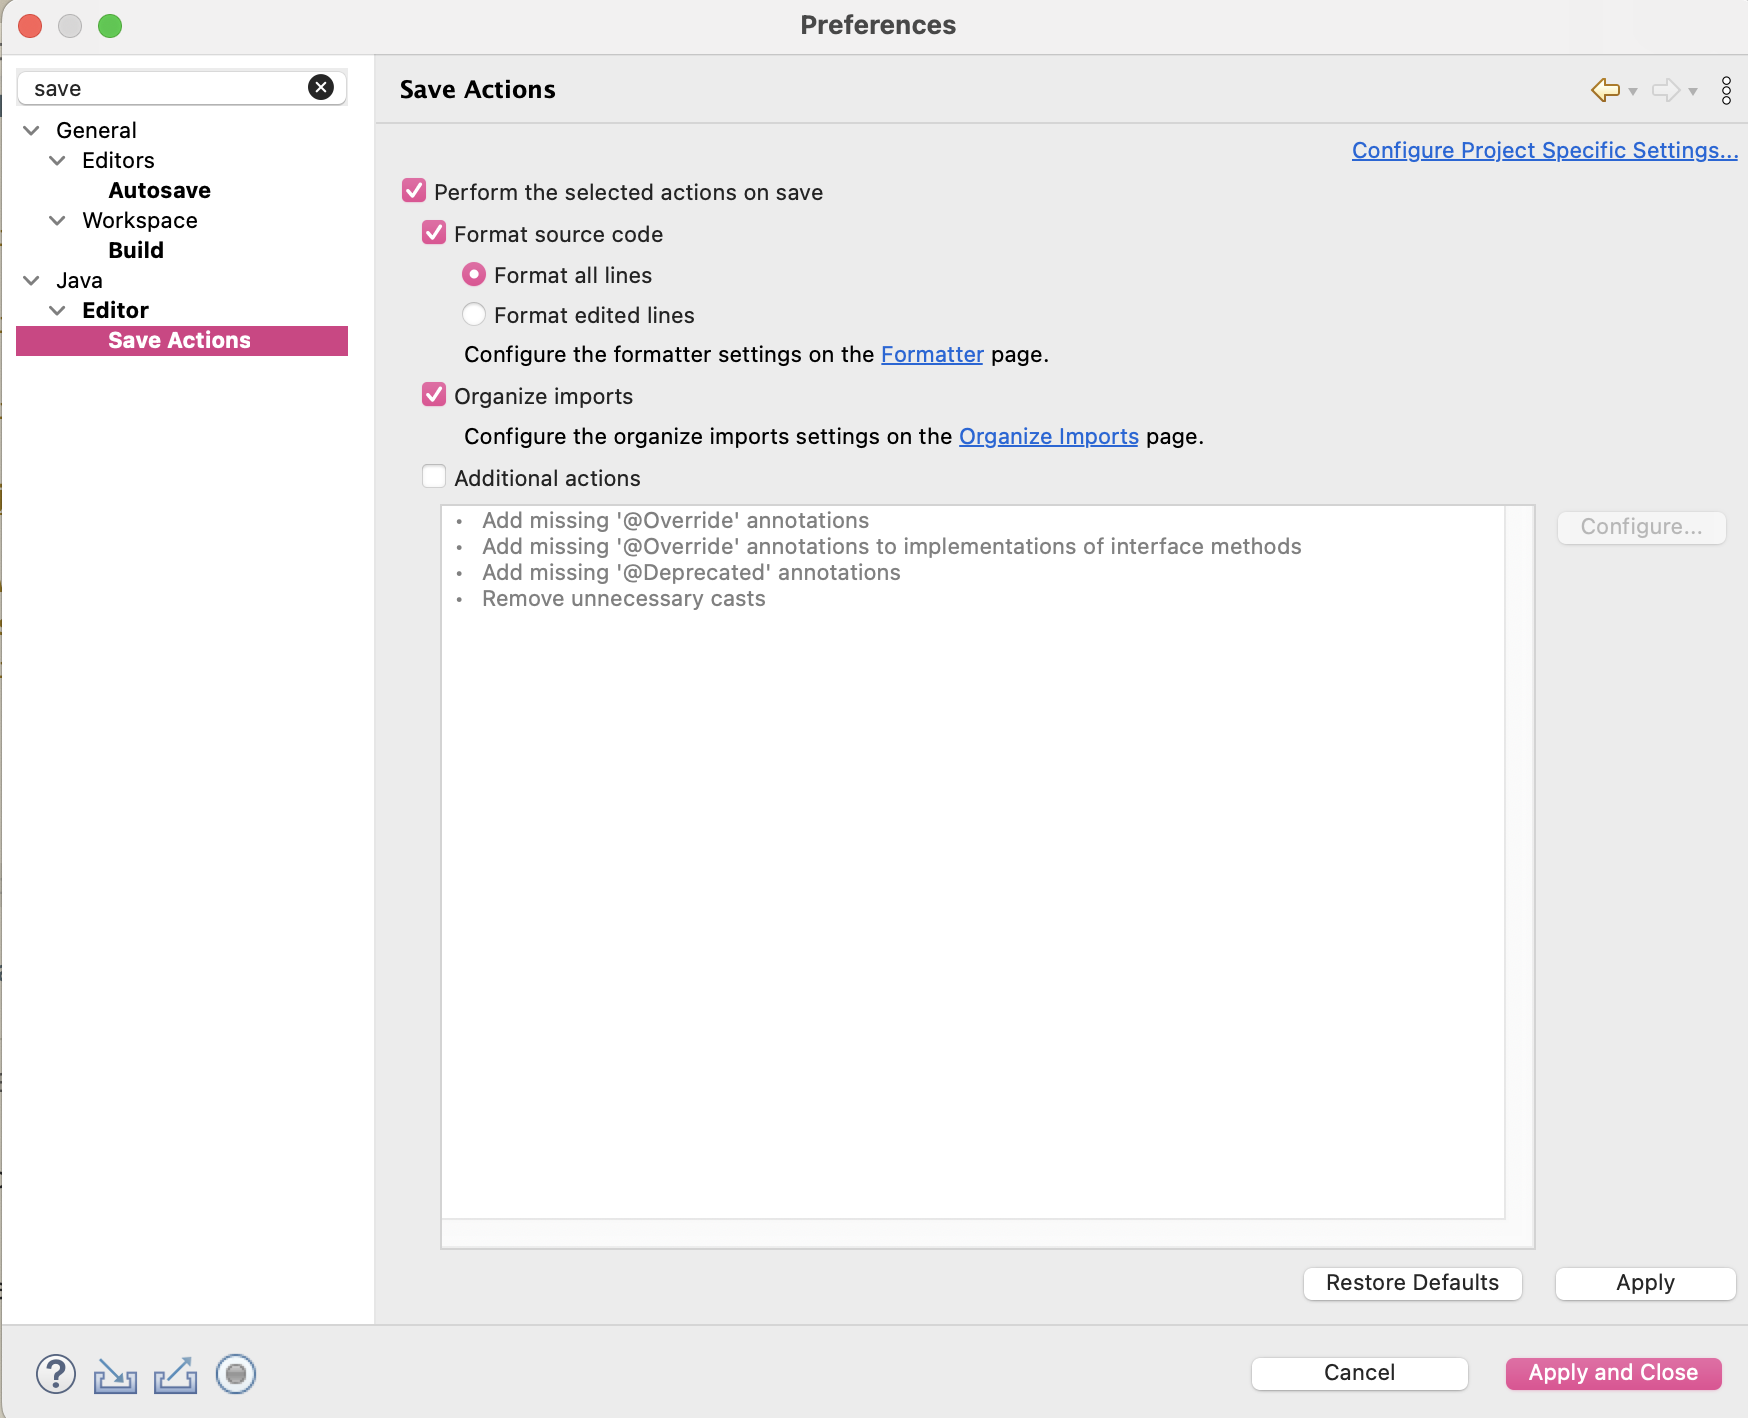
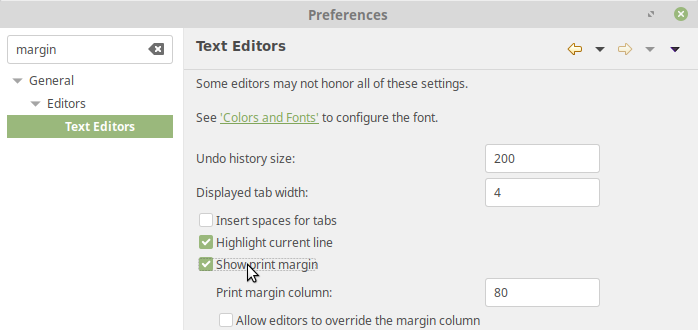
Text Editors
- Show the print margin (under Text Editors) to see the 80-character limit.
- Download 📖user.dictionary and save it in your workspace location (e.g.
CS159-workspace)- Select a "user defined dictionary" (filename) for the spell checker. This file will store new words you add to the dictionary. You should select the user.dict you just downloaded.
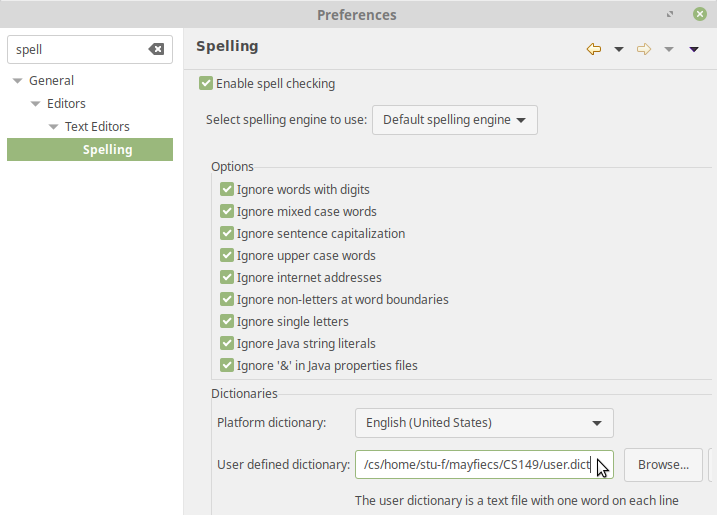
- Select a "user defined dictionary" (filename) for the spell checker. This file will store new words you add to the dictionary. You should select the user.dict you just downloaded.
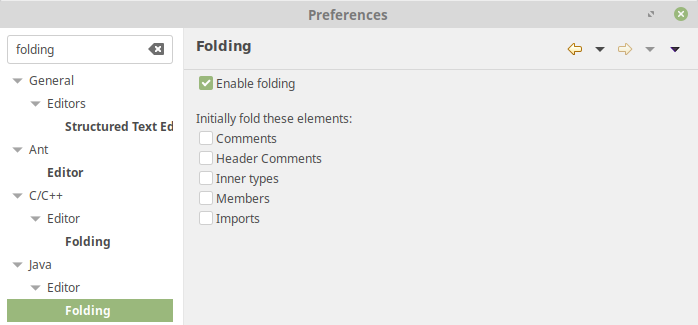
- Do not initially fold any code elements, so you can see the whole file.
Don’t forget to click “Apply and Close” at the end!
Step 8: Create Project
An Eclipse “project” is a collection of files that make up a single application. Typically each lab or assignment will be its own project.
- Click the “New” button on the Eclipse toolbar (Figure 11)
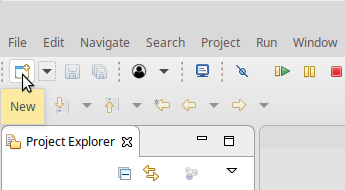 Figure 11
 - select “Java Project”, click “Next”, and enter a name (e.g.,
HW1).- Make sure “Create separate folders for sources and class files” is selected (Figure 12 below, but this shouldn’t be necessary since you set this already in the Java Build Path step above). (You can click on “Configure default…” so this will always be the case.)
- Also uncheck the box that says “Create module-info.java file” or you will get an error saying “No source folder exists in the project”. (This error is harmless and can be ignored.) You should not have a module-info.java file in your project at any point this semester unless explicitly required by an assignment.
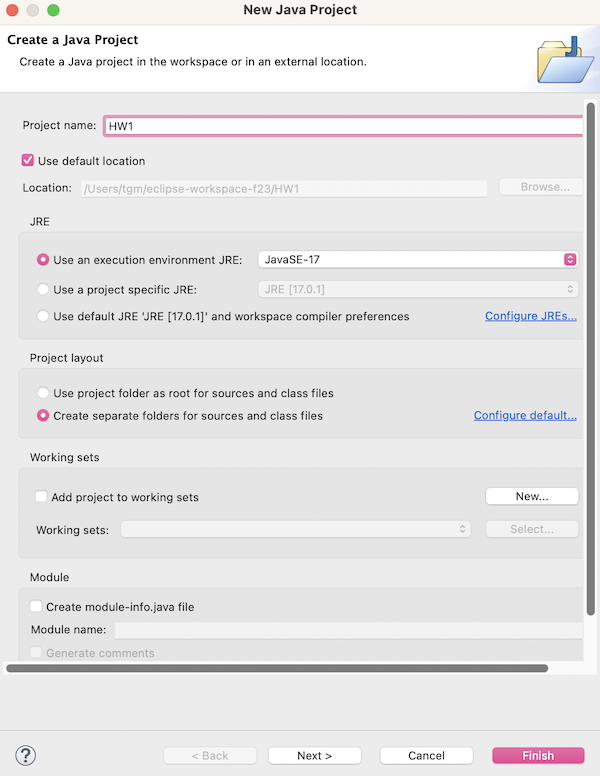
Figure 12
- Checkstyle must be turned on manually for each project.
- Go to the
Project > Propertiesmenu - click “Checkstyle” on the left
- check the boxes “Checkstyle active for this project” and “files not opened in editor”, as shown in Figure 13.
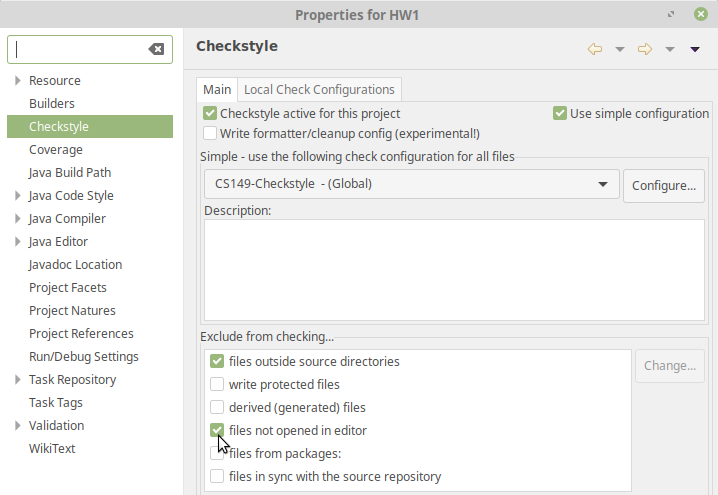 Figure 13
- Go to the
Step 9: Settings Checkup
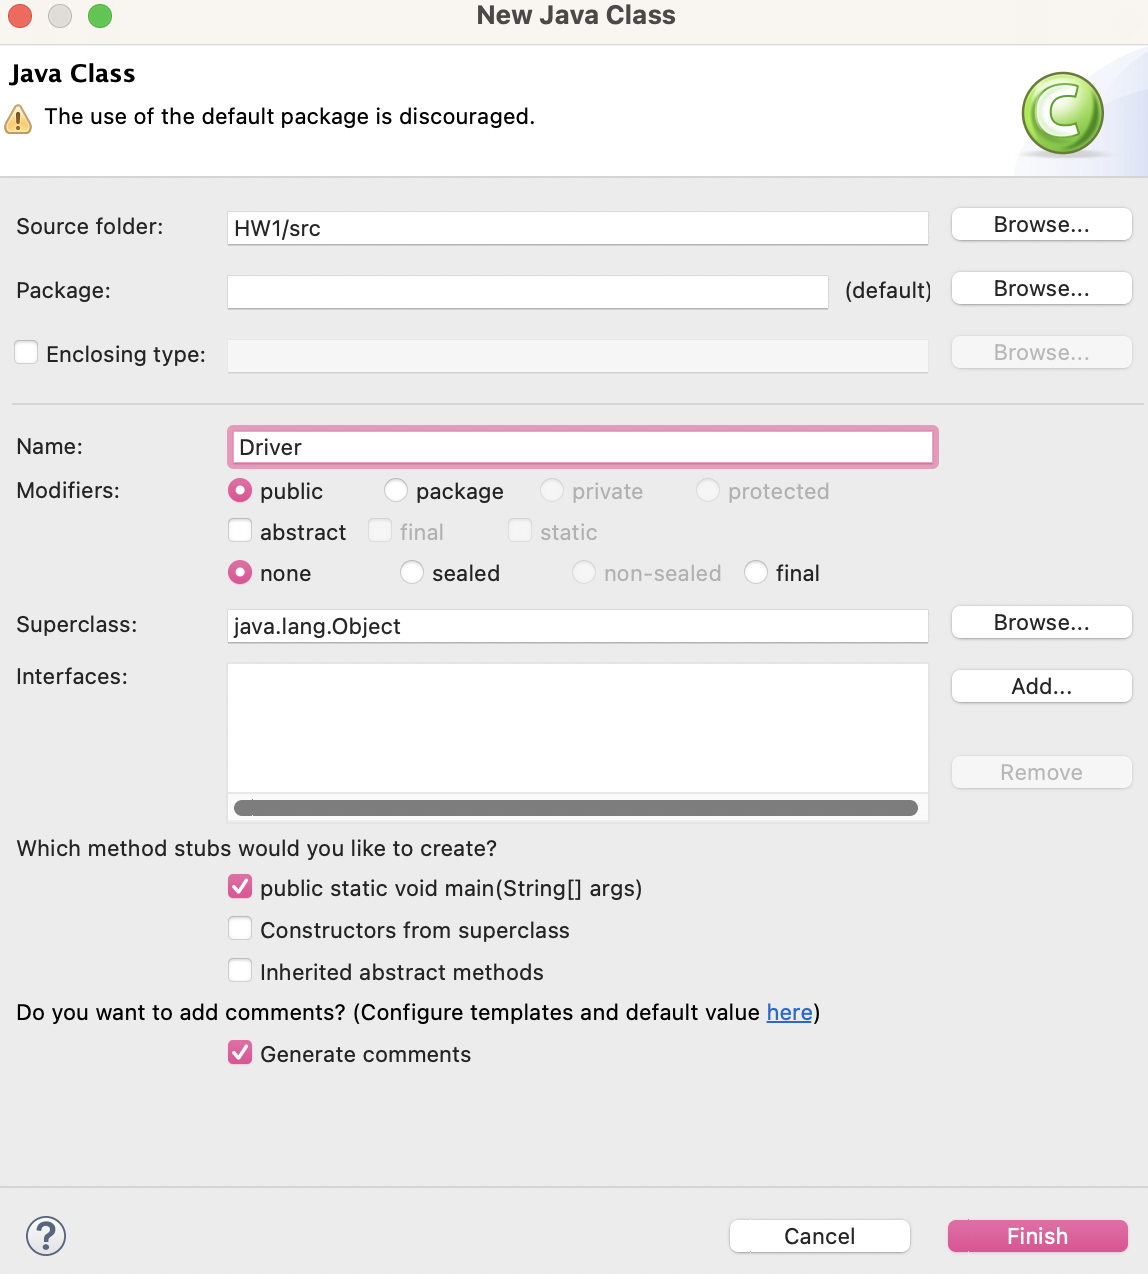
- Create a new Java Project by going to
File > New > Java Projectand name itHW1. - right-click on the newly created project and choose
New...>Class. - Confirm that your view looks similar to the figure below, especially where the figure is annotated:
- note that the
Package Exploreris showing. - note that in the Java Project (name of the project doesn’t matter as long as there are no spaces!) there is a
srcdirectory. - note that the class you just created (the name of the class visible in the editor should match the file name including that the first letter of both is capitalized, but the filename also has “.java”) shows that it is in the
default package.

Watch this video and verify that your Eclipse settings are correct. After that, congratulations! You now have Eclipse all set up to do some serious programming this semester.
Eclipse Perspectives
Eclipse is a powerful tool that can do way more than we’ll have need of this semester. I often still find the many features overwhelming since I rarely if ever need so many of them.
One last feature we want to mention is Eclipse’s Perspectives. A perspective is a named collection of view settings. Which views are showing and how those views are arranged are the kinds of settings saved in a perspective. We will mostly use the Java Perspective this semester. Secondarily, we will use the Debug Perspective heavily as well. By default, the top-right corner of Eclipse shows a small icon that appears to be depressed (not like 😞, but like “has been pressed”) as illustrated in the figure.

If you find that your really dislike some of the configuration of the default Java and/or Debug perspectives, once you have the views arranged as you wish, you may want to save your perspective with a new name, e.g. MyJavaPerspective. To do this, click the Window menu and select Perspective and then Save Perspective As.... You can then give it a name and click OK. You can then switch to your new perspective by clicking the Window menu and selecting Perspective and then Open Perspective and then selecting your new perspective.
If you end up with your views configured in a way where you can’t find something, consider checking that you’re in the perspective you intend (e.g. in Java when developing and Debug when debugging), and if they still aren’t satisfactory, reset the perspective by clicking the Window menu and selecting Perspective and then Reset Perspective. This will reset the perspective to the default configuration.
An indulgent, selective history of user interfaces
⌨️ tl;dr
If typing is weird in Eclipse, and especially if you notice your caret is a block █ rather than a line | look for the Insert key (sometimes abbreviated toIns) on the keyboard and press it once to toggle back to Insert Mode.🧓 Back in the times before these of blinding light, there was darkness, and in the times before the darkness, there was bliss. In this time of bliss, I didn’t know it yet, but I was kindling the flame of my passion for user interfaces. There was in this time a mechanical contraption. It is difficult to explain, but imagine something like what we call a keyboard, but rather than a puny 1mm of travel like on my laptop keys, there was 6 or even 12 mm of travel as you pressed your finger down on a mechanical key lever until it bottomed out and the hammer for that key struck an inked ribbon against paper to print the character! What a world. Lots of the keys that have mostly disappeared from laptops, but remain on many full size desktop keyboards like those in our computer labs make more sense when you think to their mechanical predecessors (e.g. space moves the caret forward by the width of 1 character, so backspace moves it backward by that width… the underscore was its own key, but most often used after a word requiring emphasis was typed, the backspace pressed a few times to move the cursor to the beginning of the word, and then underscore pressed the corresponding number of times to create an underline of the word 🤯).
One particularly confusing “feature” we still have in a surprising number of apps from this time is “overwrite mode” (also called “overtype mode”, the counterpart to the only mode any of us pretty much ever want, “Insert mode”). In overwrite mode (which many apps indicate at least by changing the caret from the usual thinner line like | to a thicker block like █), the character typed from the keyboard is not inserted at the caret, but will instead overwrite the character under the caret (replacing it with the key you struck). If this feature is present, it is common to activate it with the Insert key .