James Madison University, Fall 2016 Semester
Lab17: Getting started with Eclipse
Background
Throughout the semester, you have been using classes that come with the Java Platform, Standard Edition or "Java SE" for short. Did you know that the source code for Java SE is freely available? Have you ever wondered what "real world" Java code looks like? This lab has two main objectives: (1) introduce you to the Eclipse IDE, and (2) show you what Java library source code looks like. Eclipse is a heavyweight IDE that makes it easier to navigate large software projects.
Part 1 - Hello World
Eclipse provides two levels of organization:- A workspace is a collection of projects and settings. Typically students create a separate workspace for each course they take.
- A project is a collection of files that make up a single application. Typically each lab or assignment will be its own project.
-
If you have not done so already, open Eclipse. At the "Select a workspace" prompt, specify a location for your workspace (e.g.,
/cs/home/stu/username/CS149). -
From the "Welcome" screen, click on the tutorials icon (pen and green check-mark). Select the "Create a Hello World application" tutorial.
-
Follow the instructions carefully, except for one detail. When creating projects for CS 149/159, we recommend that you do NOT create separate folders for source and class files.
NOTE: Putting source and class files in the project folder enables you to switch back and forth between Eclipse, the command-line, and other editors without making any changes.
-
Go ahead and close the "Task List" view on the right, since we won't be using it. Explore the menus, toolbars, and other areas of the program. Ask questions on features you are curious about.
-
Be sure to see how the automatic syntax checking works by introducing some bugs in your HelloWorld program. Press Ctrl+Shift+F to "Format" your code.
-
Explore the autocomplete feature by typing partial lines of code. For example, type the code
System.and see the list of options that pop up. Then typeSystem.out.and press Ctrl+Space to see a list of possible method calls. Use the arrow keys to select different methods, and see how the Javadoc displays in a yellow tooltip.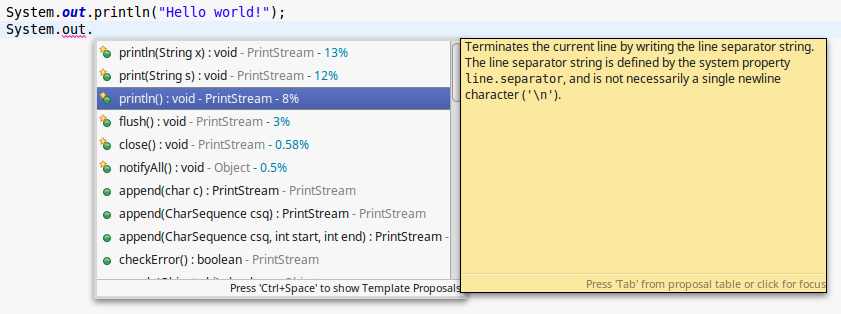
At this point, you should have a working Hello World program. Do not proceed until you have completed the tutorial and Steps 4-6 above.
Part 2 - Get the Point?
Eclipse does a pretty good job generating the mundane parts of classes for you. Unfortunately, doing so may interfere with you learning how to write the code yourself.
-
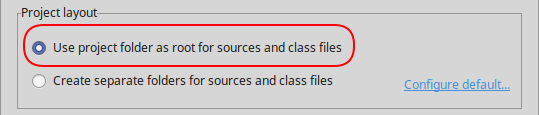
Create a new Eclipse project named
Lab20. Don't forget to use the project folder as root for sources and class files. (You may want to configure that option to be the default.) -
Create a new class named
Point, but do NOT check the box to create a main method. Write a documentation comment including your name and today's date. -
Write the code that declares two (private non-static) double attributes named x and y. Then click the "Source" menu and select "Generate Constructor using Fields."
-
Do the same thing for "Generate Getters and Setters" and "Generate toString." After all your methods are in place, rearrange them (by hand) so they are in alphabetical order.
-
Make sure there is a blank line between each method. Press Ctrl+Shift+F to clean up the code. Quickly write the documentation comments for each method.
-
At the bottom of the class (on the line just before the last
}), press Ctrl+Space. Arrow down to themainoption, and press Enter. Write a two-line program that constructs and prints a Point of your choice.
At this point, you should have a working Point program. Make sure it compiles and runs without any errors. You will turn in this file later on.
Part 3 - Java Library Source
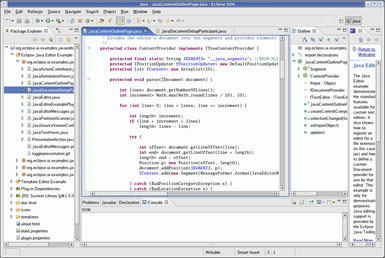
Technically speaking, code like System.out.println() is not part of the Java language, but rather part of the Java library. You can learn a lot about programming by exploring the Java library source code.
-
If you download the source code for the Java library, it comes in a single file named
src.zip. From a CS Linux lab machine, typenemo /usr/lib/jvm/openjdk-7to locate that zip file. Open it and find the source code forjava.lang.String. -
Eclipse automatically knows about this file (if it's installed on your computer). In your Point.java program, add the line
String str = "Hello";and put your cursor on the word String. Then press the F3 button (which is a shortcut for "Open Declaration"). -
Notice the "Outline" view on the right. Click on the
substringmethods and take a look at how they are implemented. Then close the "String.class" window, move the cursor toprintln, and press F3 again. Now see how that method is implemented. -
You can also hover your mouse over pretty much anything. In the
println(Object x)method, hover your mouse over the codevalueOfand read the tooltip. Then put your cursor there, press F3, and see the source code forvalueOf. -
As a final exercise, figure out how to open the source code for
java.awt.Point. Write a short paragraph in the documentation comment for your Point.java that summaries (1) the differences between it and Java's built-in Point, and (2) the main things you learned by doing this lab.
Submit your Point.java to Canvas by the end of the day.