In-Class Activity #1: Drawing Pictures
Objectives
The goal of today's activity is to get comfortable working with basic features of the Python programming language including the Python interpreter, variables, user defined functions and loops.Introduction
The following example illustrates the process of importing and executing turtle commands.
Python 3.4.0 (default, Apr 11 2014, 13:05:11)
[GCC 4.8.2] on linux
Type "help", "copyright", "credits" or "license" for more information.
>>> from turtle import *
>>> forward(100)
>>> left(90)
>>> forward(100)
Complete documentation for the turtle module can be found in the Python Standard Library Documentation. The following functions should be enough to get you started for today's activities:
forward(distance)backward(distance) |
Move the turtle forward/backward the indicated distance (in pixels). |
left(angle)right(angle) |
Turn the turtle left/right by the indicated angle (in degrees). |
penup()pendown() |
After penup() is called, the turtle will
not draw until pendown() is called. |
goto(x,
y) |
Move the turtle to the indicated position. The orientation is not changed. |
setheading(to_angle) |
Set the orientation of the turtle to the indicated angle. Zero degrees points to the right, and ninety degrees points up. |
exitonclick() |
This command prevents the turtle screen from closing
until it is clicked by the user. This should be the last
command in your main. |
Note that you must be using a version of Python that
has Tk support, because
the turtle module uses
the
tkinter module for graphics output. The labs in
ISAT/CS (143, 248 and 250) should have this software installed.
Exercises
-
Getting Started
- If you haven't already, open a terminal window and
start the Python interpreter by typing "
python3" at the prompt. - Spend a few minutes experimenting with the turtle commands from the table above.
- If you haven't already, open a terminal window and
start the Python interpreter by typing "
-
Rectangles
- Save the file shapes.py to your Desktop.
- Start Idle3 and open
shapes.py. - Take note of the
importstatement at the top of the file. We will learn about this statement later, but for now you should know that it allows you to callturtlemodule functions without prefacing them with the module name. In other words, you may simply write "forward(100)" instead of "turtle.forward(100)". In general, this is a bad idea (for reasons we will discuss later), but it will simplify our code for the purposes of this lab. - Add a new function with the following signature:
This function should draw a rectangle with the indicated width and height. The lower-left corner of the rectangle will be at position (x, y).rectangle(x, y, width, height) -
Modify your main so that it calls your newly created function. Test your program by pressing F5 or clicking on "Run Module" under the Run menu.
You can also execute your code by typing "python3 shapes.py" at the terminal prompt. Try out both methods.
-
Polygons
- Add a new function to your program with the
signature
This function should draw a polygon with the indicated number of sides at position (x, y). The length of each side is determined by thepolygon(x, y, sides, size)sizeparameter.
Hints:- This could be accomplished using either a
forloop or awhileloop. The best approach is to use aforloop along with therangefunction to control the number of loop iterations. - Notice that the turn angles required for drawing a square were 90° and that 90 = 360.0 / 4.
- This could be accomplished using either a
- Update your
mainso that it includes several calls to your newly definedpolygonfunction.
- Add a new function to your program with the
signature
-
Rows
- Add a new function to your program with the
signature
row(x, y, count,
              size)
This function should draw a horizontal row of squares with the lower-left corner of the row at position (x, y). The left edge of each square should be aligned with the right edge of the previous square. The
countandsizeparameters indicate the number of squares in the row and the size of each square respectively.Don't copy/paste code from the existing
squarefunction! Yourrowfunction should invokesquarewith appropriate parameter values. - Update your
mainso that it includes a call to your completed function.
- Add a new function to your program with the
signature
-
If you Have Extra Time
- Create and test a new function with the following
signature:
This function should create agrid(x, y, rows, columns, size).rows x columnsgrid of squares. The lower-left corner of the grid will be at position (x,y). Thesizeparameter indicates the width of the individual squares. - Create two new functions:
filled_squareandcheckerboard. Thefilled_squarefunction should create a single colored square, and thecheckerboardfunction should create a checkerboard-style grid of alternating filled and un-filled squares. You will need to look through the documentation for thebegin_fill()andend_fill()functions. - If you want some practice with a more complex algorithm, try
writing a function that draws a Sierpinski
triangle. You should be able to reuse the
polygonfunction you wrote earlier, and you may wish to use thespeed()ortracer()/update()functions to speed up your code development. Here is an example of what the end result should look like:
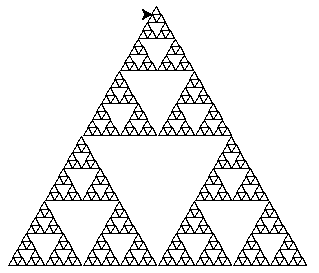
Hint: use recursion!
- Create and test a new function with the following
signature: