
The MIMP
Introduction
Welcome to ImageCorp! You have been hired to work on a ground-breaking new image manipulation application named MIMP: The Madison Image Manipulation Program. MIMP is designed to be a competitor to existing products such as Photoshop or GIMP.
The User Interface Team has already designed a stylish and functional GUI. It will be your job to program the classes that actually store and manipulate image data.
Representing Images
It is often convenient to represent digital images as a two-dimensional array of "pixels", where each pixel encodes the brightness or color of a tiny rectangular region of the overall image.
For the case of grayscale images, each pixel may be represented with a single number indicating the brightness of the corresponding image region. These values are commonly stored as integers in the range 0-255, where 0 is black, 255 is white, and intermediate values correspond to shades of gray.
For color images, each pixel may be represented by its red, green and blue color components. Each component is restricted to be an integer in the range 0 to 255. Under this representation (red=0, green=0, blue=0) corresponds to black, (255, 255, 255) corresponds to white, (255, 0, 0) corresponds to red etc. This approach makes it possible to represent 256*256*256 = 16,777,216 distinct colors.
The Java Standard libraries include some built in image classes,
including java.awt.Image
and java.awt.image.BufferedImage. Unfortunately these
classes are not ideal for our purposes. They are designed primarily
to represent images in a graphical interface, not to support
pixel-level manipulation.
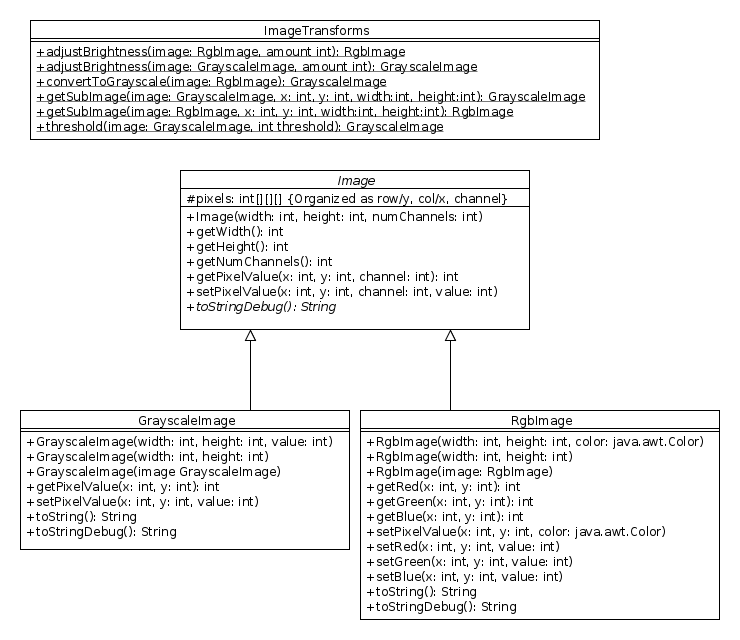
Project UML
For this project you will implement the four classes illustrated in the following UML diagram:
 (PDF version: mimp_uml.pdf)
You are free to add private or protected instance variables that do not appear in the UML above. You are also free to add private helper methods. See below for detailed requirements for each class.
The Image Class
The Image class acts as an abstract base class for
both RgbImage and GrayscaleImage. The Image
class stores individual pixels as small arrays containing the
necessary integer values to represent either the color or brightness
of a single image location. These pixel arrays will have three entries
for RgbImages and only one entry for GrayscaleImages. The number of
entries required to represent a pixel is referred to as the number of
"channels".
Under this representation, the pixel data for any image may be stored as a three-dimensional array, where the first dimension corresponds to the row (i.e. y-coordinate), the second dimension corresponds to the column (i.e. x-coordinate), and the third dimension corresponds to the channel. For example, the following statement accesses the red channel of the pixel at 20th row and 50th column of some image:
int red = pixels[20][50][0]; // Channel 0 corresponds to red.Similarly, we could access the green and blue channels as follows:
int green = pixels[20][50][1];  // Channel 1 corresponds to green.
int blue = pixels[20][50][2];   // Channel 2 corresponds to blue.
Under this representation we can think of a grayscale image as a color image with only one color channel:
int brightness = pixels[20][50][0];    // Channel 0 corresponds to brightness.
int b = pixels[20][50][1];             // This will cause an ArrayIndexOutOfBoundsException!
Note that this representation places pixel coordinate (x=0, y=0) at the upper-left corner of the image.
Detailed Requirements
-
setPixelValue- This method should clip all values so that they remain in the range 0-255. In other words, values above 255 should be converted to 255, and values below 0 should be converted to 0. This requirement will also apply to all of the pixel value setter methods in both subclasses: it should not be possible for any image to contain pixel values outside of the range 0-255. This method, and all of the pixel getters and setters for this project, should throw anArrayIndexOutOfBoundsExceptionif the pixel coordinate is invalid.
The required behavior for the remaining methods in the Image
class should be clear from the signatures.
The GrayscaleImage Class
As described above, a grayscale image is an image with a single color channel.Detailed Requirements
- Two argument constructor - The two argument constructor should
initialize a white image of the appropriate size. Both this constructor and the three-argument constructor must throw
an
IllegalArgumentExceptionif either the height or width is less than 1. - Three argument constructor - In addition to the size parameters, the three argument constructor takes an initial brightness value that should be assigned to all pixels.
- Copy constructor - This method should produce a deep copy of the image.
-
getPixelValue, setPixelValue- These methods don't add any additional functionality beyond what is provided by the superclass methods they overload. These are convenience methods that make it possible to access pixel values without explicitly specifying that channel 0 should be used. toString- The format for thetoStringmethod should be"<GrayscaleImage width=w height=h>"wherewandhare the height and width of the image. For example:"<GrayscaleImage width=640 height=480>"would be the correct string for any image that is 640 pixels wide and 480 pixels high.toStringDebug-ThetoStringDebugmethod is designed to facilitate debugging by returning an easy-to-read string representation of an image. The following string illustrates the correct format for a tiny 4x3 pixel image:<GrayscaleImage width=4 height=3> [1] [2] [3] [4] [5] [6] [7] [8] [9] [10] [11] [12]
Use tab characters ("\t") to indent your pixel values and separate the columns in your string. Note that the Web-CAT submission tests will require an exact match to this formatting, including white-space and newline characters.
The RgbImage Class
- Two argument constructor - The two argument constructor should
initialize a white image of the appropriate size. Both this
constructor and the three-argument constructor must throw
an
IllegalArgumentExceptionif either the height or width is less than 1. - Three argument constructor - In addition to the size parameters,
the three argument constructor takes a
Colorobject that should be used to initialize all pixels. - Copy constructor - This method should produce a deep copy of the image.
-
getRed, setRed, getBlue, etc.- These methods don't add any functionality beyond that provided by thegetPixelValueandsetPixelValuemethods defined in the superclass. These are convenience methods that make it possible to access pixel color components without specifying color channels numerically. toString- The format for thetoStringmethod should be"<RgbImage width=w height=h>"wherewandhare the height and width of the image. For example:"<RgbImage width=640 height=480>"would be the correct string for any image that is 640 pixels wide and 480 pixels high.toStringDebug-ThetoStringDebugmethod is designed to facilitate debugging by returning an easy-to-read string representation of an image. The following string illustrates the correct format for a tiny 4x3 pixel image:<RgbImage width=4 height=3> [1, 101, 201] [2, 102, 202] [3, 103, 203] [4, 104, 204] [5, 105, 205] [6, 106, 206] [7, 107, 207] [8, 108, 208] [9, 109, 209] [10, 110, 210] [11, 111, 211] [12, 112, 212]
Each bracketed triple corresponds to the color of a single pixel, where the first entry is the red value, the second is the green value and the third is the blue value. There should be a comma and a single space between each entry in the triple. Use tab characters ("\t") to indent your pixel values and separate the columns in your string.
The ImageTransforms Class
ImageTransforms is a utility class that contains static
methods for performing basic image transformations. Note
that none of the methods
defined in ImageTransforms modify the existing
image. In each case a new image is returned that is a result
of applying the requested transform.
Detailed Requirements
-
adjustBrightness– These methods simply increases or decreases the value of all color channels by the indicated amount. If the original grayscale image above is adjusted by +100, the correct result would be the following:<GrayscaleImage width=4 height=3> [101] [102] [103] [104] [105] [106] [107] [108] [109] [110] [111] [112]
Increasing the brightness of the color image by 100 would have the following result:<RgbImage width=4 height=3> [101, 201, 255] [102, 202, 255] [103, 203, 255] [104, 204, 255] [105, 205, 255] [106, 206, 255] [107, 207, 255] [108, 208, 255] [109, 209, 255] [110, 210, 255] [111, 211, 255] [112, 212, 255]
convertToGrayscale– This method converts anRgbImageto aGrayscaleImage. Most image processing programs accomplish this by computing a weighted average of the three color components. Green is weighed most heavily, reflecting the fact that the human eye is more sensitive to green wavelengths. Your method must use the following weighting scheme: L = 0.299R + 0.587G + 0.114B. Where L is referred to as "luminosity" or "brightness". You can find more information on the Wikipedia Grayscale page.Here is the resulting image if we compute the grayscale version of the original 4x3 color image above:
<GrayscaleImage width=4 height=3>
	[82]	[83]	[84]	[85]
	[86]	[87]	[88]	[89]
	[90]	[91]	[92]	[93]
In this example, the upper left pixel has the value 82 because,
.299 * 1 + .587 * 101 + .114 * 201 = 82.5
. Note that the floating point result is truncated rather than rounded. This is the default behavior in Java when a floating point value is assigned to an integer variable.-
getSubImage– These methods create a new image by copying a specified portion of the original image. Thexandyparameters indicate the position of the upper-left corner of the region to be copied. Thewidthandheightparameters indicate the size of the region to be copied. The following code fragment provides an example://Print the un-cropped image: System.out.println(gray.toStringDebug()); //Obtain a subImage, and print the contents: GrayscaleImage cropped = ImageTransforms.getSubImage(gray, 0, 1, 3, 2); System.out.println(cropped.toStringDebug());
Executing this code would result in the following output:<GrayscaleImage width=4 height=3> [1] [2] [3] [4] [5] [6] [7] [8] [9] [10] [11] [12] <GrayscaleImage width=3 height=2> [5] [6] [7] [9] [10] [11]
The
getSubImagemethods must throw anIllegalArgumentExceptionif the provided arguments don't represent a valid image region. -
threshold– This method converts aGrayscaleImageto black and white by setting all pixels with a brightness below the threshold to black, and all other pixels to white. The result of applying a threshold of 10 to our originalGrayscaleImagewould be the following:<GrayscaleImage width=4 height=3> [0] [0] [0] [0] [0] [0] [0] [0] [0] [255] [255] [255]
Provided Code
The following code has been provided for you. You should not need to modify any of these files:- MimpApp.java – This contains the main for the graphical MIMP application. Running this application is one way to test your finished classes.
- ImageComponent.java – This is a helper class needed by MimpApp.java.
- ImageUtils.class (ImageUtils Documentation) – This is the binary version of a utility class that handles converting back and forth between our Image class and the image classes from the java Standard libraries.
This application is provided so that you will have a convenient mechanism for interacting with your code once it is completed. The application probably won't be useful for debugging your code while you work on your implementation.
Submitting
The submission for this assignment will be divided into two parts.
For part A, you must submit completed versions of the three image
classes. Part B will also include the ImageTransforms
class. As with all programming assignments in this course, it will
not be possible to receive credit for part B unless you pass all of
the Web-CAT submission tests for part A. Each part is worth 50% of
the overall assignment grade. Both parts will have the same
submission deadline.
This assignment will include a penalty for excessive Web-CAT submissions. You are allowed five submissions for each part with no penalty. There will be a one point deduction for each submission beyond five.