Eclipse
Introduction
In this lab, you will explore Eclipse. If you already use the Eclipse editor, this lab may provide you with more information.
All Eclipse applications are built as a project. If you choose to use Eclipse this semester, each lab and each PA that you complete will be in its own project and each project will have its own folder.
Resources
Norm Krumpe's Eclipse Tutorial covers some of the basic information you'll need to complete this activity.Part 1 - Hello World
- If you have not done so already, open Eclipse. At the "Workspace" prompt, fill in a location for your workspace.
- Choose the tutorials icon. (Pen and green check-mark).
- Choose "Create a Hello World application".
- Follow the steps in the tutorial. Be sure to see how the automatic syntax checking works by introducing some bugs. Also explore the autofill options (showing the list of available members of an object).
Part 2 - Coding in Eclipse
- Create a new Eclipse project named
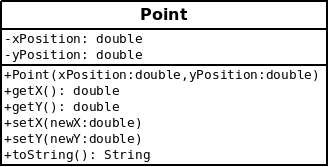
PointLab. - Use Eclipse to create a new class that corresponds to the UML
diagram below. Don't worry about commenting the code. We'll address
that later on.

The return value of the
toStringmethod should consist of an open-parenthesis followed by the x-coordinate, followed by a comma, then a space, then the y-coordinate followed by a close-parenthesis. For example:"(1.0, 2.0)". - Once you have completed a syntactically correct
Pointclass, move on to the next step.
Part 3 - Importing and Running
- Download the files PointDemo.java and PointDisplay.java to your Desktop.
-
Drag those files into the "src" section of your project.
- Look over the
PointDemoclass to get a feel for what it should do, then run the code to confirm that everything is working as expected.
Part 4 - Checkstyle Eclipse Integration
Checkstyle is a development tool that makes it easy to test Java code against a particular coding standard. Our Web-CAT submission system will analyze your programming assignments using Checkstyle to verify that they conform to the CS159 style guide. It will be in your best interest to use Checkstyle off-line so that you can avoid wasting your limited submissions. Checkstyle can be run from the command line, but today we will try it out using an Eclipse plug-in.
- Navigate to the following web-page in a separate browser window or tab: http://eclipse-cs.sourceforge.net. Drag the blue "Install" button onto your Eclipse window and follow the instructions for installing the plugin.
- Download the following XML file to your Desktop: BMS_checkstyle.xml. This file contains a Checkstyle configuration that matches the CS159 style guide. This is exactly the same configuration that Web-CAT will use to check your submissions.
- Configure the Checkstyle plugin to use the configuration file: Window -> Preferences -> Checkstyle -> New. Select "External Configuration" as the Type and then select the file you downloaded in the previous step. Click "OK" and then set this configuration as the default.
-
Unfortunately, checkstyle needs to be explicitly enabled for each new
Eclipse project. Right click your
PointLabproject in the "Package Explorer" tab and then select Properties -> Checkstyle. Click on the check-box labeled "Checkstyle active for this project". -
Once you have completed the previous step, navigate to
your
Point.javafile, right-click in the editor window and select "validate". Many lines of code should now be marked in yellow. Each of these marked lines contains a violation of the style guidelines that would prevent you from successfully submitting a programming assignment. Clicking on the yellow magnifying glasses in the left margin will show you a description of the problem. We'll fix these problems in the next part of the lab.
Part 5 - Eclipse Auto-Formatting
One of Eclipse's handiest features is the ability to automatically handle low-level code formatting. This dramatically reduces the effort involved in producing consistently formatted (and thus more readable) code. This auto-formatting feature will also help you write code that conforms to the course coding standards.
- Download the file BMS_formatter.xml. This XML file contains the configuration information necessary for Eclipse to format your code in a way that is consistent with the CS159 coding standards.
- Configure Eclipse to use the file you just downloaded: Preferences -> Java -> Code Style -> Formatter -> Import.
-
Once you have configured the auto-formatter you should be able to re-format your
Point.javafile by selecting the entire file (CTRL-A) and then pressing SHIFT-CTRL-F. - Once you have auto-formatted your code, re-validate using Checkstyle. Hopefully, many of the flagged formatting errors should now be gone. Most of the remaining issues probably relate to missing Javadocs.
-
Add appropriate Javadoc comments to your
Pointclass. Eclipse will automatically generate a Javadoc template for any method. You can either type/**[ENTER]just above the method, or select the method and press SHIFT-ALT-J. - Re-run code validation, and address any remaining formatting issues.
Part 6 - Submitting Through Web-CAT
- Navigate to http://webcat.cs.jmu.edu and log-in using your JMU eid and password.
-
Submit the file
Point.java. (For submissions involving multiple files you'll need to create a zip archive containing all of your code. Since this lab only involves a single file, we can skip that step.) - If your code fails any of the submission tests, make any necessary modifications and resubmit until there are no failures.