
PA #1: MIMP
Objectives
The purpose of this assignment is to practice working with two dimensional arrays, and implementing Java classes according to an existing specification.
Introduction
Welcome to ImageCorp! You have been hired to work on a ground-breaking new image manipulation application named MIMP: The Madison Image Manipulation Program. MIMP is designed to be a competitor to existing products such as Photoshop or GIMP.
The User Interface Team has already designed a stylish and functional GUI. It will be your job to program the classes that actually store and manipulate image data.
Representing Images
There are many different ways to digitally represent images. One common approach is to maintain a two-dimensional grid of pixels, where each pixel corresponds to the color of a single location in the image. The color of each pixel is represented by its red, green and blue components. Each color component is restricted to be an integer in the range 0 to 255. Under this representation (red=0, green=0, blue=0) corresponds to black, (255, 255, 255) corresponds to white, (255,0,0) corresponds to red etc. This approach enables us to represent 255*255*255 = 16,581,375 distinct colors.
The Java Standard libraries include some built in image classes,
including java.awt.Image and java.awt.image.BufferedImage.
Unfortunately these classes are not ideal for our purposes. They are
designed primarily to represent images in a graphical interface, not
to support pixel-level manipulation.
For this project you will implement three classes: one representing individual pixels, one representing complete images, and a utility class that is able to perform basic image manipulations such as blurring, brightening, etc.
The Pixel Class
Your implementation of the Pixel class should conform to the following UML diagram. Note that Pixel is an immutable type: once a Pixel object has been created it cannot be modified.
Method details:
- Constructor – The constructor should automatically clip color values to the appropriate range. In other words, if a Pixel is declared as follows:
Pixel p = new Pixel(-100, 300, 50);
The resulting red green and blue color components should be 0, 255 and 50 respectively. -
toString– The toString method should return a string with the following format:"(red, green, blue)". The appropriate string for the pixel above would be"(0, 255, 50)". For this method, and all other methods that return strings, your formatting must exactly match the specifications. -
getColor– The getColor method should take an integer value in the range 0-2, indicating which color channel is requested, 0=red, 1=green, 2=blue, and return the corresponding color value. If any other color is requested, the return value should be -1. This is a convenience function that makes it possible to loop over colors.
The Image Class
Your implementation of the Image class should conform to the following UML diagram. Note that location (0,0) is in the upper-left corner of the image.
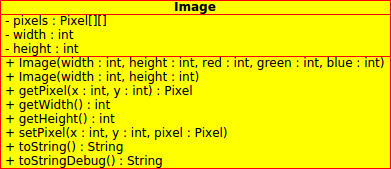
Method details:
- The two argument constructor should create a completely white image. The five argument constructor should create an image using the indicated color values.
-
toString– The format for the toString method should be"<Image, width=w, height=h>"wherewandhare the height and width of the image. For example:"<Image, width=640, height=480>"would be the correct string for any image that is 640 pixels wide and 480 pixels high. -
toStringDebug– The toStringDebug method is designed to facilitate debugging by returning an easy-to-read string representation of an image. The following string illustrates the correct format for a tiny 4x4 pixel image:<Image, width=4, height=4> red 1 2 3 4 5 6 7 8 9 10 11 12 13 14 15 16 green 101 102 103 104 105 106 107 108 109 110 111 112 113 114 115 116 blue 201 202 203 204 205 206 207 208 209 210 211 212 213 214 215 216
Use tab characters ("\t") to indent your pixel values and separate the columns in your string. This ensures that the columns will be correctly aligned.
The ImageTransforms Class
ImageTransforms is a utility class that contains static methods for
performing basic image transformations. Note that none of the methods defined
in ImageTransforms modify the existing image. In each case a new
image is returned that has undergone the requested transform.
Method details:
-
adjustBrightness– This method simply increases or decreases all three color channels by the indicated amount. If the original image above is adjusted by +100, the correct result would be the following:<Image, width=4, height=4> red 101 102 103 104 105 106 107 108 109 110 111 112 113 114 115 116 green 201 202 203 204 205 206 207 208 209 210 211 212 213 214 215 216 blue 255 255 255 255 255 255 255 255 255 255 255 255 255 255 255 255
-
blur– A blur effect can be achieved by creating a new image in which every pixel value takes on the average value of a small, square region of pixels in the original image. The size of the square will determine the degree of blurring. Blurring our original image with a region of size 3 has the following result:<Image, width=2, height=2> red 6 7 10 11 green 106 107 110 111 blue 206 207 210 211
Note that the blurred version is slightly smaller than the original version. This happens because pixels at the edge of the image do not have a complete set of neighbors that can be used for calculating an average value.
In this case, the upper left red value is 6 because it is the average of the surrounding red values in the original image:
	1	2	3
	5	6	7
	9	10	11
These numbers add up to 54 and 54/9 = 6. convertToGrayScale– This method converts an image to grayscale by setting all three color channels to the same value. Most image processing programs accomplish this by computing a weighted average of the three color components. Green is weighed most heavily, reflecting the fact that the human eye is more sensitive to green wavelengths. Your method must use the following weighting scheme: L = 0.299R + 0.587G + 0.114B. Where L is referred to as "luminosity" or "brightness". You can find more information on the Wikipedia Grayscale page.Here is the resulting image if we compute the grayscale version of the original 4x4 image above:
<Image, width=4, height=4>
red
	82	83	84	85
	86	87	88	89
	90	91	92	93
	94	95	96	97
green
	82	83	84	85
	86	87	88	89
	90	91	92	93
	94	95	96	97
blue
	82	83	84	85
	86	87	88	89
	90	91	92	93
	94	95	96	97
In this example, the upper left pixel has the value 82 because,
.299 * 1 + .587 * 101 + .114 * 201 = 82.5
-
threshold– This method converts the image to black and white by setting all pixels with a luminosity below the threshold to black, and all other pixels to white. The result of applying a threshold of 90 to our original image would be the following:<Image, width=4, height=4> red 0 0 0 0 0 0 0 0 255 255 255 255 255 255 255 255 green 0 0 0 0 0 0 0 0 255 255 255 255 255 255 255 255 blue 0 0 0 0 0 0 0 0 255 255 255 255 255 255 255 255
Provided Code
The following code has been provided for you. You should not need to modify any of these files:- MimpApp.java – This contains the main for the graphical MIMP application. Running this application is one way to test your finished classes.
- ImageComponent.java – This is a helper class needed by MimpApp.java.
- ImageUtils.class (ImageUtils Documentation) – This is the binary version of a utility class that handles converting back and forth between our Image class and the image classes from the java Standard libraries.
Submitting/Grading (Updated 9/12)
Submit through Web-CAT by the project deadline. Your grade will be based on the following factors, and may also be affected by the number of submissions that you make. See below for more details on how each component will be calculated.
| Autograding based on correctness/testing: | 80% |
| Autograding based on static analysis of style: | 10% |
| Instructor grading based on style and readability: | 10% |
Autograding based on correctness/testing
This portion of your grade is based on three factors.
- Providing your own unit tests.
- Passing your own unit tests.
- Passing the instructor-provided unit tests.
Web-CAT will not run your code against the instructor unit tests if you haven't provided unit tests of your own. There is no point in submitting until you have written your own tests.
Rember that
Web-CAT is configured to deduct points if there are any methods
that are not executed by at least one of your JUnit tests.
Web-CAT includes the default constructor of
the ImageTransforms class in this calculation. In other words,
you will lose points if you never instantiate an object of type
ImageTransforms, even though it doesn't make sense to instantiate an object of
type ImageTransforms. You can deal with this problem by including the
following statement in one of your tests.
ImageTransforms t = new ImageTransforms();
Autograding based on static analysis of style
Web-CAT will use checkstyle to analyze your code for conformance to the course style guide. I strongly suggest that you to install checkstyle for Eclipse on your own machine so that you can run your own style checks before submission. You can find the checkstyle configuration file that Web-CAT will use on the course supplemental material page.
Instructor grading based on style and readability
This portion of your grade will based on stylistic issues that cannot be checked automatically. This includes:
- Appropriate acknowledgment statement.
- Meaningful variable names.
- Clear documentation.
- Avoiding unnecessary code repetition.
- etc.
Submission penalties
Your grade will also be based on the number of submissions that you make. You may make up to six submissions with no penalty. Your grade will then be reduced by 3% after every six submissions:
| Number of submissions | Penalty |
|---|---|
| 1-6 | 0 |
| 7-12 | -3% |
| 13-18 | -6% |
| ... | ... |