Project 1 - Workstation Configuration
Categories:
6 minute read

Let’s get ready to code! To make sure we are ready for the labs and the projects for this class, let’s configure your workstation/environment with the required toolsets and construct a few small Python program.
We will test our configuration out using the Pacman game, which
was developed by Berkerly AI (http://ai.berkeley.edu).
Tasks
-
Install and/or verify that you have Python and the required packages on your computer. The recommended version is 3.10.9 and the minimum version is 3.8.10. Optionlly install an IDE for Python (highly recommended).
-
Download and run the Pacman game and take a screenshot to show that you workstation is properly configured.
-
Write a small Python program (see below).
Submit files to gradescope
Files
- Download
workstationConfig.zip
.
This file contains the many of the components for the Pacman game so you
can test that the game operates propertly on your workstation. It also contains
the
shopSmart.py(UNFINISHED) andbuyLotsOfFruit.py(UNFINISHED) files you will need to complete (plus a few support files).
Introduction
CS Lab Computers
All CS lab computes running Ubuntu have the required Python software and packages (imports) for this class. If you do not have a laptop that you can bring to class that supports the software and configuration described in this assignment, please contact me. Having a functional computer during class is a requirement of this class.
Unix/Mac versus Windows
Provided code for this class may occasionally contain UNIX/Mac specific shell scripts. Code for this class also utilizes GUIs, which typically do not run well under VMs.
If you are going to be running Windows, it is advised that you setup and configure the Windows Subsystem for Linux (WSL). Here are some instructions from Microsoft.
If you are going to run Windows, I will not be able to offer a lot of support (since I do not know Windows well nor do I use it). I can offer some basic support and also remind you that the CS lab computers will completely support this class.
Mac M1 (Apple Silicon)
Apple recently starting making Macintosh computers that utilize their own M1 and M2 chips. These chips have different instruction sets then their Intel predecessors, and thus, require new libraries and executables.
If you have one of these new Macs, make sure you are using Python 3.8.10, as earlier versions have a few relavaent bugs when running on the Apple(M series) chips. I recomend version 3.10.9 for this class (see notes on Python below).
Task 1: Install Python and Required Packages
Python 3.10.9 is recommended for this class (a minimum version of 3.8.10). You can download Python for Mac or Windows from python.org's Download page.
Virtual Environments with Python
Python supports its own idea of a virtual environment, which allows for sets of packages
to be managed independently from one another and without administrative rights on the computer
(which is more secure). You can create Python environments both using venv (Python’s tool) or
more advanced managers such as Conda. I prefer to keep it simple, so, I use venv.
Installing Python
-
Download a Python version (recommend 3.10.9) from python.org's Download page and install it (on a MAC, that means running the pkg file).
-
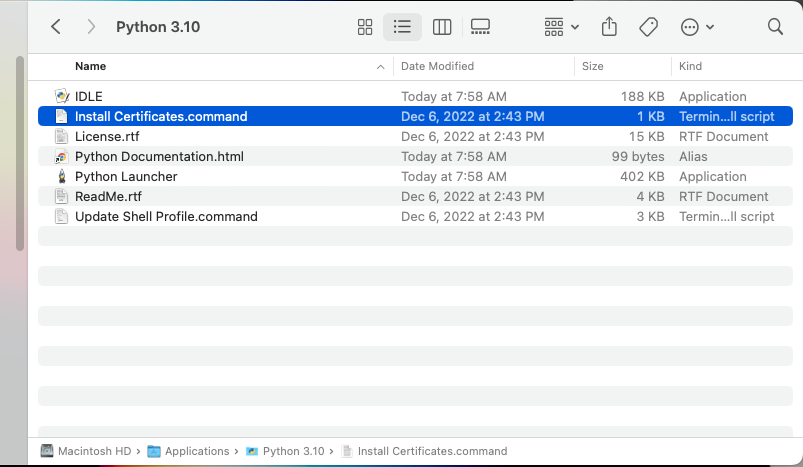
Make sure to run the
Install Certificates.commandby double clicking on this in Finder. You can find this by navigating to the Python folder under Applications.
Configuring a new VENV
-
Open a terminal window and navigate to a folder where you will create your virtual environment for this class. I use VSCode, which prefers to have all your python venvs located in the same folder, which for me is
/Users/molloykp/dev/python_venvs. For this class, I created a new venv folder under this named:/Users/molloykp/dev/python_venvs/cs444_2023Spring. If you are using MS Windows, create a folder somewhere under your account to serve the same purpose (your path will obviously be different). -
If you are using Ubuntu or a MAC, execute the following commands from the terminal window that has the directory you created in step 1 as your current working directory (verified below by
pwd):
pwd
python3.10 -V
python3.10 -m venv cs444_venv
source cs444_venv/bin/activate
- If you are using Windows (if you are not, skip this step), open a terminal and run these commands (leave the terminal open as you will need it for the next step).
%LOCALAPPDATA%\Programs\Python\Python310\python.exe --version

%LOCALAPPDATA%\Programs\Python\Python310\python.exe -m venv c:\Users\%username%\dev\python_venvs\cs444_venv

c:\Users\%username%\dev\python_venvs\cs444_venv\Scripts\activate.bat
- Install the packages you will need using the Python pip command.
python -m pip install --upgrade pip
curl -O https://w3.cs.jmu.edu/molloykp/teaching/cs444_s24/pas/workstationConfig/cs444Requirements.txt
python -m pip --require-virtualenv install -r cs444Requirements.txt
IDEs – Microsoft Visual Studio Code
I recommend using Microsoft’s Visual Studio Code. During the development process, you will need to run games that have graphical interfaces (like Pacman) or display/analyze plots created with matplotlib. Neither of these processes work well when using VSCode with remote-ssh. One reason this document was created is to enable you to have a local version of this environment to address this issue.
Configuring VSCode with multiple Python venvs has proven non-trivial for me.
To tell VSCode where to find my venvs, select Code-Preferences-Settings
from the menu, which presented the screen below. Navigate to extensions and
then Python.
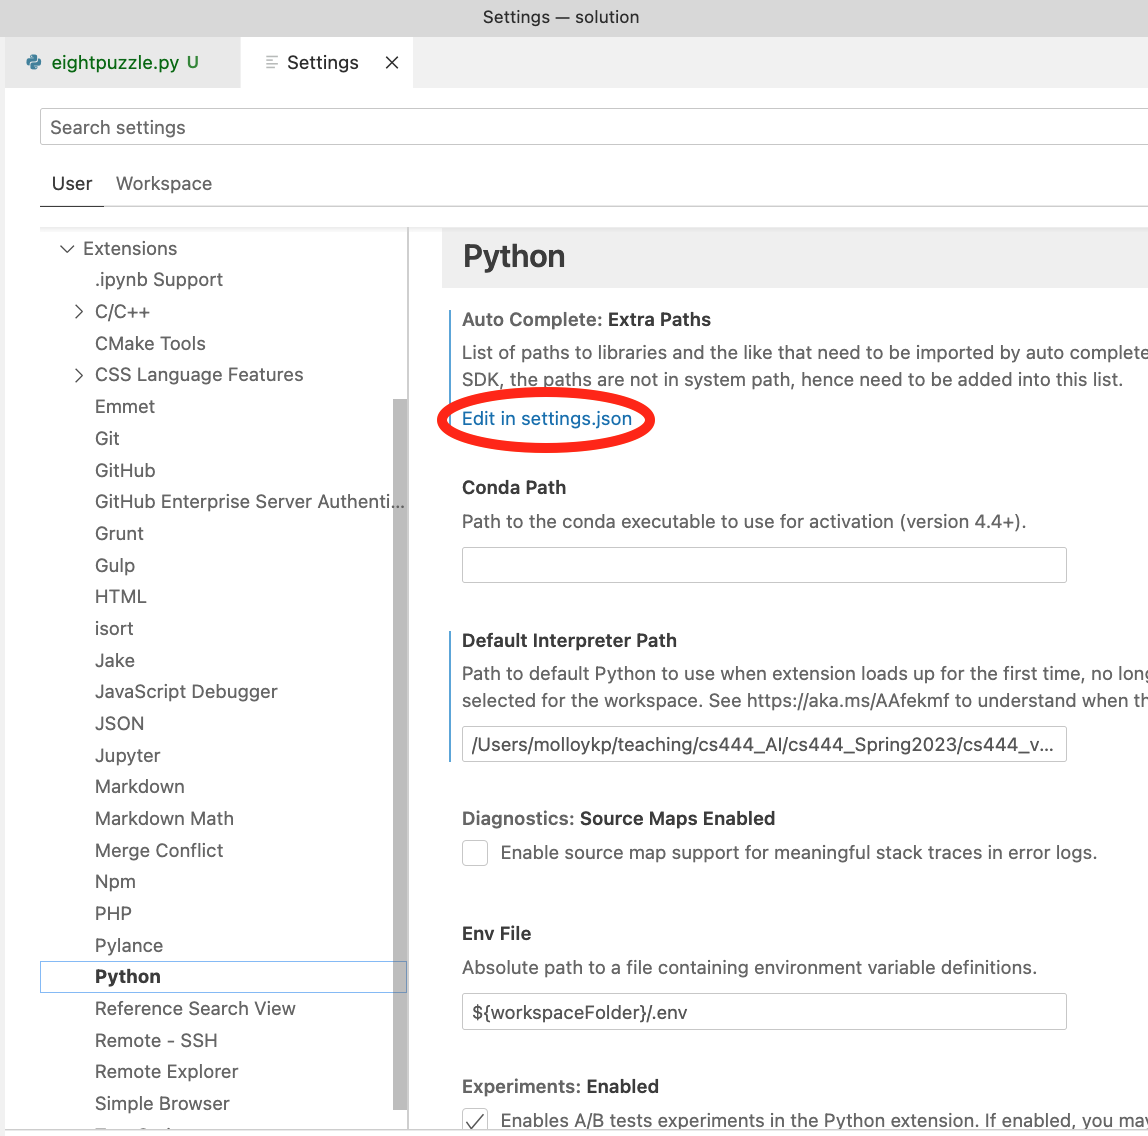
I then clicked on the edit in settings.json hyperlink (circled in red in the image above).
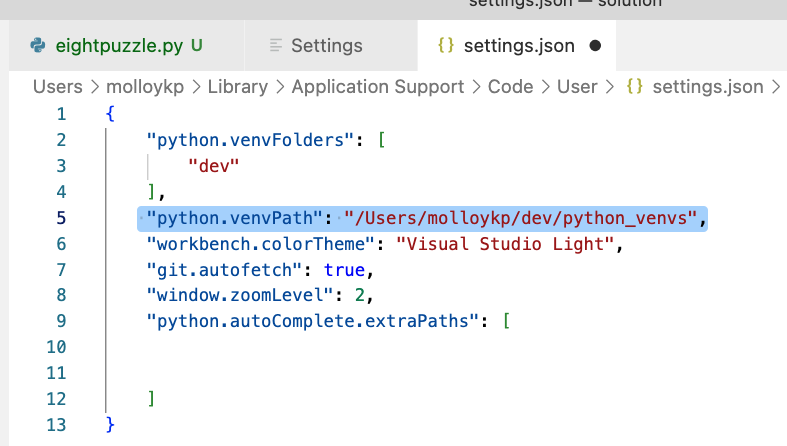
I then added the line that is highlighted in the image below, which
instructs VSCode which directory to look in for my venvs.
This document outlines
the setting of the vEnvPath setting in VSCode.
Edit any .py file now in VSCode. In the lower right corner, you should be
able to select your venv environment. If the correct one is not shown, click
on it and select it from the list that is presented. The image below shows my environment
with it set to the venv for cs444.

Task 2: Testing your Environment
To test your enviornment, unzip
workstationConfig.zip
.
If you are using VSCode, you can open the workstation folder this creates by
going to Open and then Open Folder.... From the terminal (either directly or from
within VSCode), run the pacman.py file as shown below.
python pacman.py
If all is well with your installation, a game of Pacman will start. Navigate pacman using the arrow keys on your keyboard.
Take a screen capture of pacman operating on your computer and name this
file pacman_capture.pdf. You will be uploading this file to Gradescope.
Task 3: Intro to Python Programming
Complete the one function in buyLotsOfFruit.py and another
function in shopSmart.py so that it
complies with its docstring (comment block after the function definition).
This code introduces you to the idea of dictionarys in Python (hashmaps) and also has you
write a simple for loop. Note: typically Python does not use
camel case and prefers that
underscores are used to separate out words, alas, some habits are hard to break.
Python utilizes docstrings for documentation (much like Java uses Javadoc).
Here are the
CS 149 instructions for docstrings
which may prove helpful in your Python programming career.
You can test your code by running buyLotsOfFruit_test.py file, which is included in the
Submission and Grading
Grading
| Project Part | Weight |
|---|---|
| Screen Capture | 52% |
| shopSmart.py | 24% |
| buyLotsOfFruit.py | 24% |
Submit the following items to gradescope.
- The screen capture of your workstation running the Pacman game and name this
file
pacman_capture.pdf. - Submit your completed
buyLotsOfFruit.pyfile. - Submit your completed
shopSmart.pyfile.