This is the multi-page printable view of this section. Click here to print.
Projects
1 - Project 1 - Workstation Configuration

Let’s get ready to code! To make sure we are ready for the labs and the projects for this class, let’s configure your workstation/environment with the required toolsets and construct a few small Python program.
We will test our configuration out using the Pacman game, which
was developed by Berkerly AI (http://ai.berkeley.edu).
Tasks
-
Install and/or verify that you have Python and the required packages on your computer. The recommended version is 3.10.9 and the minimum version is 3.8.10. Optionlly install an IDE for Python (highly recommended).
-
Download and run the Pacman game and take a screenshot to show that you workstation is properly configured.
-
Write a small Python program (see below).
Submit files to gradescope
Files
- Download
workstationConfig.zip
.
This file contains the many of the components for the Pacman game so you
can test that the game operates propertly on your workstation. It also contains
the
shopSmart.py(UNFINISHED) andbuyLotsOfFruit.py(UNFINISHED) files you will need to complete (plus a few support files).
Introduction
CS Lab Computers
All CS lab computes running Ubuntu have the required Python software and packages (imports) for this class. If you do not have a laptop that you can bring to class that supports the software and configuration described in this assignment, please contact me. Having a functional computer during class is a requirement of this class.
Unix/Mac versus Windows
Provided code for this class may occasionally contain UNIX/Mac specific shell scripts. Code for this class also utilizes GUIs, which typically do not run well under VMs.
If you are going to be running Windows, it is advised that you setup and configure the Windows Subsystem for Linux (WSL). Here are some instructions from Microsoft.
If you are going to run Windows, I will not be able to offer a lot of support (since I do not know Windows well nor do I use it). I can offer some basic support and also remind you that the CS lab computers will completely support this class.
Mac M1 (Apple Silicon)
Apple recently starting making Macintosh computers that utilize their own M1 and M2 chips. These chips have different instruction sets then their Intel predecessors, and thus, require new libraries and executables.
If you have one of these new Macs, make sure you are using Python 3.8.10, as earlier versions have a few relavaent bugs when running on the Apple(M series) chips. I recomend version 3.10.9 for this class (see notes on Python below).
Task 1: Install Python and Required Packages
Python 3.10.9 is recommended for this class (a minimum version of 3.8.10). You can download Python for Mac or Windows from python.org's Download page.
Virtual Environments with Python
Python supports its own idea of a virtual environment, which allows for sets of packages
to be managed independently from one another and without administrative rights on the computer
(which is more secure). You can create Python environments both using venv (Python’s tool) or
more advanced managers such as Conda. I prefer to keep it simple, so, I use venv.
Installing Python
-
Download a Python version (recommend 3.10.9) from python.org's Download page and install it (on a MAC, that means running the pkg file).
-
Make sure to run the
Install Certificates.commandby double clicking on this in Finder. You can find this by navigating to the Python folder under Applications.

Configuring a new VENV
-
Open a terminal window and navigate to a folder where you will create your virtual environment for this class. I use VSCode, which prefers to have all your python venvs located in the same folder, which for me is
/Users/molloykp/dev/python_venvs. For this class, I created a new venv folder under this named:/Users/molloykp/dev/python_venvs/cs444_2023Spring. If you are using MS Windows, create a folder somewhere under your account to serve the same purpose (your path will obviously be different). -
If you are using Ubuntu or a MAC, execute the following commands from the terminal window that has the directory you created in step 1 as your current working directory (verified below by
pwd):
pwd
python3.10 -V
python3.10 -m venv cs444_venv
source cs444_venv/bin/activate
- If you are using Windows (if you are not, skip this step), open a terminal and run these commands (leave the terminal open as you will need it for the next step).
%LOCALAPPDATA%\Programs\Python\Python310\python.exe --version

%LOCALAPPDATA%\Programs\Python\Python310\python.exe -m venv c:\Users\%username%\dev\python_venvs\cs444_venv

c:\Users\%username%\dev\python_venvs\cs444_venv\Scripts\activate.bat
- Install the packages you will need using the Python pip command.
python -m pip install --upgrade pip
curl -O https://w3.cs.jmu.edu/molloykp/teaching/cs444_s24/pas/workstationConfig/cs444Requirements.txt
python -m pip --require-virtualenv install -r cs444Requirements.txt
IDEs – Microsoft Visual Studio Code
I recommend using Microsoft’s Visual Studio Code. During the development process, you will need to run games that have graphical interfaces (like Pacman) or display/analyze plots created with matplotlib. Neither of these processes work well when using VSCode with remote-ssh. One reason this document was created is to enable you to have a local version of this environment to address this issue.
Configuring VSCode with multiple Python venvs has proven non-trivial for me.
To tell VSCode where to find my venvs, select Code-Preferences-Settings
from the menu, which presented the screen below. Navigate to extensions and
then Python.
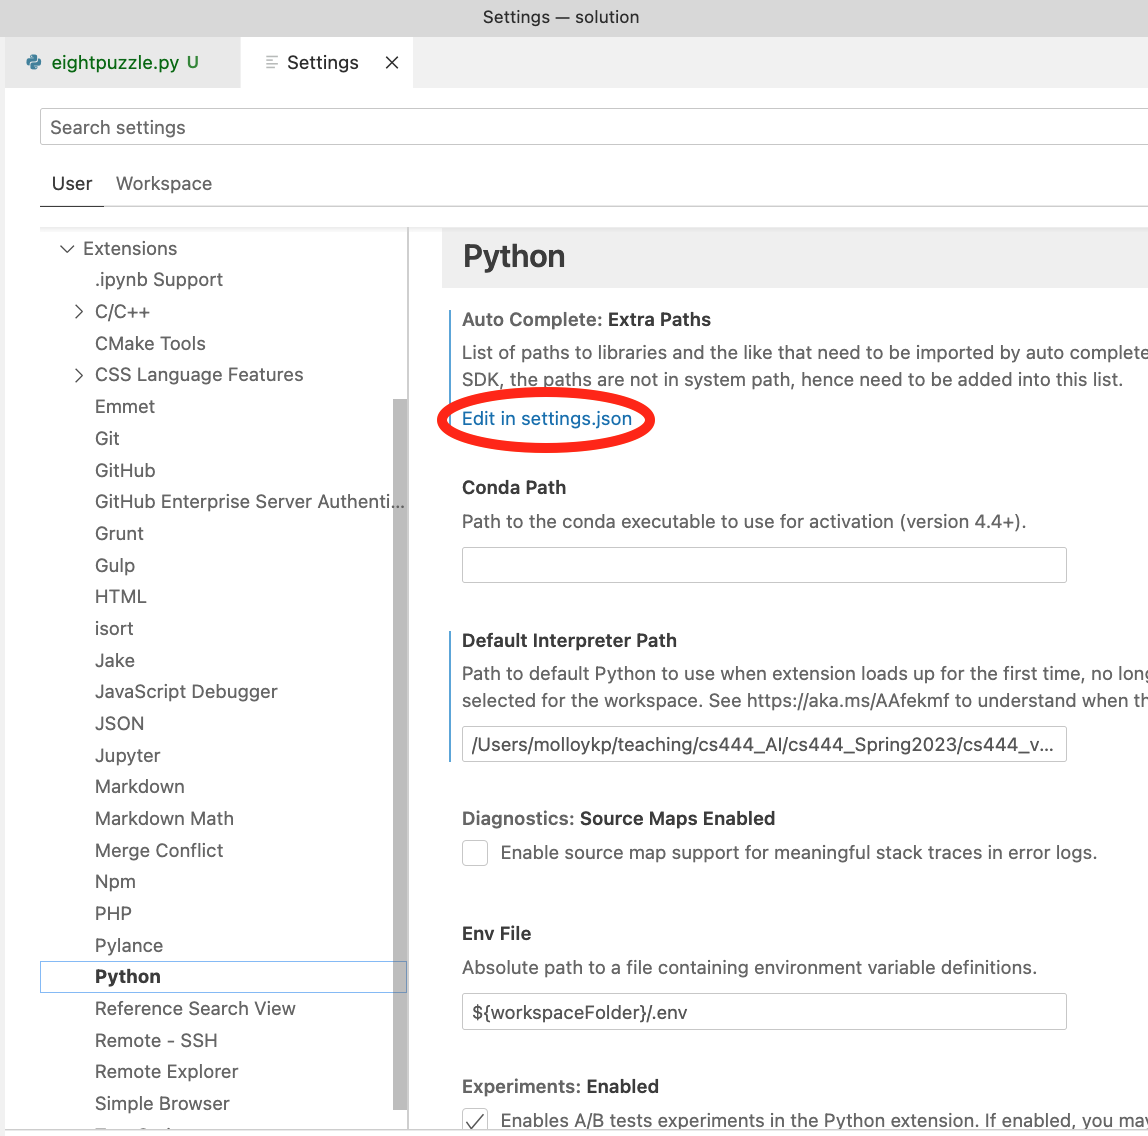
I then clicked on the edit in settings.json hyperlink (circled in red in the image above).
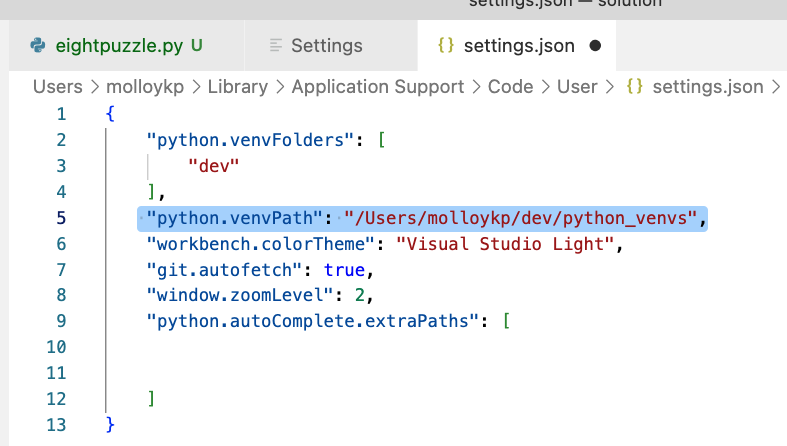
I then added the line that is highlighted in the image below, which
instructs VSCode which directory to look in for my venvs.
This document outlines
the setting of the vEnvPath setting in VSCode.
Edit any .py file now in VSCode. In the lower right corner, you should be
able to select your venv environment. If the correct one is not shown, click
on it and select it from the list that is presented. The image below shows my environment
with it set to the venv for cs444.

Task 2: Testing your Environment
To test your enviornment, unzip
workstationConfig.zip
.
If you are using VSCode, you can open the workstation folder this creates by
going to Open and then Open Folder.... From the terminal (either directly or from
within VSCode), run the pacman.py file as shown below.
python pacman.py
If all is well with your installation, a game of Pacman will start. Navigate pacman using the arrow keys on your keyboard.
Take a screen capture of pacman operating on your computer and name this
file pacman_capture.pdf. You will be uploading this file to Gradescope.
Task 3: Intro to Python Programming
Complete the one function in buyLotsOfFruit.py and another
function in shopSmart.py so that it
complies with its docstring (comment block after the function definition).
This code introduces you to the idea of dictionarys in Python (hashmaps) and also has you
write a simple for loop. Note: typically Python does not use
camel case and prefers that
underscores are used to separate out words, alas, some habits are hard to break.
Python utilizes docstrings for documentation (much like Java uses Javadoc).
Here are the
CS 149 instructions for docstrings
which may prove helpful in your Python programming career.
You can test your code by running buyLotsOfFruit_test.py file, which is included in the
Submission and Grading
Grading
| Project Part | Weight |
|---|---|
| Screen Capture | 52% |
| shopSmart.py | 24% |
| buyLotsOfFruit.py | 24% |
Submit the following items to gradescope.
- The screen capture of your workstation running the Pacman game and name this
file
pacman_capture.pdf. - Submit your completed
buyLotsOfFruit.pyfile. - Submit your completed
shopSmart.pyfile.
2 - Project 2 - Paths for Pacman
In this assignment, you will utilize the graph search methods developed in Lab 1 and Lab 2 within the Pacman game. The basis for this game and the course code for the game itself were developed by Berkerly AI (http://ai.berkeley.edu).
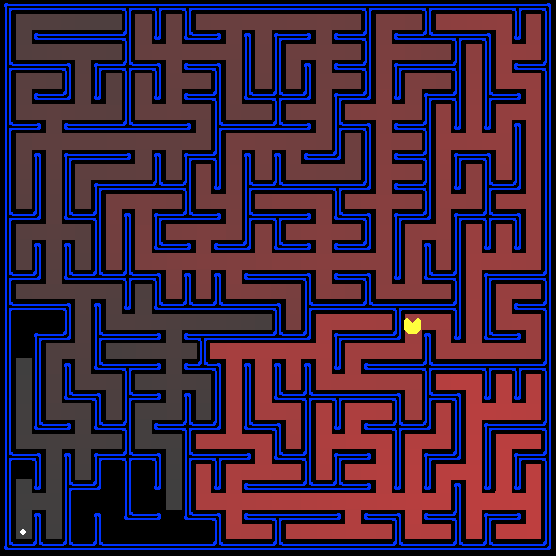
Pacman Maze
Tasks
-
Create a new directory and copy over all files (and subdirectories) from your completed Informed Search lab .
-
Complete the programming tasks below (tasks 1 - 4). Each task has tests cases to help verify your code.
-
Submit your code to Gradescope.
-
We will have a post-project discussion where you may be called upon to explain your heuristics and code in class or to me.
Task 1 Finding All Corners with Breadth First Search
The corner mazes problems consists of a food pellet in each corner
of the maze.
Our new search problem is to find the shortest path through
the maze that touches all four corners (whether the maze actually
has food there or not). Note that for some mazes like tinyCorners,
the shortest path does not always go to the closest food dot first!
Note: the shortest path through tinyCorners takes 28 steps.
Your task is to complete the CornersProblem search problem/class
in searchAgents.py.
You will need to create a state representation that
encodes all the information necessary to detect whether all
four corners have been reached. To receive full credit, you
must define an abstract state representation that does not encode
irrelevant information (like the position of ghosts, where extra
food is, etc.). In particular, do not use a Pacman
GameState as a search state. Your code will be very,
very slow if you do (and also incorrect).
Hints
-
As discussed in class, list the items that you need to track in order to solve this problem. These are the only items you should track in your state variables.
-
You can augment the constructor (
__init__) function to create instance variables. In Python, instance variables are always prefixed with self. -
When coding
isGoalState, ask yourself what consistutes a goal state (when the game can end). -
When coding
getSuccessorsmethod inside theCornersProblemclass you can directly copy the example code to detect walls/legal moves (this is commented out immediately before the for loop). The work you need to do in this function is to consider if the proposed action modifies the game’s state, and if it does, update the state that is returned bygetSuccessorsfor that action.
Your search agent should solve these problem instances:
python pacman.py -l tinyCorners -p SearchAgent -a fn=bfs,prob=CornersProblem
python pacman.py -l mediumCorners -p SearchAgent -a fn=bfs,prob=CornersProblem
Expect breadthFirstSearch to expand just under 2000 search nodes on mediumCorners. However, heuristics (used with A* search) can reduce the amount of searching required (see the next task).
You can test your code against the same tests as Gradescope using the following command:
python autograder.py -q q5
Task 2 Corners Problem Heuristic
The real power of A* becomes more apparent on more challenging search
problems. Now, it’s time to design a heuristic for the CornersProblem.
Implement a non-trivial, consistent heuristic
in the cornersHeuristic function within the searchAgents.py file.
The function as provided just returns zero (and thus, the examples
below will complete, but with a good heuristic you can reduce the
number of expanded states).
python pacman.py -l mediumCorners -p AStarCornersAgent -z 0.5
Note: AStarCornersAgent is a shortcut for
-p SearchAgent -a fn=aStarSearch,prob=CornersProblem,heuristic=cornersHeuristic
Admissibility vs. Consistency: Remember, heuristics are just functions that take a problem state and return an estimate of the cost(a number) to the nearest goal. More effective heuristics will return values closer to the actual goal costs. To be admissible, the heuristic values must be a lower bounds on the actual shortest path cost to the nearest goal (and non-negative). To be consistent, it must additionally hold that if an action has cost c, then taking that action can only cause a decrease in the heuristic value h(x) of at most c.
Remember that admissibility isn’t enough to guarantee correctness in graph search – you need the stronger condition of consistency. However, admissible heuristics are usually also consistent, especially if they are derived from problem relaxations. Therefore it is usually easiest to start out by brainstorming admissible heuristics. Once you have an admissible heuristic that works well, you can check whether it is indeed consistent, too. The only way to guarantee consistency is with a proof. However, inconsistency can often be detected by verifying that for each node you expand, its successor nodes are equal or higher in in f-value. Moreover, if UCS and A* ever return paths of different lengths, your heuristic is inconsistent. This stuff is tricky!
Non-Trivial Heuristics: The trivial heuristics are the ones that return zero everywhere (UCS) and the optimal heuristic computes the true remaining cost. The former won’t save you any time, while the latter will timeout the autograder. You want a heuristic which reduces total compute time, though for this assignment the autograder will only check node counts (aside from enforcing a reasonable time limit).
Grading: Your heuristic must be a non-trivial non-negative consistent heuristic to receive any points. Make sure that your heuristic returns 0 at every goal state and never returns a negative value. Depending on how few nodes your heuristic expands, you’ll be graded:
| Nodes Expanded | Points |
|---|---|
| > 2000 | 10/25 |
| > 1601 and <= 2000 | 15/25 |
| > 1201 and <= 1600 | 20/25 |
| <= 1200 | 25/25 |
Remember If you heuristic is inconsistent or not admissible, you will receive no credit.
You can test your code against the same tests as Gradescope using the following command:
python autograder.py -q q6
Task 3 Eat All the Dots Heuristic
This problem asks for a plan where Pacman eats all the food (dots) in as few steps as possible.
A new search problem definition which formalizes the food-clearing problem
named FoodSearchProblem is already implemented for you in searchAgents.py.
A solution is defined to be a path that collects all of the food in the
Pacman world. For the present project, solutions do not take into account
any ghosts or power pellets; solutions only depend on the placement of
walls, regular food and Pacman. Of course ghosts can ruin the execution of
a solution! We’ll get to that in the next project.
If you have written your
general search methods correctly, you can use A* with a null heuristic (equivalent to
uniform-cost search) to quickly find an optimal solution to the testSearch
problem (should return a cost of 7):
python pacman.py -l testSearch -p AStarFoodSearchAgent
UCS starts to slow down even for the seemingly simple tinySearch (to
run this test, in the command above replace testSearch with tinySearch).
As a reference, my implementation takes 2.5 seconds to find a path of
length 27 after expanding 5057 search nodes. I gave up waiting
on the mediumSearch problem (I waited more than 4 hours).
You should try the tinySearch and verify you get similar numbers.
Your job in Task 3 is to complete the foodHeuristic function within searchAgents.py.
Your heuristic must be admissible and consistent. Try your UCS agent on
the trickySearch board:
python pacman.py -l trickySearch -p SearchAgent -a fn=astar,prob=FoodSearchProblem,heuristic=nullHeuristic
Mine takes about 20 seconds to run and expands 16668 nodes.
A few notes on heuristic development:
- any non-trivial non-negative consistent heuristic will receive 1 point.
- make sure your heuristic returns 0 when at a goal state.
- your score for this part of the PA will depend on the number of nodes expanded
To test your foodHeuristic on the trickySearch board, you can use
the following command:
python pacman.py -l trickySearch -p SearchAgent -a fn=astar,prob=FoodSearchProblem,heuristic=foodHeuristic
Your score for this section will be based on the number of expand operations and is outlined in the following table:
| Nodes Expanded | Points |
|---|---|
| expands > 15000 | 10/25 |
| 12000 < expands <= 15000 | 15/25 |
| 9000 < expands <= 12000 | 20/25 |
| 7000 < expands <= 9000 | 25/25 |
| expands <= 7000 | 30/25 |
You can test your code against the same tests as Gradescope using the following command:
python autograder.py -q q7
Task 4 An Approximation of Eat All the Food
Sometimes, even with A* and a good heuristic, finding the optimal path through all the dots is hard (think of the mediumSearch problem from Task 3). In these cases, we would still like to find a reasonably good path and quickly.
In this task, you’ll write an agent that greedily eats the closest dot.
The ClosestDotSearchAgent class is implemented for you in searchAgents.py,
but it’s missing a key function that finds a path to the closest dot.
Implement the function findPathToClosestDot in searchAgents.py. Your
agent should be able to solve this maze (suboptimally!) in under a second with a path cost of 350.
Hints:
-
The quickest way to complete
findPathToClosestDotis to create anAnyFoodSearchProblem. This problem is completed for you EXCEPT for the goal test. Then, solve this problem using one of your already completed and appropriate search functions. -
Notice that
AnyFoodSearchProblemdoes not take a goal state in its constructor. This is ON PURPOSE. Think of a way you can writeisGoalStatewithout an explicit goal state.
The solution should be very short!
Your ClosestDotSearchAgent won’t always find the shortest possible
path through the maze. Make sure you understand why and try to come
up with a small example where repeatedly going to the closest dot
does not result in finding the shortest path for eating all the dots.
Here are some examples you can use to test your methods.
python pacman.py -l mediumSearch -p ClosestDotSearchAgent -z .5 --frameTime 0.07
python pacman.py -l bigSearch -p ClosestDotSearchAgent -z .5 --frameTime 0.06
You can use this command to run the autograder for this task:
python autograder.py -q q8
Submission and Grading
You should never start design or construction until you completely understand the project.
You should start by carefully reading the project specifications. (In general it is a good idea to print a paper copy so that you can take notes and perform calculations as you read.)
Complete the tasks in the order specified (as sometimes one task depends on the prior tasks) and submit them to gradescope.
You are not required to submit tests cases for these classes. Submit the following files:
- search.py
- searchAgents.py
Your grade will be computed as follows:
| Project Part | Weight |
|---|---|
| Task 1 | 25% |
| Task 2 | 25% |
| Task 3 | 25% |
| Task 4 | 20% |
| Quality | 5% |
The code quality grade will be based on such things as:
- Comment clarity
- Code clarity (including variable names)
- Code duplication
- Elegance
- Acknowledgements (as appropriate)
You may submit to Gradescope an unlimited number of times.
3 - Project 3 - Pacman with Ghosts
In this project, you will design agents for the classic version of Pacman. The basis for this game and the course code for the game itself were developed by Berkerly AI (http://ai.berkeley.edu). The code base has not changed much from the previous project, but please start with a fresh installation, rather than intermingling files from PA 1.
As in PA 1, this project includes an autograder for you to grade your answers on your machine.
Tasks
-
Download pacmanMultiagent.zip file and unzip it in a directory.
-
Complete the programming tasks below (questions 1 - 3).
-
Submit your assignment to Gradescope.
NOTE You do not need to complete the betterEvaluationFunction at this time (it
is NOT part of this PA).
Question 1 Minimax
Write an adversarial search agent in the provided MinimaxAgent class
stub in multiAgents.py. Your minimax agent should work with any
number of ghosts, so you’ll have to write an algorithm that is
slightly more general than what you’ve previously seen in lecture. In particular,
your minimax tree will have multiple min layers (one for each ghost)
for each max layer.
Your code should also expand the game tree to an arbitrary depth. Score the leaves
of your minimax tree with the supplied self.evaluationFunction,
which defaults to scoreEvaluationFunction. MinimaxAgent extends
MultiAgentSearchAgent, which gives access to
self.depth and self.evaluationFunction.
Make sure your minimax code makes reference to and respects to
these two variables where appropriate
as these variables are populated in response to command line options.
Important: A single search ply is considered to be one Pacman move and all the ghosts’ getting a single move. So, a depth 2 search gives Pacman and each ghost two moves each. While this seems to differ from the definition of ply given in the reading, the fact that Pacman and the ghosts each move in one time step hopefully clarifies why this is considered a single ply.
Grading: Your code will be checked to determine whether it explores
the correct number of game states. This is the only reliable way to
detect some very subtle bugs in implementations of minimax. As a result,
the autograder will be very picky about how many times you call
GameState.generateSuccessor. If you call it any more or less than necessary, the autograder will complain. To test and debug your code, run:
python autograder.py -q q1
This will show what your algorithm does on a number of small trees, as well as a pacman game. To run it without graphics, use:
python autograder.py -q q1 --no-graphics
Hints and Observations
- Implement the algorithm recursively using helper function(s).
- The correct implementation of minimax will lead to Pacman losing the game in some tests. This is not a problem: as it is correct behaviour, it will pass the tests.
- The evaluation function for the Pacman test in this part is already written (self.evaluationFunction). You shouldn’t change this function, but recognize that now we’re evaluating states rather than actions, as we were for the reflex agent. Look-ahead agents evaluate future states whereas reflex agents evaluate actions from the current state.
- The minimax values of the initial state in the
minimaxClassiclayout are 9, 8, 7, -492 for depths 1, 2, 3 and 4 respectively. Note that your minimax agent will often win (665/1000 games for us) despite the dire prediction of depth 4 minimax.
python pacman.py -p MinimaxAgent -l minimaxClassic -a depth=4
-
Pacman is always agent 0, and the agents move in order of increasing agent index.
-
All states in minimax should be
GameStates, either passed in togetActionor generated viaGameState.generateSuccessor. In this project, you will not be abstracting to simplified states. -
On larger boards such as openClassic and mediumClassic (the default), you’ll find Pacman to be good at not dying, but quite bad at winning. He’ll often thrash around without making progress. He might even thrash around right next to a dot without eating it because he doesn’t know where he’d go after eating that dot. Don’t worry if you see this behavior, question 5 will clean up all of these issues.
-
When Pacman believes that his death is unavoidable, he will try to end the game as soon as possible because of the constant penalty for living. Sometimes, this is the wrong thing to do with random ghosts, but minimax agents always assume the worst:
python pacman.py -p MinimaxAgent -l trappedClassic -a depth=3
Make sure you understand why Pacman rushes the closest ghost in this case.
Question 2 Alpha-Beta Pruning
Make a new agent that uses alpha-beta pruning to more efficiently
explore the minimax tree, in AlphaBetaAgent. Again, your algorithm
will be slightly more general than the pseudocode from lecture, so
part of the challenge is to extend the alpha-beta pruning logic
appropriately to multiple minimizer agents.
You should see a speed-up (perhaps depth 3 alpha-beta will run
as fast as depth 2 minimax). Ideally, depth 3 on smallClassic
should run in just a few seconds per move or faster.
python pacman.py -p AlphaBetaAgent -a depth=3 -l smallClassic
The AlphaBetaAgent minimax values should be identical to the
MinimaxAgent minimax values, although the actions it selects can
vary because of different tie-breaking behavior. Again, the minimax
values of the initial state in the minimaxClassic layout
are 9, 8, 7 and -492 for depths 1, 2, 3 and 4 respectively.
Grading: Because we check your code to determine whether it explores the correct number of states, it is important that you perform alpha-beta pruning without reordering children. In other words, successor states should always be processed in the order returned by GameState.getLegalActions. Again, do not call GameState.generateSuccessor more than necessary.
You must not prune on equality in order to match the set of states explored by the autograder. (Indeed, alternatively, but incompatible with our autograder, would be to also allow for pruning on equality and invoke alpha-beta once on each child of the root node, but this will not match the autograder.)
The pseudo-code below represents the algorithm you should implement for this question.

python autograder.py -q q2
This will show what your algorithm does on a number of small trees, as well as a pacman game. To run it without graphics, use:
python autograder.py -q q2 --no-graphics
Question 3 Expectimax
Minimax and alpha-beta are great, but they both assume that you are playing against an adversary who makes optimal decisions. As anyone who has ever won tic-tac-toe can tell you, this is not always the case. In this question you will implement the ExpectimaxAgent, which is useful for modeling probabilistic behavior of agents who may make suboptimal choices.
As with the search algorithms covered so far in this class, the beauty of these algorithms is their general applicability. To expedite your own development, we’ve supplied some test cases based on generic trees. You can debug your implementation on the small game trees using the command:
python autograder.py -q q3
Debugging on these small and manageable test cases is recommended and will help you to find bugs quickly.
Once your algorithm is working on small trees, you can observe its success in Pacman.
Random ghosts are of course not optimal minimax agents, and so modeling them with minimax
search may not be appropriate. Rather than taking the min over all ghost actions,
the ExpectimaxAgent will take the expectation according to your agent’s model of
how the ghosts act. To simplify your code, assume you will only be running against
an adversary that chooses among its getLegalActions uniformly at random.
To see how the ExpectimaxAgent behaves in Pacman, run:
python pacman.py -p ExpectimaxAgent -l minimaxClassic -a depth=3
You should now observe a more cavalier approach in close quarters with ghosts. In particular, if Pacman perceives that he could be trapped but might escape to grab a few more pieces of food, he’ll at least try. Investigate the results of these two scenarios:
python pacman.py -p AlphaBetaAgent -l trappedClassic -a depth=3 -q -n 10
python pacman.py -p AlphaBetaAgent -l trappedClassic -a depth=3 -q -n 10
You should find that your ExpectimaxAgent wins about half the time, while your AlphaBetaAgent always loses. Make sure you understand why the behavior here differs from the minimax case.
The correct implementation of expectimax will lead to Pacman losing some of the tests. This is not a problem: as it is correct behavior, it will pass the tests.
Submission and Grading
You should never start design or construction until you completely understand the project.
You should start by carefully reading the project specifications. (In general it is a good idea to print a paper copy so that you can take notes and perform calculations as you read.)
Implement all of the classes (in accordance with the specifications, perhaps informed by the implementation hints above) and submit them to gradescope.
You are not required to submit test cases for these classes but it is strongly recommended to use the small test cases and in the event you need help, showcase one of these tests failing and where in the test you receive the unexpected/incorrect results.
| Project Part | Points |
|---|---|
| Q1 (Minimax) | 30 |
| Q2 (Alpha Beta Pruning) | 30 |
| Q3 (Expectimax) | 30 |
| Instructor Points | 10 |
Make sure that your code:
- contains comments that provide clarity
- has meaningful variable names
- Acknowledgements and honor code statement (as appropriate)
You may submit to Gradescope an unlimited number of times.
4 - Project 4 - QLearning
Gridworld

Introduction
In this lab, you will construct the code to qlearning and utilize epsilon greedy within this framework. The basis for lab were developed as part of the Berkerly AI (http://ai.berkeley.edu) project.
Files
The value iteration agent that you implemented in the last PA does not actually learn from experience. Rather, it ponders its MDP model to arrive at a complete policy before interacting with a real environment. When it does interact with the environment, it simply follows the precomputed policy (e.g. it becomes a reflex agent). This distinction may be subtle in a simulated environment like a Gridword, but it’s very important in the real world, where the real MDP T and R functions are not available.
Part 1: QLearning
You will now write a Q-learning agent, which does very little on construction,
The agent instead learns by trial and error from interactions with the environment through its
update(state, action, nextState, reward) function.
A stub of a Q-learner is specified in QLearningAgent in qlearningAgents.py. When you
run the model you can select it with the option -a q.
For this portion of the assignment, you must implement the following functions
within qlearningAgents.py:
- init (init some class variables that you might need)
- update
- computeValueFromQValues
- getQValue
- computeActionFromQValues
Note: For computeActionFromQValues, you should break ties randomly for better behavior.
The random.choice() function will help. In a particular state, actions that your agent hasn’t seen
before still have a Q-value, specifically a Q-value of zero, and if all of the actions that your agent has seen before have a negative Q-value, an unseen action may be optimal.
With the Q-learning update in place, you can watch your Q-learner learn under manual control, using the keyboard:
python gridworld.py -a q -k 5 -m
Recall that -k will control the number of episodes your agent gets during the learning phase.
Watch how the agent learns about the state it was just in, not the one it moves to, and “leaves learning in its wake.”
Hint: to help with debugging, you can turn off noise by using the –noise 0.0 parameter (though this obviously makes Q-learning less interesting). If you manually steer the Gridworld agent north and then east along the optimal path for 5 episodes using the following command (with no noise), you should see the following Q-values:
python gridworld.py -a q -k 5 -m --noise 0.0
Grading: We will run your Q-learning agent and check that it learns the same Q-values and policy as our reference implementation when each is presented with the same set of examples. To grade your implementation, run the autograder:
python autograder.py -q q1
Part 2: Epsilon Greedy
Complete your Q-learning agent by implementing the epsilon-greedy action selection technique in the getAction function. Your agent will choose random actions an epsilon fraction of the time, and follows its current best Q-values otherwise. Note that choosing a random action may result in choosing the best action - that is, you should not choose a random sub-optimal action, but rather any random legal action.
For this portion of the assignment, you must implement/augment the following function:
- getAction Implements Epsilon greedy.
HINTS:
- In python, You can choose an element from a list uniformly at random by calling the random.choice function.
- You can simulate a binary variable with probability p of success by using util.flipCoin(p), which returns True with probability p and False with probability 1-p.
After implementing the getAction method, observe the following behavior of the agent in gridworld (with epsilon = 0.3).
python gridworld.py -a q -k 100
Your final Q-values should resemble those from your value iteration agent (Lab9), especially along well-traveled paths. However, your average returns will be lower than the Q-values predict because of the random actions and the initial learning phase.
You can also observe the following simulations for different epsilon values. Does that behavior of the agent match what you expect?
python gridworld.py -a q -k 100 --noise 0.0 -e 0.1
python gridworld.py -a q -k 100 --noise 0.0 -e 0.9
To test your implementation, run the autograder:
python autograder.py -q q2
Working with the Crawler
If your eplison grredy code is working, you can run the crawler simulation shown in class.
python crawler.py
If this doesn’t work, you’ve probably written some code too specific to the GridWorld problem and you should make it more general to all MDPs.
This command above invokes the crawling robot from class using your Q-learner. Play around with the various learning parameters to see how they affect the agent’s policies and actions. Note that the step delay is a parameter of the simulation, whereas the learning rate and epsilon are parameters of your learning algorithm, and the discount factor is a property of the environment.
Crawler Report
Create a report that showcases the following items:
- How many steps did it take for your crawler to function (that is, crawl well)
- what values did you use for the eps, learning rate parameters. How/when/why did you change them during the simulation.
Part 3: Having Fun With Pacman (Optional)
Time to play some Pacman! Pacman will play games in two phases. In the first phase, training, Pacman will begin to learn about the values of positions and actions. Because it takes a very long time to learn accurate Q-values even for tiny grids, Pacman’s training games run in quiet mode by default, with no GUI (or console) display. Once Pacman’s training is complete, he will enter testing mode. When testing, Pacman’s self.epsilon and self.alpha will be set to 0.0, effectively stopping Q-learning and disabling exploration, in order to allow Pacman to exploit his learned policy. Test games are shown in the GUI by default. Without any code changes you should be able to run Q-learning Pacman for very tiny grids as follows:
python pacman.py -p PacmanQAgent -x 2000 -n 2010 -l smallGrid
Note that PacmanQAgent is already defined for you in terms of the QLearningAgent
you’ve already written. PacmanQAgent is only different in that it has default learning
parameters that are more effective for the Pacman problem (epsilon=0.05, alpha=0.2, gamma=0.8).
You will receive full credit for this question if the command above works without exceptions and your agent wins at least 80% of the time. The autograder will run 100 test games after the 2000 training games.
Hint: If your QLearningAgent works for gridworld.py and crawler.py but
does not seem to be learning a good policy for Pacman on smallGrid, it may be because your
getAction and/or computeActionFromQValues methods do not in some cases properly consider unseen actions.
In particular, because unseen actions have by definition a Q-value of zero, if all of the
actions that have been seen have negative Q-values, an unseen action may be optimal.
Beware of the argmax function from util.Counter!
Note: If you want to experiment with learning parameters, you can use the option -a, for example -a epsilon=0.1,alpha=0.3,gamma=0.7. These values will then be accessible as self.epsilon, self.gamma and self.alpha inside the agent.
Note: While a total of 2010 games will be played, the first 2000 games will not be displayed
because of the option -x 2000, which designates the first 2000 games for training (no output). Thus, you will only see Pacman play the last 10 of these games. The number of training games is also passed to your agent as the option numTraining.
Note: If you want to watch 10 training games to see what’s going on, use the command:
python pacman.py -p PacmanQAgent -n 10 -l smallGrid -a numTraining=10
During training, you will see output every 100 games with statistics about how Pacman is faring. Epsilon is positive during training, so Pacman will play poorly even after having learned a good policy: this is because he occasionally makes a random exploratory move into a ghost. As a benchmark, it should take between 1000 and 1400 games before Pacman’s rewards for a 100 episode segment becomes positive, reflecting that he’s started winning more than losing. By the end of training, it should remain positive and be fairly high (between 100 and 350).
Make sure you understand what is happening here: the MDP state is the exact board configuration facing Pacman, with the now complex transitions describing an entire ply of change to that state. The intermediate game configurations in which Pacman has moved but the ghosts have not replied are not MDP states, but are bundled in to the transitions.
Once Pacman is done training, he should win very reliably in test games (at least 90% of the time), since now he is exploiting his learned policy.
However, you will find that training the same agent on the seemingly simple mediumGrid does not work well. In our implementation, Pacman’s average training rewards remain negative throughout training. At test time, he plays badly, probably losing all of his test games. Training will also take a long time, despite its ineffectiveness.
Pacman fails to win on larger layouts because each board configuration is a separate state with separate Q-values. He has no way to generalize that running into a ghost is bad for all positions. Obviously, this approach will not scale.
To test your implementation, run the autograder:
python autograder.py -q q3
Testing Your Code
You can test your implementation using manually driving around your agent commands from above and also using the following autograder command:
python autograder.py -q q1
python autograder.py -q q2
Part 3 is optional and is not graded.
Submission
Turn in the following items into Gradescope:
qlearningAgents.py- Craweler_report.pdf
Grading:
| Project Part | Points |
|---|---|
| Autograder score | 20 |
| Crawler Report | 4 |
| Instructor review | 1 |