Project 2: Mini-ELF loader
This project is based on a project originally written by Dr. Michael Kirkpatrick.
This project serves as an expansion of the Mini-ELF utility from the first project, and the goal is to reinforce the relationship between a compiled executable and the standard Linux/C memory model.
In this project, you will continue reading data from the Mini-ELF file by first loading the program headers and then loading segments of the file into a large virtual memory array.
For generic project instructions, refer to the project guide.
Here is the path to the starter tarball file on stu:
/cs/students/cs261/f22/p2-load.tar.gz
The project distribution contains a compiled solution to Project 1 (i.e., p1-check.o). If your Project 1 submission passed all of the tests for that project, you may choose to remove this file (save it somewhere else first!) and copy your p1-check.c into the folder, modifying the makefile appropriately (i.e., move p1-check.o from OBJS to MODS). This will give you better debug information by compiling with your solution rather than my precompiled (and stripped) solution. If you're not happy with your P1 solution, just ignore this. Also, if you do use your P1 solution, I highly recommend testing without it before you submit just to make sure that you haven't made any incorrect assumptions that were not exposed by the P1 test suite. Be sure to run "make clean" to clear out any old .o files before you test.
Mini-ELF, program headers, and Y86 virtual memory
As in the previous project, you will be working with a binary file using the Mini-ELF structure. In the previous project, you read the first 16 bytes as a header. In this project, you will read in addditional program headers based on the information from the header, and then you will use the information in those program headers to load in segments of the file into memory. When you are done, the program will be fully loaded and ready for disassembly and execution.
Specifically, the hdr.e_num_phdr field tells you how many program headers you have and the hdr.e_phdr_start tells you the byte offset into the file where the program headers start. You will need to seek to this file location (fseek() may be useful here) and read the headers into a elf_phdr_t struct.
The purpose of the program headers is to provide information on how to map the contents of the file to memory when running the program. Each header will have information on a single memory segment, including an offset, a size, a virtual address, a type, flags, and a magic number). The offset refers to the byte location in the file where that data exists. The size is the number of bytes in the segment. The virtual address is where the data will be loaded into your simulated memory space (see below). Read the new information in the expanded elf.h carefully for more information and descriptions of the other fields.
The actual loading of a program header should be implemented in the read_phdr function. Note that this function reads in a single program header but Mini-ELF files may have multiple program headers. Therefore, you will need to create an array of them in your main function and call read_phdr multiple times. The dump_phdrs function should print the full array of program headers.
In the remainder of these projects, we will be simulating a 64-bit architecture called Y86. However, we will not simulate a full 64-bit address space because that much space would be excessive for our purposes. Rather, we will use a memory space with the size is determined by a constant called MEMSIZE. This constant is defined in y86.h to have a value of 0x1000, which in decimal is 4096 (so 4KB).
In your main module, you should simulate this memory by allocating space on the heap for virtual memory. We have provided the byte_t type (declared in y86.h) that we recommend using to store a pointer to your memory block (recall that memory is just an array of bytes). If you have a byte pointer, you can use standard array accessing (e.g., if mem is a byte_t* then you can use mem[8] to access the byte at address 8). For consistency and easier debugging, you should initialize this block of memory to all zeroes.
After you have read in the program headers as described above, you will need to use the information in those headers to read code and data from the file into your virtual memory array. The actual loading should be implemented in the load_segment function, which you should call once for each segment in your main module. The corresponding output function is dump_memory, which should print the bytes in a specified region of the virtual memory.
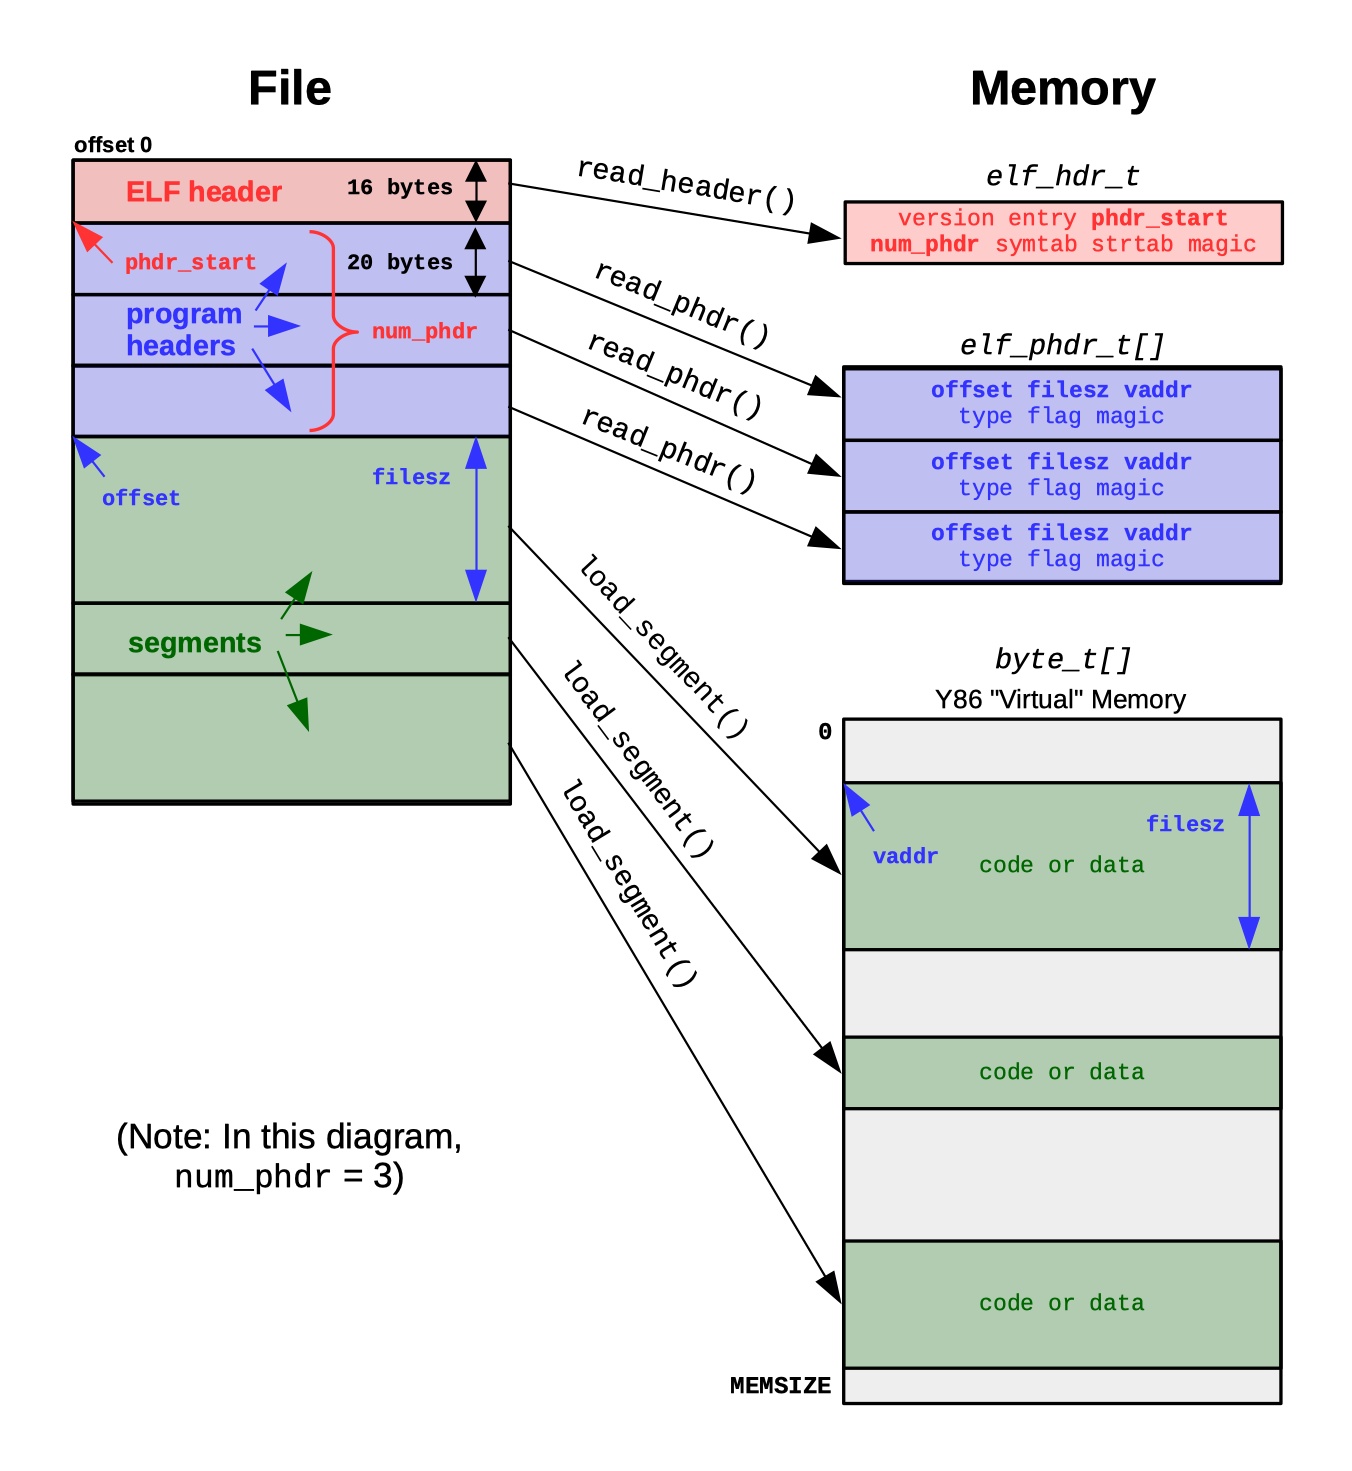
Here is an overview diagram of the Mini-ELF format, showing all headers and segment information (including the main ELF header, which you loaded in P1):
Unit requirements
Here are the required functions that you must implement in p2-load.c. We will use unit tests to exercise this portion of your submission.
- bool read_phdr (FILE *file, uint16_t offset, elf_phdr_t *phdr);
Read a Mini-ELF program header from file into the space pointed to by phdr, starting from byte offset in the file. If the reading fails or it is not a valid program header (e.g., the magic number is incorrect), return false. - bool load_segment (FILE *file, byte_t *memory, elf_phdr_t phdr);
Read data from the file into an address space beginning at memory based on the program header phdr. Note that memory should be a pointer to the beginning of the address space, not the actual location where the segment should go (which can be accessed inside load_segment via phdr). Note also that there could be zero-byte segments; for such segments there is no need to actually read anything from the file. This function should also reject unknown segment types and any segment that would write past the end of virtual memory.
WARNING: To ensure your solution's compatibility with future projects, you should NOT print anything to standard output in these functions.
Recommended functions
We recommend writing the following functions as helpers for your main routine, but they are not required and thus are not covered by unit tests. You may add these to either main.c or p2-load.c, but we recommend the latter. In future projects, we will provide compiled implementations of these functions in p2-load.o.
- bool parse_command_line_p2 (int argc, char **argv, bool *print_header,
bool *print_segments, bool *print_membrief, bool *print_memfull,
char **filename);
As in Project 1, set the boolean pointed to by the parameter print_header to true if the -H option is passed. Additionally, set the boolean pointed to by print_segments to true if -s was passed. Set print_membrief or print_memfull to true based on whether -m or -M was passed; it is invalid to pass both. If the command line is invalid, return false; if it is valid, return true. Also, the user must pass exactly one file name that should be returned using filename, as in Project 1. - void dump_phdrs (uint16_t numphdrs, elf_phdr_t phdr[]);
Print the Mini-ELF program headers passed in phdr. There will be numphdrs of them. - void dump_memory (byte_t *memory, uint16_t start, uint16_t end);
Print the contents of Y86 virtual memory starting at address start and ending just before address end. For instance, if start = 5 and end = 8, then you will print the bytes at addresses 5, 6, and 7. Each line of output should be 16-byte aligned, but you should only output hex for the actual bytes requested; any leading bytes should be printed as empty spaces. There should be no trailing spaces, however.
WARNING: As in Project 1, to ensure your solution's compatibility with future projects, you should NOT use the above function names if you are not adhering exactly to the above specifications.
Integration requirements
In addition, you must implement main() in main.c such that your program behaves as described below. The main goal of this part of the semester-long project is to load all of the segments of a valid Mini-ELF file into a virtual memory address space in preparation for disassembly and execution. This simulates the behavior of a real executable loader. We will use integration tests to exercise this portion of your submission. We recommend that you implement and use the recommended functions described above to make your main() method cleaner.
For this project, your program must handle command-line parameters according to the following usage text:
Usage: ./y86 <option(s)> mini-elf-file
 Options are:
  -h      Display usage
  -H      Show the Mini-ELF header
  -a      Show all with brief memory
  -f      Show all with full memory
  -s      Show the program headers
  -m      Show the memory contents (brief)
  -M      Show the memory contents (full)
The -h and -H options behave identically to their counterparts in Project 1. This project adds four additional options as described below. Flags can be combined in a variety of combinations:
$ y86 -H -s file.o
$ y86 -sH -m file.o
$ y86 -m -s file.o
The -a flag is equivalent to -H -s -m and the -f flag is equivalent to -H -s -M.
As in Project 1, the -H flag should cause your program to print the header:
$ ./y86 -H tests/inputs/simple.o
01 00 00 01 10 00 02 00  58 00 70 00 45 4c 46 00
Mini-ELF version 1
Entry point 0x100
There are 2 program headers, starting at offset 16 (0x10)
There is a symbol table starting at offset 88 (0x58)
There is a string table starting at offset 112 (0x70)
The header output above specifies that there are 2 program headers. Each program header provides information about how to copy data from the file into memory segments. The -s flag should cause your program to print the segment information:
$ ./y86 -s tests/inputs/simple.o
 Segment   Offset    VirtAddr  FileSize  Type      Flag
  00       0x0038    0x0100    0x0015    CODE      R X
  01       0x004d    0x0200    0x000b    DATA      RW
In this example, the first program header indicates that you should read 0x15 bytes (i.e., 21 bytes) from the file starting at offset 0x38 into the Y86 virtual memory at address 0x100. The program header also tells you this segment is CODE and has the flags R and X (read and execute permissions). The second segment starts at offset 0x4d in the file, is 0xb bytes (i.e., 11 bytes) in size, and should be loaded into address 0x200. This segment is DATA and has RW (read and write) permissions.
Note that there is an extra space after "RW" for the second segment, indicating that that segment is NOT executable. Make sure your output includes this space. In general, there should be a character for each permission (read, write, and execute). If the corresponding bit (read=4, write=2, execute=1) is set in the flag field, you should print the corresponding upper-case letter and if it is not set you should print a space.
The -m option should print the address ranges that contain data loaded from the file (i.e., the segments). In this output, the first column is the memory address of the first byte. After that, you should print the contents of memory in hex format as follows:
$ ./y86 -m tests/inputs/simple.o
Contents of memory from 0100 to 0115:
  0100  30 f3 0f 00 00 00 20 31  40 13 fd ff ff ff 60 31
  0110  70 08 01 00 00
Contents of memory from 0200 to 020b:
  0200  aa bb cc dd 00 00 00 dd  00 00 00
Note the 16-bit address at the beginning of each line as well as the extra space between sets of eight bytes (as in Project 1). Your output must match this format exactly. If the range does not start at a multiple of 16, you should print blank spaces until the correct location on the line.
The -M flag (again, note the capital) should cause your program to print the entire 4KB contents of the Y86 memory, regardless of whether it has data loaded from the file. Any data not loaded should be zero. Example output (note the omission of some lines for brevity):
$ ./y86 -M tests/inputs/simple.o
Contents of memory from 0000 to 1000:
  0000  00 00 00 00 00 00 00 00  00 00 00 00 00 00 00 00
  0010  00 00 00 00 00 00 00 00  00 00 00 00 00 00 00 00
  0020  00 00 00 00 00 00 00 00  00 00 00 00 00 00 00 00
  ... [some lines omitted]
  00f0  00 00 00 00 00 00 00 00  00 00 00 00 00 00 00 00
  0100  30 f3 0f 00 00 00 20 31  40 13 fd ff ff ff 60 31
  0110  70 08 01 00 00 00 00 00  00 00 00 00 00 00 00 00
  0120  00 00 00 00 00 00 00 00  00 00 00 00 00 00 00 00
  ... [some lines omitted]
  01f0  00 00 00 00 00 00 00 00  00 00 00 00 00 00 00 00
  0200  aa bb cc dd 00 00 00 dd  00 00 00 00 00 00 00 00
  0210  00 00 00 00 00 00 00 00  00 00 00 00 00 00 00 00
  ... [some lines omitted]
When flags are combined, you should always print the header first (if requested), followed by the segments (if requested), then the contents of memory. For instance, the following example should the output for the -a flag (which as noted above is equivalent to -H -s -m):
$ ./y86 -a tests/inputs/simple.o
01 00 00 01 10 00 02 00  58 00 70 00 45 4c 46 00
Mini-ELF version 1
Entry point 0x100
There are 2 program headers, starting at offset 16 (0x10)
There is a symbol table starting at offset 88 (0x58)
There is a string table starting at offset 112 (0x70)
 Segment   Offset    VirtAddr  FileSize  Type      Flag
  00       0x0038    0x0100    0x0015    CODE      R X
  01       0x004d    0x0200    0x000b    DATA      RW
Contents of memory from 0100 to 0115:
  0100  30 f3 0f 00 00 00 20 31  40 13 fd ff ff ff 60 31
  0110  70 08 01 00 00
Contents of memory from 0200 to 020b:
  0200  aa bb cc dd 00 00 00 dd  00 00 00
IMPORTANT: As in P1, it is crucial that you load the segments into the virtual memory address space even if none of the memory output flags are passed. In P3 and P4 you will need the loaded segments to disassemble and interpret the Y86 program contained in them.
Error checking
Robust software proactively checks for potential errors and responds appropriately when an error occurs. Failure to build robust software leads to security breaches, lost sales, and other problems; this failure is not acceptable. Our grading procedures will try to break your code. The following list is a sample (not complete) of the types of errors we may test:
- Passing NULL values in pointer parameters
- Passing names of files that do not exist or have permission restrictions that prevent reading
- Passing invalid command-line options
- Not passing a file name
- Passing the name of a file that is too small
- Passing a file that contains an invalid header
- Passing a file with program headers that do not match the rest of the file
- Passing a file with invalid program headers
If the given file cannot be opened or contains invalid Mini-ELF data, your program should print the error message "Failed to read file" with a newline and exit with the EXIT_FAILURE code defined in stdlib.h.
The above list is not necessarily exhaustive, and you should think carefully about what sort of errors might occur so that you can prevent them or perform additional error checking as needed. In particular, we will also use Valgrind to detect memory leaks. Failure to respond appropriately will result in grade reductions.
Hints
After you have read the above description thoroughly, watch the P2 experimentation video for a less structured and more informal walkthrough of the "big picture" of this project before you dive into the details of your implementation.
- Work incrementally. First, update your command-line parsing routine from P1 and verify that it works. Then implement read_phdr and dump_phdrs and verify that they work. Finally, use the information that you now have from the program headers to implement load_segment and dump_memory. In general, you should use the grading tiers (see below) as a rough guide as to the order in which to implement new functionality. Note that this may mean you should work on some integration-level functionality before finishing all unit-level functionality (e.g., error checking).
- If a segment's size is zero, there is no data to copy so you should not attempt to read anything from the file.
Grading
The following requirements are necessary to earn a grade of 'A' for this project:
- Read the program headers from the file
- Print the segment information from the program headers
- Load the segment contents into a dynamically allocated memory array
- Print the full memory contents according if passed -M
- Print the brief memory contents according if passed -m
- Accept all valid command-line options
- Handle error checking appropriately
- Reject invalid command-line arguments
Completing steps 1-6 are required to earn a grade of 'B' while completing only steps 1-4 will yield a maximum grade of 'C'. You may receive a grade of 'A-' for completing all of steps 1-6 with the exception of correct unaligned segment memory output (as exercised by the A_unaligned1 and A_unaligned2 tests). Note that these are the maximum grades you can earn. Inadequate error checking, failure to adhere to the coding standards, or deviations from the submit procedures will result in grade reductions as described in the project guide.
Failure to submit code that compiles on stu.cs.jmu.edu may result in an automatic grade of 0. In particular, you SHOULD NOT modify the included header files; your code must compile without errors or warnings against the original headers.
Caution: No test suite is fully exhaustive, and the test suite distributed with this program is no exception. Be aware that we may test your code with new test cases created after the submission deadline. These test cases will not substantively change the project specification, but they may exercise your program more thoroughly than the current test suite does. You should treat the given test suite as providing your maximum possible base grade, and you should always anticipate how your program may fail to adhere to the project spec in ways that the initial test suite does not test.
Submission
Please see the project guide for general project help and grading policies. Please refer to the coding standards for coding practice guidelines.