This is the multi-page printable view of this section. Click here to print.
Preps
1 - Prep 01: Setup Dev Environment and Creating a skeleton website
- Python via uv
- Django 6.1.
- MDN Django Tutorial through Part 2
- Put it on github
Prereq
- Create a directory for 347 work on your local machine. See our docs on:
- Working Locally vs. Remotely
- 🚨 Complete the auth via keypairs steps
- Files
- Working Locally vs. Remotely
Instructions
- Do the following (“do” as in read, take notes, and try to make work) from our fork of the MDN Django Tutorial:
- Django introduction
- Setting up a Django development environment
- Django Tutorial: The Local Library website
- Django Tutorial Part 2: Creating a skeleton website
Submitting
- After you complete the steps linked above, you will have pushed some commits to a github repository.
- Github provides a link for each commit.
- Submit a
commit.urlfile containing the url to the latest commit of your public github repo that was relevant to the steps above to gradescope. - Here’s an example of what such a URL might look like
https://github.com/347s26/locallibrary-hcientist/commit/caca9ecbcc79f5aa3ec29300c47c123b9a7a0ca5. See the screenshot below to see where to click to reach the right kind of URL.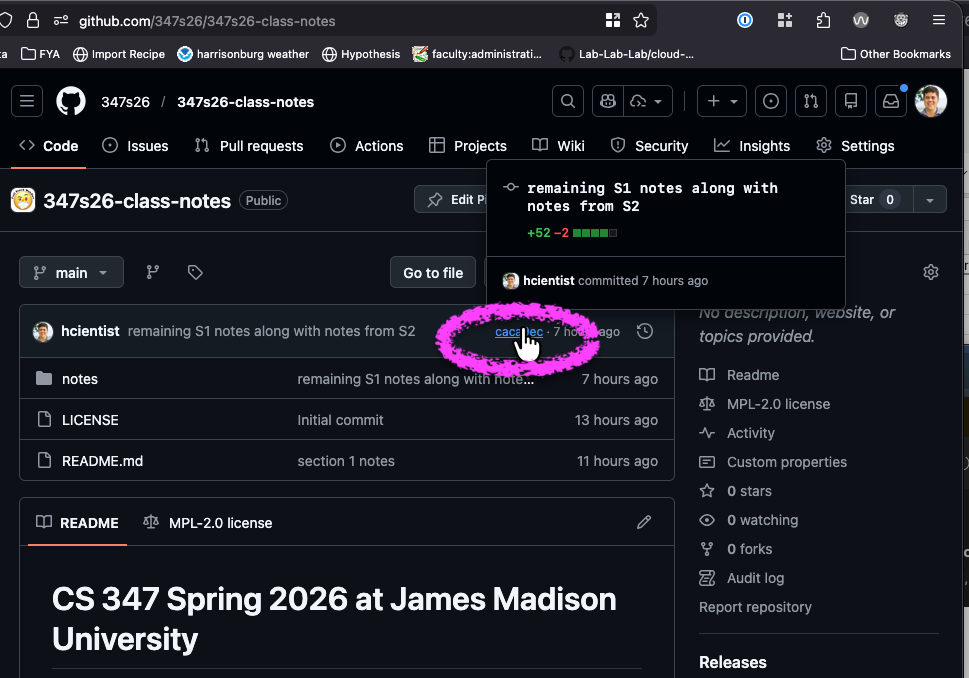
2 - Prep 02: Django Models and admin from MDN Tutorial Parts 3-4
Continuing to work in the repo you created for Prep 01.
Part 3
- Do Part 3 (Models)
- Question: what is a migration? did we need any yet? what alternative could there have been? how do they work?! e.g.
- how does django know what to put in a migration?
- how does django know which migrations have been applied?
- Read “Falsehoods Programmers Believe About Names – With Examples”
- Based on the points in the article, what (if any) changes might you propose to the models in this Prep?
- Have you ever been unsure how to enter information about yourself into a computer system?
- What information were you trying to enter?
- Do you recall what system?
- What was the cause of your uncertainty?
- (reflect on this personally, and if you have reflections that you wish to share that don’t doxx you, feel free to bring them to in-class discussion)
- Consider installing some database tools:
- GOAT: DBeaver Community (supports pretty much every kind of db ever)
- db-specific:
Best Practices: env files (for repeatability, secrets, and great good)
env files help track configuration information. Often these values may differ on different machines of your own or at least between you and a team member, and likely also between your machine for (local) development and your server(s) in the cloud that hosts your app.
Because it might be convenient to discard and recreate your database on occasion, and also to have consistent expectations for troubleshooting across all the students’ computers, make these files so that we don’t have to waste time waiting for you to re-find your django admin user’s password.
env files can help us in being safe in production, but below I’m proposing that on our local django projects (that no one else can reach anyway) we will all use the same weak password.
I WOULD NEVER TELL YOU TO DO THAT IN PRODUCTION!
- Ensure that your
.gitignore- exists at all 😆
- if it doesn’t, maybe start from a good Python .gitignore template such as that provided by github
- has
.envin it
- exists at all 😆
- Create a file named
.env.examplein the root of your project (so it’s a sibling ofcatalog/,locllibrary_config/, andmanage.py) with this code:DJANGO_SUPERUSER_USERNAME="me" DJANGO_SUPERUSER_PASSWORD="me" DJANGO_SUPERUSER_EMAIL="me@me.me" - save a copy of that file as
.env
We could add other things here, but this is all we need for now.
Instruct django project to use env file
- add django-environ as a dependency:
uv add django-environ - edit
settings.pytoimport environat the top- immediately after the definition of
BASE_DIR, add the followingenv = environ.Env() # FYI: OS environment variables take precedence over variables from .env env.read_env(str(BASE_DIR / ".env"))
create superuser with values from env
With this env file created and expected in your settings, you can add an argument to the django-admin createsuperuser command to have it default to these values:
uv run python manage.py createsuperuser --no-input
Part 4
- Do Part 4 (admin site).
Submitting
- Push your updated code back to your github repo
- submit the most recent commit URL to the gradescope assignment in a file called
commit.url.
3 - Prep 03: Django Admin Site and Home Page from MDN Tutorial Part 5
- Continuing to work in the repo you created for Prep 01, and extended in Prep 02, complete MDN Django Tutorial Part 5.
- Note: Near the end of Part 5, the tutorial fails to mention that if you have had your development server (the one you get with the
runservercommand) running the whole time you were working on this Part, you’ll have to kill it and start it again before you can expect django to find your new template.
- Note: Near the end of Part 5, the tutorial fails to mention that if you have had your development server (the one you get with the
- Push your updated code back to the github repo
- submit the most recent commit URL to the gradescope assignment.
4 - Prep 04: List and Detail Views from MDN Tutorial Part 6
MDN Django Tutorial
So far
By now, you should have a django web application that:
- you can run locally
- has several library-related models that are persisted to a database
- this database has a few instances of the various models
- has a super user (admin)
- has admin pages that the admin can login to and see (and modify) the current instances in the database
- has a templated home page that renders static content as well as dynamic content retrieved from the database.
Next Steps
- Continuing to work in the repo you created and connected to github for the previous preps, complete MDN Django Tutorial Part 6.
- Push your updated code back to the github repo
- submit the most recent commit URL to the gradescope assignment
5 - Prep 05: DX, Sessions and Permissions from MDN Tutorial Parts7-8
DX - Developer Experience
“DX” or Developer Experience refers to features of tools for software developers that help them do their job well. In this prep we will introduce several and apply them to our locallibrary.
Django Admin Shell
Django’s Admin command-line utility provides tons of useful features.
In this proep, we’ll use its shell to interact with your application. It can be helpful to use the shell as a REPL to confirm that the python you write for django works as you expect.
Let’s use the shell to perform CRUD actions with the models you’ve defined.
- launch the django admin shell by running
python manage.py shell - list all the genres in your database
all_genres = Genre.objects.all() all_genres- Note: the django admin shell automatically imports all models from all
INSTALLED_APPS. This is why we didn’t have to explicitly importGenrefor this to succeed.
- Note: the django admin shell automatically imports all models from all
- create a new genre called “Food Science”
food = Genre.objects.create(name="Food Science") food.id # this should show you the internal unique id of this new instance of the Genre class- Note: we could have used the Genre class’s constructor here, but that would require a second line of code to
savethe newGenreinstance (so that it would not only exist in memory, but also would be persisted to the database.)
- Note: we could have used the Genre class’s constructor here, but that would require a second line of code to
- again list all the genres (and confirm you see the
Food Sciencegenre) - search for the genre that has the name
Food Sciencebyebyebye = Genre.objects.get(name="Food Science")- Note: we can search in other ways such as with
filter. Many of the interactions we’ll have like this are with Django’s QuerySet objects and many of its methods expect a certain field lookup syntax
- Note: we can search in other ways such as with
- let’s see that we can delete instances by deleting this new genre
byebyebye.delete() all_genres- you should see that the model instance’s delete function returned a tuple showing that 1 instance was deleted and what class that instance belonged to.
- Note: you should see that evaluating
all_genresshows the correct remaining set of instances of theGenreclass even though we didn’t update it after invoking the instance’sdelete(). As the docs explain, theQuerySetclass only actually interacts with the database when the object is evaluated. When we earlier evaluatedall_genresit actually asked the database for the current situation, but then we we again evaluatedallgenresjust now, it again communicated with the database automatically.
- You can exit the django shell the same way you usually exit the python shell, e.g.
exit()
pyproject.toml
What/Why?
By keeping a list of a project’s dependencies in a pyproject.toml file, you can use source control to track the changes over time, and if you need to run your project in a new environment (e.g. on a different computer of your own, on your team member’s computer, or in the cloud when you deploy your project), you won’t have to go read your diary for all the uv add commands.
How?
Instead of running uv add Django>=6.1 or any other uv add PACKAGE commands directly, you should instead add the package to your pyproject.toml and then run uv sync. Or, you can use uv add PACKAGE which does both in one step.
Create pyproject.toml
In our course, this is likely unnecessary because you already ran a uv init command
- create a new file called
pyproject.tomlin the root of your locallibrary. Note: this file should be a sibling to.venv/,locallibrary/,manage.py, anddb.sqlite3 - give it this content
[project]
name = "locallibrary"
version = "0.1.0"
requires-python = ">=3.14"
dependencies = [
    "Django>=6.1",
]
Install dependencies from pyproject.toml
The installer (uv) shouldn’t reinstall packages that you already have so if you already have some dependencies installed and then add one new dependency to your pyproject.toml, then tell it to install again, it shouldn’t do redundant installs, but only actually install the new dependency.
To install the dependencies (that you don’t already have) from the pyproject.toml, run:
uv sync
When working with other developers, this is a command you may need to run after you get changes from them.
- How will you know whether you need to run it again?
- Are there any other steps you might need to take after receiving code from your teammates?
Data Migrations
As first introduced in Part 2 of the MDN Django Tutorial, migrations are used to update the database when we make changes to our models.
So new models, removal of models, and changes to models should result in the creation of migrations when we run the makemigrations command.
In addition to creating migrations for changes to the structure of our data model (in db land, they’d say schema changes), it can be helpful to provide necessary instance of our models to our application programmatically (i.e. rather than interactively clicking through a ton of the admin forms or having to write sql queries to do so). Django calls this a data migration.
When working with other developers, this is a command you may need to run after you get changes from them.
- How will you know whether you need to run it again?
- Are there any other steps you might need to take after receiving code from your teammates?
These next few steps are helpful for your future work, but this semester you likely already have the data below from doing the data migration in class.
- it’s helpful for django to create the “empty” migration file into which we will write our commands
uv run manage.py makemigrations --empty catalog- Note: you should see output that s`hows the path to the newly created migration file.
- Open the new file in your editor. You’ll see that there’s not much in there. The main thing that’s useful is that django assumes we might like the new migration to depend on the most recent migration in the same app, which is correct in our case, so don’t modify the
dependencieslist it created. Instead add an entry to theoperationslist.migrations.RunPython(seed_books),- Note: The docs on
RunPythonexplain among other things that we can write reversible or irreversible migrations.
- Note: The docs on
- Now we need to write the
seed_booksfunction we referred to. At the top of your file, after the imports but before the definition of theMigrationclass begins, define theseed_booksfunction. Why not steal mine this time?- Note:
- this code looks like code that we could have written in the django shell. Mostly it is! It’s using the model and QuerySet functions like in our exploration of the shell above, but there’s a super cool difference, and it’s subtle but so powerful: instead of importing the models the typical python way (i.e.
from catalog.models import Book), we useapps.get_model(). The difference is thatapps.get_modelishistory-awarewhile the regularimportis anachronistic. When we write this migration, it could be that the Book (model) class has a certain structure (or schema) that might not be the same in the future. We would like to write this migration file in a way that it can succeed not only at the time of authoring, but that it will also succeed even if we eventually remove a field from the Book class that we are referencing in this file, or even ifBookcomes to have a new required field that we aren’t populating in this file.
- this code looks like code that we could have written in the django shell. Mostly it is! It’s using the model and QuerySet functions like in our exploration of the shell above, but there’s a super cool difference, and it’s subtle but so powerful: instead of importing the models the typical python way (i.e.
- Note:
- Add all these objects to our database by migrating
python manage.py migrate- there should be output that suggests this was successful, e.g.
11 objects imported automatically
- there should be output that suggests this was successful, e.g.
- Confirm that the migration worked. In the django shell (do you remember how to get in there?), do
da = Author.objects.get(first_name="Douglas", last_name="Adams") da_books = da.book_set.all() da_books- You should see that
da_booksis aQuerySetthat has (at least) theBooktitledHitchhiker's Guide to the Galaxy. - BUT WAIT! search your whole project for
book_set- in vs code you can do: Ctrl+Shift+F (or Cmd+Shift+F on a mac)
- we never defined a property of the
Authormodel calledbook_set! Why did it work?! one thing that you may not have noticed when you completed Part 6 of the MDN Django tutorial is illustrated here: when using django field types that create relationships between model classes, django’s default behavior is to create accessor fields in both directions. So we explicitly defined theauthorfield on theBookmodel and django automatically created a convenience accessor for us to follow the relationship in the opposite direction (i.e. when we have an instance of an author, we can refer to all their books). We can customize or even prevent this behavior if we wish/require.
- You should see that
MDN Django Tutorial
Improve the Data Model
Look at this ridiculous excerpt from the Book model as created in Part 3 of the tutorial.
...
class Book(models.Model):
    ...
    author = models.ForeignKey('Author', on_delete=models.RESTRICT, null=True)
    # Foreign Key used because book can only have one author, but authors can have multiple books.
    # Author as a string rather than object because it hasn't been declared yet in file.
    ...
Do you see that?!
because book can only have one author, but authors can have multiple books
Admit it. That’s outrageous! Books can totally have multiple authors! Let’s fix it!
- create a
BookAuthormodel that has- a foreign key to
Book - a foreign key to
Author - an integer field named
author_order
- a foreign key to
- update the
Bookmodel to (keepauthorfor now and also) haveauthors. Declare it as aManyToManyField, but unlike the one you already have forGenre:- use the
throughparameter to explicitly tell django that the intermediate model is your newly createdBookAuthor - use the
related_nameparameter to tell django that when referencing all their books from anauthorinstance, you want the accessor to be called justbooks(otherwise it will default tobook_setand collide with the existing accessor created byBook’sauthorforeign key field)
- use the
- Having added a new model and changed an existing model, tell django to
makemigrationsand tomigrate - now remove the old
authorfield from theBookmodel and run (ONLY)makemigrations(this will likely fail because we are referencingauthorfrombookinadmin.py). If it does:- remove the
authorfield from thelist_displayofBookAdmin - remove the
BookInlinefromAuthorAdmin - run (ONLY)
makemigrations
- remove the
- we need to edit this newly generated migration (it should be in
locallibrary/catalog/migrations) to record our existing book-author relationships asBookAuthorinstances before it discards them! - make a new function before the definition of the
Migrationclass in the new migration file.def authorize_books(apps, schema_editor): # "author-ize" get it X-D Author = apps.get_model("catalog", "Author") Book = apps.get_model("catalog", "Book") BookAuthor = apps.get_model("catalog", "BookAuthor") # TODO add code here to create a new BookAuthor for each book - add your new function as the first operation in the list of
operationsin theMigrationclass (look back at one of your data migrations if [like me 😅] you don’t remember how) - tell django to
migrate - add
BookAuthorto your admin site - create a
BookAuthorInlineand include it onAuthorandBook - update your templates to do the right thing now that there can be multiple authors
- Push your updated code back to the github (classroom) repo
- submit the most recent commit URL to the canvas assignment