Docs
Technical Information about CS 343
There’s a lot to install and setup. In total it may take close to an hour.
⏱️ Track your time?
Yo, help a prof out 🙏 and see if you can track 📝 about how long all this takes you.
Files
- Create a directory (i.e. a “folder”) somewhere on your computer for this course, perhaps you’d call it
cs343.
- Make sure that this is outside of a location that is auto-synced to the cloud (e.g. Dropbox, OneDrive, iCloud)
- Note that, by default, a lot of systems auto-sync the Desktop and Documents folders! Avoid these!
- Inside your
cs343 directory, create a directory called notes.
- this would be a great place to put:
- the class’s slides if you download them
- your own notes from the in-class mini-lectures
- your own notes from your out-of-class time working on the preps, labs, and projects
- Inside your
cs343 directory, create a directory called dev
- all the code you write for this course should go in your
dev directory, ideally in a subdirectory of dev named for the thing you’re working on (e.g. lab01, prep01, and etc.)
Browsers
- Install 🦊 Firefox if you don’t have it already (ensure you have at least 2 browsers installed, you might also consider 🦁 Brave, 🐤 DuckDuck, 🔭 Edge).
- For whatever browsers, install extensions:
- a userscripts extension like Tampermonkey
- this accessibility checker extension WebAIM’s WAVE
- this HTML validator
- Consider bookmarking this page?
⚠️ Safari
tl;dr - don't use Safari in this course
Listen, in general Safari is an excellent browser in many ways. Unfortunately, their excellent privacy-protecting defaults defeat many popular websites' code, esp. when linking to things like protected files. Very likely you will not be able to download provided code from Canvas with Safari (unless you disable their privacy-protecting features, which are themselves excellent and most of the reason to use Safari...).
API Exploration
- Add a Bookmark for Hoppscotch
Editors
🫵 VSCode is Required
tl;dr - You must us VSCode in this course
If you have strong feelings about your editor, please know you’re almost certainly right.
You can even tell anyone you wish that we said so!
That being said, in-class and out-of-class, please use vscode.
We have the best chance of being able to support you this way.
- Install Visual Studio Code (a.k.a. “vscode”):
- Windows folks, if you’re asked by the install wizard 🧙♀️, ensure that you enable/select the following:
*
Explorer context menu
* Add to PATH
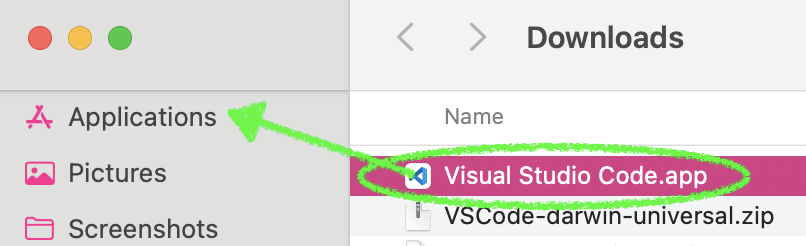
- macOS people:
- Dr. Stewart has an unconfirmed hypothesis that for some apps (like VSCode), if you place them any where other than
/Applications or ~/Applications, they may not function correctly. So when you download and open the zip, drag the resulting Visual Studio Code.app file to Applications
* 
- After installing vscode, launch it and press the “DO ALL THE THINGS!” shortcut: command+shift+P and then (do not delete the pre-filled
>) type shell and choose the Shell Command: Install 'code' command in PATH entry. (docs)
- Install these vscode extensions:
- HTML Validate Extension
- Live Server
- Live Share Extension
- Remote Development extension pack
Make sure code is available from command line (“CLI”):
- Windows: the installer should have done it, try opening Windows Terminal or PowerShell or whatever and just type
code and hit enter.
- MacOS
- Linux: the installer should have added it to your path already, try it in your shell
Git
If you don’t already have git installed (it’s installed by default on macOS and some linux distros), install it (and make sure it’s added to path where you can use the git command from the CLI).
Windows
The git install wizard defaults are probably fine, but if you happen to notice this, consider answering a few of the steps as follows:
- Default editor:
- vscode
- Git Pull something:
- rebase
- Extra Options:
- ✅ enable symlinks
(On Windows) Ensure that once you install git, you have git bash, and that in git bash you have curl. This post may help if you don’t have curl on Windows.
Not Windows
Probably you already have git installed, try it in your shell by opening a terminal and running git
Terminal
Windows: always the git bash terminal?
- pretty much all semester if we say “open a terminal/shell”, people running windows should understand us to actually mean “open the git bash terminal”
linux and macOS
- it doesn’t really matter as far as we can tell which you use. (for what it’s worth: Dr. Stewart, Dr. Weikle, and a CS student have started posting things about their general dev setup on a mac to the CS wiki)
Configuring Git (all OSes)
- Open a terminal
- Windows: open
git bash
- mac or linux open a terminal
- run the 2 commands found at the following link, but:
- don’t type the
$ that’s at the beginning and
- change the placeholder values for real ones
- note: the username and email you set do not have to match things github already knows about
- ok, here’s the link - Git::First-Time Setup:YourIdentity
Confirm/Install rsync
Open a terminal (if you are running Windows, we mean specifically open git bash).
Run which rsync to check if rsync is found. (On Windows, rsync is likely not installed.)
Windows
Follow these steps to get rsync working in Git Bash (without having to install and configure a bunch of other tools):
- Download and open the latest rsync package from MSYS2.
- Copy the
usr folder (from rsync...tar.zst) into C:\Program Files\Git.
- This should merge the files into the existing
C:\Program Files\Git\usr folder.
- Download the latest libxxhash package from MSYS2.
- Copy the
usr folder (from libxxhash...tar.zst) into C:\Program Files\Git.
- This should merge the files into the existing
C:\Program Files\Git\usr folder.
- You should now be able to type
rsync in Git Bash and see the usage message.
Not Windows
- use your usual package manager to install rsync
GUI for Accessing Files Remotely
- Install Cyberduck
GUI for Git
One of the best GUIs for Git isn’t available on linux 🤦♂️. So in the interest of consistency, everyone should Install the GitHub Desktop app.
A curated selection of the Firefox DevTools documentation.
For pretty much every coding activity in this course, you need to begin the same way.
I can haz MOAR WebDev pls?