Lab 8 - Play Fetch
Categories:
9 minute read
Learning Objectives
By the end of this lab, you should be able to:
- Understand the different request methods and how they differ
- Use fetch() to interact with third-party APIs
- Modify an HTML page based on the result of an API call
Introduction
In this lab, you will use the knowledge you’ve learned about HTTP requests, asynchronous Javascript (including Promise), and fetch() to interact with a third-party API and use its results to modify an HTML page.
You’ll start by practicing your requests and learning about the different request methods and the different ways of formatting data for a request.
Then, you’ll retrieve data from an API and use it to populate a page and modify the DOM.
In the last part, you will write some starter code that interacts with the specific API you chose for the class project.
Getting Started
Start by going to the GitHub Classroom link provided by your instructor and accept the assignment. For this lab, you may work in your project groups.
Clone the created repository to your computer. You will need to use Live Preview or Live Server for this lab; opening the file directly in your browser may prevent some requests from working.
Open the repository folder in VS Code.
Part 1: Requests Practice – Echo (echo) Server
For this first part, we will be interacting with an “echo server” that simply echoes back the request that you give it. We’ll use Zuplo’s Echo API.
Start with the part1.html and js/part1.js files. You will see a couple of input fields and three buttons, plus an area for the output. Each of the buttons needs to make a specific request to the echo API, and then display the resulting JSON in the output. You shouldn’t need to modify the HTML for this lab, just reference it. Edit the JavaScript
-
Write the event handler for
get-btn(this should be stubbed out for you inpart1.js):-
This function should send a
GETrequest to thehttps://echo.zuplo.io/apiendpoint. -
The request should include the name and the age as parameters in the URL’s query string
-
There are two ways of accomplishing this:
- Manually add the keys and values to the URL:
let resp = await fetch("https://www.mywebsite.com/search?q=" + query + "&page=" + pageNum); - Use URLSearchParams and give the constructor an object containing the keys and values you want to encode:
(Note: the URLSearchParams constructor can also parse a query string, and then you can easily access its keys/values)
let params = new URLSearchParams( {q: query, page: pageNum} );
let resp = await fetch("https://www.mywebsite.com/search?" + params.toString());
- Manually add the keys and values to the URL:
-
After you get the response from the server, parse the body as JSON
-
Set the
textContentof the<pre>element (with the id ofoutput) to a nicely-formatted version of that JSON:JSON.stringify(...)can take in three parameters: the object you want to stringify, a “replacer” (which can be null), and the number of spaces to indent the JSON. This will produce a formatted version of the data:let data = { city: "Seattle", population: 757992, }; let formatted = JSON.stringify(data, null, 2); // JSON.stringify(object_to_format, null, num_spaces_for_indent)
-
Test the “GET” button (open the developer console to check for errors). You should see something like this:
Notice how the
"query"attribute contains the parameters from the query string we gave.
-
-
Next, write the event handler for
post-json-btn:-
This function should do the same thing, except, instead of a
GETrequest, it should send aPOSTrequest. -
The body of the request should be JSON data that contains the
nameand theage:- The
fetch()function can accept a second argument, which is an object that specifies the request options:let options = { method: "POST", headers: { "Content-Type": "application/json", // or "application/x-www-form-urlencoded", "text/plain", etc. }, body: JSON.stringify( {q: query, page: pageNum} ), }; let resp = await fetch("https://www.mywebsite.com/search", options);
- The
-
Again, after you get the response, parse the body as JSON and display it in
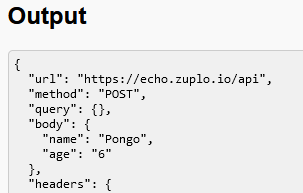
output. This should look like:
Note how now the request’s data was found in
"body"instead of"query".
-
-
Finally, write the event handler for
post-form-btn:-
This function does the same as the last, but, instead of the data being formatted as JSON, the data should be formatted as “URL-encoded” form data. This is how HTML forms usually POST their data to a server.
-
The body of the request basically contains data in the same format as a query string:
let options = { method: "POST", headers: { "Content-Type": "application/x-www-form-urlencoded", }, body: new URLSearchParams( {q: query, page: pageNum} ), }; let resp = await fetch("https://www.mywebsite.com/search", options); -
You should also parse the response’s body as JSON and display it in
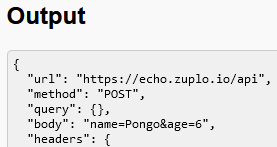
output. This should look like:
Now, look at how the request’s data are formatted in the
"body".
-
With Part 1, you should feel comfortable using fetch() to make requests and include data in both the query string and the request body. These are fundamental tools to add to your arsenal for dealing with any API you may encounter!
Part 2: List Those Users!
Now that we’ve practiced making API requests with a simple echo server, let’s go a little further and interact with an API that actually gives real (fake) data! We will use reqres.in, which provides mock data via a simple set of API endpoints.
Open the part2.html and js/part2.js files. The HTML contains an example of how a user should be displayed and an empty <div> with the id of user-list.
- In
js/part2.js, inside theDOMContentLoadedevent handler, write code to request the first page of users fromreqres.in:- First, take a look at the API endpoints for
reqres.in, specifically the “List Users” endpoint. - The base URL is
"https://reqres.in", and the endpoint is"/api/users". This means that the full URL you should send the request to is"https://reqres.in/api/users". - What request method does it use? (
GET?POST?PUT?) - How do you specify which page to retrieve? (Query string? JSON body? Form body?)
- First, take a look at the API endpoints for
- Once you get the response from the API, you should parse the body as a JSON object.
- We don’t always do this; it depends on what the API endpoint returns! (aka we need to read the documentation)
- For
reqres.in, all the endpoints return stringified JSON data in the response body.
- Next, you’ll want to loop over the returned list of users and create new elements in the HTML for each user.
- Take a look at the format of the returned data first on the
reqres.inwebsite! - Each new user added to the HTML should follow this format:
<div class="card"> <h2>Firstname Lastname</h2> <img src="https://reqres.in/img/faces/some_image.jpg" alt="Firstname Lastname"> </div> - You can create the elements manually in JavaScript, you can clone the existing example, or you can create a
<template>to use.- You may minimally modify the HTML to help you, but the format of each user must match the example above.
- Make sure each new user card is added to the
<div>with the id ofuser-list. Also don’t forget to add the"card"class to the<div>!
- Take a look at the format of the returned data first on the
The result should look like this:

Part 3: Your Project APIs
For this last part, you will interact with the two APIs you chose for your semester-long project. For now, you will simply make a request and display the response.
Open the part3.html and js/part3.js files. You will need to modify both the HTML and JS for this part.
- In
part3.html, for API #1, replace[TODO]with the name of one of your APIs. - Next, go to the documentation for your specified API. Find a specific endpoint you want to use. Take note of the following:
- What is the base URL for the API?
- (This is usually found in a “Getting Started” or “API Concepts” documentation)
- Does your API require authentication?
- (This is also usually found in “Getting Started” pages)
- What is the path to the specific endpoint?
- (Found on your specific endpoint’s documentation)
- What method does the endpoint use?
- (
GET,POST,PUT,PATCH,DELETE)
- (
- How is the data specified?
- (In the query string? In the body as JSON/form-urlencoded?)
- What format is the data returned in?
- (JSON? Text? No data?)
- What is the base URL for the API?
- In the HTML, replace the
[TODO]for the URL with the full URL of the endpoint you will be using. - Also replace the method (
[GET/POST/PUT/...]) with just the specific one you will be using. - In the
js/part3.jsfile, in the event handler for theapi-1-btn, write code to make the request and output the returned data.- If your API’s response does not contain any data in the body, output the status code instead.
- I recommend using the MDN docs on
fetch()as a reference. - Also
console.log(...)the response object (fromfetch()) so you can look at it in the developer console! - Make the output nicely formatted if it’s JSON, just like in Part 1.
- Test the button. Does it display anything? Make sure to open the developer console to check for errors!
- Usually the HTTP status code of the response can help diagnose what’s wrong.
- Sometimes, its as simple as missing a parameter, or forgetting to include the “Content-Type”!
- If you are getting an error saying something about “CORS” or “origin”:
- Does your API support CORS?
- (This can be found in the documentation or on the public api list if that’s where you found your API)
- What is CORS?
- Cross-Origin Resource Sharing (CORS) is a way for a server to say, “Hey, I’m allowing other webpages to access me! Here’s a list of the ones I approve of.”
- Without CORS enabled, web browsers will NOT allow a page to access that specific server/resource! This is for security reasons; otherwise, malicious websites could send requests to, say, your banking site, using your login credentials!
- However, server-side applications can still access that server; CORS is only for restricting client-side access.
- This means that we are unable to access it from anything we do in CS 343. We would need to access it via a backend.
- But wait! There’s a workaround:
- Simply tell a server to make the request for you!
- There’s a free “CORS Proxy” at corsproxy.io you can use. There is also allOrigins.win as an alternative.
- The CORS proxy will act as a intermediary between you and the API server. This does open up some concerns about latency and security, so only use it for non-sensitive data and only for this class.
- Does your API support CORS?
- Did your API return something about “unauthorized”?
- You may need to authenticate your app! Look in the documentation to see how you need to retrieve an “API key” or “access token” of some kind.
- This is usually then given to the API in the header of your request, or even in the query string.
- There are other methods of authorization, which may be more complicated to use.
- Are you using the Spotify API? It’s a little more complicated to authorize!
- You may need to authenticate your app! Look in the documentation to see how you need to retrieve an “API key” or “access token” of some kind.
- Usually the HTTP status code of the response can help diagnose what’s wrong.
- Once the first API is working, repeat the steps for the second API!
- This should give you a head start on the last part of the project.
- For your actual project, you will need to do something with the response, not just output it!
Submission
Commit and push your code back to GitHub.
