This is the multi-page printable view of this section. Click here to print.
Labs
1 - Eclipse Lab
Introduction
In this lab, you will practice the process of creating a class in Eclipse and submitting it through Gradescope.
Before working on this lab, you should already have completed the steps in Installing Java and Eclipse .
Part 1 - Coding in Eclipse
-
Create a new Eclipse project named
PointLab:
File -> New -> Java Project -
Create a new class that corresponds to the UML diagram below. For now, don’t worry about commenting the code. We’ll address that later.
Point
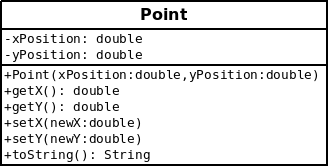
UML for the Point class
Note:-
The return value of the
toStringmethod should consist of an open-parenthesis followed by the x-coordinate, followed by a comma, then a space, then the y-coordinate followed by a close-parenthesis. For example:“(1.0, 2.0)”. -
The
equalsmethod should return true if the other point has the same x and y coordinates. -
Notice that the parameter type for the
equalsmethod isObject, notPoint. This is the standard signature for anequalsmethod: objects of different types should generally be considered not-equal, but it should be possible to perform the comparison. -
This means that
equalsmethod implementations are typically structured to use theinstanceofoperator as in the following example:public class Person { private String name; // Other methods not shown... public boolean equals(Object other) { // Return false if other is not a Person. if (!(other instanceof Person)) { return false; } // Cast other to Person so that we can access // members. Person otherPerson = (Person) other; // Now we can safely compare. return name.equals(otherPerson.name); } }
-
-
Once you have completed a syntactically correct
Pointclass, move on to the next step.
Part 2 - Adding A .jar File
One standard mechanism for distributing Java code is through .jar files. A .jar file is a compressed archive that can hold any number of Java classes in either source or binary form (as .java files or as .class files). For some projects in this course you will be provided with .jar files containing support code.
- Create a new folder named “lib” in your Java project. Download the file /docs/eclipse/ PointCode.jar , and drag it into the newly-created folder.
- Right click
PointCode.jarand select Build Path -> Add to Build Path. - There should now be a “Referenced Libraries” entry in your
project explorer. Expanding that entry should allow you to inspect
the details of the
PointCode.jararchive. All classes included in that archive are now available within your project. In this case there is only one class: PointDisplay.
Part 3 - Running
- Download the file PointDemo.java to your Desktop, then drag it into the default package section of your project.
- Look over the
PointDemoclass to get a feel for what it should do. Run the code to confirm that everything is working as expected.
Part 4 - JUnit
JUnit is a tool that makes it possible to automate the execution of Java test code. It is also the tool that is used by Autolab to test your submissions. Don’t worry if you haven’t used JUnit before, we’ll spend more time on testing and JUnit later in the semester. For now, the goal is just to practice executing pre-written JUnit tests.
- Download the file PointTest.java and drag
it into your PointLab project. These are exactly the tests that will
be used by Gradescope when you submit
Point.javaat the conclusion of this activity. - Initially, this file will not compile. If you open it up you will see that many of the lines of code are labeled as errors. The problem here is that JUnit isn’t part of the Java language. It is an external library that must be added to the Java Build path before it can be used. There are several different ways that this can be managed in Eclipse:
- Option 1: You should see that the first underlined statement at the top of
PointTest.javais this:
import static org.junit.jupiter.api.Assertions.*;
org.juniton this line, Eclipse will pop up a box with an error message (“the import org.junit cannot be resolved”) and the message “three quick fixes available:”. If you scroll to the bottom and select “Fix project setup” you should see a dialog offering toAdd JUnit 5 library to build path. Click OK. Be careful! If it offers to add JUnit 4, cancel and try the next option instead.- Option 2: A simple trick that you can use to add JUnit to the build path is to ask Eclipse to auto-generate a JUnit test file. Just right-click on any file in your project and select New -> JUnit Test Case. Make sure the top radio button in the dialog is set to “New JUnit Jupiter test”. Keep the rest of the default options and click “Finish”. This should create a new test file (which you can delete) and add JUnit 5 to the build path.
- Option 1: You should see that the first underlined statement at the top of
- Once everything is compiling successfully, you can execute the tests by right-clicking
PointTest.javaand selecting Run As -> JUnit Test . Hopefully, all of the tests will pass. If not, fix the errors inPoint.javabefore moving on to the next step.
Part 5 - Checkstyle Eclipse Integration
- Recall that Checkstyle needs to be explicitly enabled for each new Eclipse project. Right click your
PointLabproject in the “Package Explorer” tab and then select Checkstyle -> Activate Checkstyle. - Once you have completed the previous step, navigate to your file. Many lines of code in
Point.javashould now be marked with Checkstyle warnings. Each of these marked lines contains a violation of the style guidelines that would prevent you from successfully submitting a programming assignment. Clicking on the magnifying glasses in the left margin will show you a description of the problem. We’ll fix these problems in the next part of the lab.
Part 6 - Eclipse Auto-Formatting
Assuming that your auto-formatter is configured correctly, you should
be able to re-format your Point.java file by selecting
the entire file CTRL + A and then pressing CTRL + SHIFT + F.
- Once you have auto-formatted your code you must save it before Checkstyle will recheck it. Hopefully, many of the flagged formatting errors should now be gone. Most of the remaining issues probably relate to missing Javadocs.
- Add appropriate Javadoc comments to your
Pointclass. Eclipse will automatically generate a Javadoc template for any method. You can either type/**+ENTER just above the method, or select the method and press SHIFT + ALT + J. - Re-run Checkstyle, and address any remaining formatting issues.
Part 7 - Submitting Through Gradescope
- Submit
Point.javathrough https://www.gradescope.com/ . You should have an email from your instructor that indicates you have been added to the course. If you have not used Gradescope before, you may need to create an account. If your code fails any of the submission tests, make any necessary modifications and resubmit until there are no failures.
2 - Memory Lab
Memory Diagrams
Introduction
Take a moment to trace the Java code listed below. (The Point class here is the same class we worked with in last week’s lab.)
|
|
Here is a memory diagram illustrating the contents of memory just
before the call to mover returns:
Memory Diagram

The two boxes labeled main and mover are referred to as
activation records. They represent the region of memory where the
local variables (including parameters) associated with a single method
call are stored. The area of memory reserved for activation records is
referred to as the stack or the call stack. Each activation record
disappears when its associated method returns.
The right side of the diagram represents the heap. The heap is
where objects are stored in memory. Basically, anything instantiated
using the new keyword is created on the heap.
Java Tutor
Java Tutor is a tool that can be used to visualize the contents of memory during the execution of a Java program. Use Java Tutor to trace the execution of the code above. Make sure you understand what’s happening each time you take a step in the program:
More Complicated Example
Draw the contents of memory just before the following main method
exits. Use a sheet of paper and show your work to your group
members. Make sure that you all agree on the final diagram and on the
expected output for this code.
|
|
Once you are confident in your answer, use Java Tutor to double check
your work. (The class name has been changed to Pointt here to prevent
Java Tutor from complaining about using a reserved name.)
Canvas Quiz
Complete the Canvas quiz associated with today’s activity. You’ll have as many attempts as you need, and you are welcome to discuss your answers with your group members and to ask for help if you need it.
3 - Two-Dimensional Arrays Lab
The goal of this lab is to gain experience working with two-dimensional arrays.
Instructions
- Create a new Eclipse project. Download and import the files Array2D.java and Array2DTest.java .
- Complete the unfinished methods in
Array2D.javaaccording to the provided JavaDoc comments. - Once all of your methods are implemented and tested, submit your finished work to Gradescope .
Notice that the methods in Array2D.java use a return value of Double.MIN_VALUE to indicate an error condition. Typically, it would make more sense to design these methods to throw exceptions.
4 - Debugger Lab
Counting Golf Balls
Here's a fun little puzzle: If we lined up passenger busses, nose to nose, from Harrisonburg to Washington D.C., then we filled up each bus with golf balls, how many golf balls would we need? The program below attempts to compute that quantity!
Spoiler Alert!
nearly 20 billionInstructions
- Open Eclipse and add the following files to a Java project:
- Type your name at the top of each file (i.e., where it says
ADD YOUR NAME HERE). Write your first and last name, just like you would at the top of an English paper. Don’t use ALL CAPS; those were only for instructions. - Debug the code by setting breakpoints and examining variables. There are several mistakes; notice that some of them are hard to find simply by testing. There is nothing wrong with the overall algorithm, but you might need to add a line or two.
- Estimator.exp shows the expected output when your corrected program runs
- Submit
Bus.javaandEstimator.javato Gradescope when you are finished. Your code should have no errors (9/10 points). The last point is for writing your name—you’d be surprised how many students forget that. - If you finish the lab early, use the rest of the time to work on PA1 and ask questions. Tip: Use the Eclipse debugger to “proofread” your code before submitting to Gradescope. You might save yourself a lot of time.
Debugging Resources
- Video: Norm Krumpe’s Debugger Tutorial (~15 min) covers basic vocabulary and explains how to track variables in different areas in the Eclipse screen, the difference between step-in and step-out, etc.
- Guide to Quick Start Debugging is a written reference with screenshots that explains how to get started and can serve as reminders of how things work as you debug.
Eclipse Debug Settings
If you haven’t already, update your Eclipse settings to prevent stepping into imported libraries:
-
Windows/Linux:
Window -
OSX:
Eclipse - Check “Use Step Filters”.
- Select all of the available filters.
-
Click the “Add Filter…” button and add
org.junit.* - Click “Apply and Close”.
Tips for Using the Debugger Effectively
Never click “Step” before thinking about what you expect to happen.
The debugger won’t magically tell you when something has gone wrong in your code. It only allows you to observe what happens one step at a time. If you don’t have an expectation for what should happen, you will have no way of noticing when something goes wrong.
Never “Step-Into” a method unless you have already determined that it contains a defect.
There is no need to waste time stepping through the instructions of a method that is working correctly. When you reach a method call, the default should be to “Step Over”. If the outcome is unexpected, you’ve learned there is a problem: now you can restart debugging and “Step Into” the method to figure out what’s wrong.
Be prepared to rewrite code to be debugger-friendly.
Imagine we step over the following statement and something goes wrong:
Now we are in an awkward situation. We know there is a problem on this line, but we don’t have a good way of narrowing it down. The debugger will be more useful if we rewrite the code as follows:
BookID miceID;
Book miceBook;

miceID = catalog.lookup("Of Mice and Men");
miceBook = library.removeBook(miceID);
bookshelf.addBook(miceBook);
This is more verbose, but it allows us to narrow down the source of the problem by stepping over one method call at a time.
5 - Class Design Lab
Bob’s Grocery Mart
Bob’s Grocery Mart has 73 locations distributed across 12 States. Bob would like to increase the profitability of his stores by improving cashier scheduling: If too few cashiers are scheduled, customers become frustrated and may not return to the store. With too many cashiers, Bob pays more wages than necessary. You have been tasked with writing a checkout simulation program that will be used to analyze the impact of increasing or decreasing the number of cashiers.
Program Specification
Your program should simulate the activity of any number of staffed check-out aisles in a Bob’s Grocery Mart. The simulation will proceed in one-second time steps. It takes between one and five seconds for a cashier to process a single object. During each one-second interval there is a .5% chance that a new customer will finish shopping and enter a checkout aisle. Customers purchase between 1-100 items. If there are any empty aisles, customers choose one arbitrarily. If all aisles are occupied, customers choose the aisle with the shortest line. The program should simulate a single eight hour shift. At the end of the simulation the program should display:
- The total number of customers served.
- The average wait time across all customers.
- The maximum wait time for any individual customer.
Design Steps
- Highlight all of the nouns and noun phrases from the program specification above. Circle entries that are good candidates for classes and cross out entries that are duplicates or do not need to be represented in the program. Any remaining highlighted words should represent entities that do need to be represented in the program but should not be classes.
- Draw a largish UML box for each of the classes that you selected in the previous step. In the upper part of the box, list an appropriate set of attributes along with their types. Think about persistent values that constitute the state of an object vs. computed values that make more sense as local variables.
- In the lower part of the box, List the necessary constructors for your Classes, along with the required arguments. Does it make sense to have a default constructor? Are there classes that may need more than one constructor?
- For each class, define an appropriate set of methods including getters
and setters,
equalsandtoString, and others. Think about the parameters and return types for each method. Should all methods be public, or are there some that are only needed within the class? - Once you are satisfied with your design, (and you have checked it with your instructor) create .java files for each of your proposed classes. Include Javadocs containing the authors, version, and a description of the class. Add the necessary instance variables and method stubs to your classes. You do not need to provide the code for your methods, but you should include a brief Javadoc comment for each.
- Make sure that your .java files compile and then submit them to Gradescope. Gradescope will not run any unit test on your submission: you should see a score of 10/10 as long as your submission compiles.
6 - ArrayList Lab
Introduction
The goal of this lab is to practice working with ArrayLists by
completing a Document class that represents a text
document as an ArrayList of String objects,
where each entry in the ArrayList corresponds to a single
line of text.
This lab was designed as a command-line Java application, so you should consider compiling and executing in the terminal. As a reminder, you can follow the following steps to compile and execute a Java program in a Unix-style terminal:
cd the_directory_where_your_code_is_stored
javac File1.java File2.java ...
java File1
This example assumes that File1.java contains the
main method for the application.
Resources
Useful API documents:
Files
The following files are provided:
-
Document.java UNFINISHED
-
DocumentTestDriver.java This is a simple driver class for testing
Document.java. Take a minute to look over this code to get a better idea of the expected behavior. -
Editor.java This is an editor application that provides a command-line interface to the
Documentclass.
Instructions
Download the files above and complete Document.java
so that all methods conform to the Javadoc comments. Test your completed
file by running the two provided application programs.
Your solution should use only enhanced for loops.
Submitting
Submit your completed version of Document.java
through Gradescope . You have an unlimited
number of submissions. If you have trouble with your submission, you
may find it helpful to look at the JUnit submission tests:
DocumentTest.java
.
7 - File I/O Lab
Introduction
The goal of this lab is to practice working with Java file I/O by
adding load/save functionality to the Document class you
completed in a previous lab.
The code for this lab was originally designed as a command-line Java application so you may want to run it in the terminal. It is also fine to run it through the Eclipse console.
As a reminder, you can follow the following steps to compile and execute a Java program in a Linux/OSX terminal:
cd the_directory_where_your_code_is_stored
javac File1.java File2.java ...
java File1
This example assumes that File1.java contains the
main method for the application.
Resources
Useful API documents:
Files
The following unfinished files are provided:
Instructions - Part 1
Download the files above and complete Document.java
so that the unfinished methods conform to the Javadoc comments. Test
your completed file by running the provided application program.
Instructions - Part 2
The current implementation of the Editor class does not
include code for handling exceptions related to file I/O: If you
attempt to open a non-existent file, or to write a file to a location
where do not have permission, the application will crash.
Modify Editor.java by removing
all throws declarations and adding try/catch blocks
to saveFile and loadFile. If an exception
occurs, these methods should print a helpful error message and
then allow execution to proceed normally.
Instructions - Part 3 (If Time)
Most text editors allow you to save the current document without re-entering the file name. Modify the Editor class so that it provides this functionality. If the file is already associated with a file name (because of an earlier save or load) then the “s” command should now save the current version without prompting for a file name. You should also add a save-as command to allow specifying a file name even if one already exists. Use “w” to trigger save-as. Make sure to update the help message to conform to the new functionality.
Submitting
Submit your completed versions of Document.java and Editor.java
to Gradescope . You have an unlimited
number of submissions. If you have trouble with your submission, you
may find it helpful to look at the JUnit submission tests:
8 - Unit Testing Lab
Unit Testing and Code Coverage
Severe Weather Policy
The goal of this lab is to gain experience writing JUnit tests and using code coverage analysis.
Background
Suppose that JMU had the following severe weather cancellation policy: (here's the real one)
JMU (FAKE) SEVERE WEATHER POLICY
If any of the following conditions are met, campus will be closed:
- More than 6.0 inches of rain are predicted within the next 24 hours.
- Wind speeds greater than 70.0 mph are predicted within the next 24 hours.
- It is predicted that there will be more than 4.0 inches of rain and wind speeds will be above 45.0 mph.
If none of the above conditions are met, the University may still issue a warning and encourage individuals to avoid non-essential outdoor activities. A warning will be issued if any of the following conditions are met:
- Predicted wind speeds are above 45.0 mph.
- Predicted precipitation is above 4.0 inches.
The following Java class has been developed as part of a JMU Decision Support system:
The weatherAdvice method provides an implementation
of the cancellation policy above. Your job is to develop a set of
JUnit tests to confirm that this method is implemented correctly.
Your testing must also confirm that the correct exception is thrown
when the method receives invalid input.
Part 1 - 100% Coverage
Creating a JUnit Test Class
Once you have set up an Eclipse project containing
WeatherUtils.java, create a stub JUnit test class:
- Right click the
WeatherUtils.javain thePackage Explorerand selectNew->JUnit Test Case. Make sureNew JUnit Jupiter testis selected. Click theNextbutton, check the box forWeatherUtils, and clickFinish(don’t worry if you see a warning against using the default package). This should prompt you to add Junit 5 to the build path and create a new file namedWeatherUtilsTest.java. - Write Javadoc comments so that Checkstyle is happy. For example:
import static org.junit.jupiter.api.Assertions.*; import org.junit.jupiter.api.Test; /** * Tests the WeatherUtils class. * * @author * @version */ public class WeatherUtilsTest { /** * Tests the weatherAdvice method. */ @Test public void testWeatherAdvice() { fail("Not yet implemented"); } } - Replace the
failmethod call with an assertion, for example:assertEquals("CANCEL", WeatherUtils.weatherAdvice(70.1, 0.0)); - Run the JUnit test by clicking the green Run button on the toolbar. If you see a green bar on the left, your test passed; if you see a red bar, your test failed.
- You can now run coverage analysis against your program by clicking the button to the right of
Run(this button should sayCoveragein the tooltip when you hover your mouse cursor over it). This should color-code your Java files to indicate which lines are being exercised by your tests. You should also see a new tab labeledCoveragethat will display coverage percentages for each file.- Note: Consider adjusting your theme away from
Darkthemes if the highlighting that indicates your test coverage makes the file nearly illegible (for some of the dark themes).
- Note: Consider adjusting your theme away from
- You can select which coverage metric to display (Line Counters, Branch Counters, etc.)
by clicking on the
View Menu(3 vertical dots icon) in the far right of theCoveragewindow.
Writing Additional Tests
Complete WeatherUtilsTest.java by writing an
appropriate set of test methods. You should be able to
check your code coverage from within Eclipse. Keep working until your tests
cover 100% of the method.
Once you are confident that your unit tests are sufficient, demonstrate them and your coverage to the instructor or TA. Your goal is to achieve 100% method, statement, and branch coverage.
Note: In order to cover the public class WeatherUtils line, you will need to construct a (useless) WeatherUtils object.
The following example "covers" the default constructor.
Notice that there is nothing to assert.
/**
 * Tests the constructor (for 100% coverage).
 */
@Test
public void testDefaultConstructor() {
    new WeatherUtils();
}
Testing for Exceptions
There are several ways to test for thrown exceptions in JUnit. The easiest way (see below and also the assertThrows example on the CS wiki ) requires a language feature we haven’t covered yet, so we recommend you use the first example in the CS wiki which involves your junit test catching the expected error, and using junit’s fail method after the line you expected to throw.
The “canonical ” way is to use assertThrows:
/**
 * Test invalid wind speed.
 */
@Test
public void testInvalidWindSpeed() {
    assertThrows(IllegalArgumentException.class, () -> {
        WeatherUtils.weatherAdvice(-1.0, 0.0);
    });
}
The -> operator defines a lambda expression.
In programming, a "lambda" is a block of code that can be assigned to a variable.
Lambdas allow you to write unnamed methods on the fly and pass them as parameters to other methods.
In the above example, we define an unnamed method that takes no paramters () and that invokes weatherAdvice.
Make sure you can answer the following questions:
- Why do you need to define a lambda expression? Why can't you just pass the result of
WeatherUtils.weatherAdvicetoassertThrows? - What does code coverage look like when exceptions are thrown? Is there any way to get 100% coverage for a test class that has exceptions?
Submission
Note
There’s a little incompatibility problem with our Gradescope setup right now. If you make the following tiny changes, you should still be able to run locally with the expected test and coverage analysis results, but also actually get points from Gradescope:
- Ensure that your test class is
public(i.e.public class WeatherUtilsTest…) - Ensure that your test methods are
public(i.epublic void testDefaultConstructor() {...) - Change the imports in your test class. Your test class hopefully has only these import statements:
but in order to workaround a little Gradescope issue we’re having, please replace these with the following (this should not cause the tests to stop passing or compiling locally [on your machine], and neither should this have an effect on your coverage report):
import static org.junit.jupiter.api.Assertions.*; import org.junit.jupiter.api.Test;import static org.junit.Assert.*; import org.junit.Test;
Upload your completed WeatherUtilsTest.java file to Gradescope.
To be graded, your code must (1) pass Checkstyle and (2) pass JUnit. If any of your tests fail, you will need to revise and resubmit.
Part 2 - Boundary Cases (Optional)
100% coverage doesn’t necessarily mean that your tests
are good enough. High-quality tests should be able to uncover
errors in the code that is being tested. The next step is to run your
tests against an implementation that is known to contain errors. If
your tests are effective, they should indicate that there is a problem
with this code. For this part of the lab, you will run your tests
against a pre-compiled .class file that we have intentionally coded to
contain at least one error.
- Create a new
Java Project. - Copy your completed
WeatherUtilsTest.javafile into the new project, and make sure that JUnit is on the classpath (right-click the project, go down toBuild Path, and clickAdd Libraries…JUnit…(ensure JUnit5 is selected)…Finish). - Download the file WeatherUtils.class to anywhere but your Eclipse project folder
- Go to
Project/Propertiesand click onJava Build Path. - Click on
Libraries->Classpath->Add External Class Folder. Navigate to the folder where you downloaded the WeatherUtils.class file. - Press “Okay”. You will see a new section in the Package Explorer window called “Referenced Libraries” and you should see your new folder beneath it.
- Execute the tests to confirm that at least one test fails.
9 - Inheritance Lab
Inheritance in Bob’s Grocery Mart
Introduction
The Bob's Grocery Mart Simulator has been a big success. Cashiers are being scheduled more efficiently, and profits are up. However, Bob is concerned that some important factors are not captured by the current program. In particular, the simulation allows checkout lines to grow arbitrarily long. Beyond a certain length, real customers would choose to leave the store rather than waiting.
Your goal for this assignment is to modify the simulation so that customers will refuse to enter a checkout line if that line has reached some maximum capacity.
Instructions
- Download the following files:
- Take a few minutes to look over the existing classes to get a feel for
how they work. Try executing
MartDriverseveral times to see what the output looks like.- What is the average wait time with 12 cashiers?
- What is the average wait time with 6 cashiers?
- Create a new class that extends
Aisle. As always, you should think carefully about what to name your class. One common convention in naming subclasses is to prefix the superclass name with an adjective the clarifies how the subclass specializes the superclass. For example, theCarclass might have a subclass namedElectricCar.- Your new class must:
- Override the
addCustomermethod so that new customers are added only if the line is below some maximum capacity. - Track the number of customers that refuse to wait because the line was too long.
- Override the
- Your new class must:
- Modify the simulation class so that it uses your new Aisle subclass: everywhere “Aisle” appears in the existing class should be replaced with your new class. You should modify the simulation constructor so that it accepts a “maximum length” parameter that describes maximum allowable length for a checkout line.
- Modify the
printResultsmethod so that it reports the total number of customers that left the store because of excessive line lengths. - Test your new simulation using eight aisles, while keeping the other parameters at their default values. How many customers depart when maximum line length is 1? 5?, 20? (INCLUDE AN ANSWER TO THIS QUESTION IN A COMMENT AT THE BOTTOM OF YOUR NEW CLASS. )
- Submit your completed
Aislesubclass and modifiedMartSimulationthrough Canvas. It is your responsibility to make sure that the behavior is correct. If you aren’t sure, check with your instructor or a TA. - If you have extra time:
- Each time this simulation is
executed, there is a different result. It might be valuable to know
the average results across many different simulation runs. Add a new
method to the
MartSimulationclass with the signature:public void runMany(int numRuns)
This method should run the simulation the indicated number of times, and calculate averages for each of the quantities reported.
- Each time this simulation is
executed, there is a different result. It might be valuable to know
the average results across many different simulation runs. Add a new
method to the
- If you have even more time:
It would be useful to be able to systematically adjust simulation parameters in small increments to see what effect this has on wait times etc. Add a loop to your
mainthat systematically increases the maximum line length from 0 to 100. For each increment, run your simulation 100 times and report the average results.
10 - Exam 2 Practice Lab
Part 1: Volume Enumerated Type (20pts)
The following table lists a set of standard US units of volume along with the corresponding conversion to ounces:
| Name | Value |
|---|---|
| OUNCE | 1 |
| CUP | 8 |
| PINT | 16 |
| QUART | 32 |
| GALLON | 128 |
Create an enumerated type named Volume that represents this set of measurements (in this order). Your enum must contain an instance variable representing the number of ounces associated with each volume. It must also provide two methods, toOunces and fromOunces with the following signatures:
public double toOunces(double amount)- This method must convert from the appropriate volume to ounces. For exampleVolume.CUP.toOunces(2.0)must return16.0because there are 16 ounces in 2 cups.public double fromOunces(double ounces)- This method must convert from ounces to the appropriate volume. For exampleVolume.GALLON.fromOunces(64.0)must return.5because 64 ounces is equivalent to .5 gallons.
Your Volume.java must have a Javadoc comment for the class, but it does not need to provide Javadoc comments for the individual methods. (You are welcome to do so, however.)
Here are the submission tests in case you find it helpful to test locally before submitting:
Submit your completed Volume.java via Gradescope .
Part 2: Saving and Loading Shapes (30pts)
Download the following files:
- Rectangle.java (finished) - A simple rectangle class that stores width and height as integers.
-
Square.java
(finished) - A subclass of
Rectangle. ASquareis-aRectanglewith equal width and height. - ShapeUtils.java (UNFINISHED) - File I/O methods. This is the only file you will need to submit.
- ShapeUtilsTest.java - Submission tests, in case you want to test locally before submitting.
- shapes.txt - Sample text file illustrating the correct file format.
Finish the two unfinished methods in ShapeUtils.java so that they conform to the provided Javadoc comments.
Submit your completed ShapeUtils.java via Gradescope .
11 - Object-Oriented Design Lab
Introduction
Frogger 🐸 is a classic 2D sprite-based1 video game from the
1980’s. The goal for this exercise is to design an appropriate class
hierarchy for implementing this game in Java.
You may assume that you have access to a drawing library that provides
methods like the following:
StdDraw.drawImage(ImageObject image, double xPosition, double yPosition)
You may also assume that you have access to image files for each of the game entities and the game background.
Instructions
-
Carefully read the game specification below, underlining words that may correspond to classes in your finished hierarchy.
-
Brainstorm a class hierarchy that would allow you to implement the game logic with a minimum of code duplication. Look for opportunities to take advantage of polymorphism and dynamic binding. Make use of interfaces and abstract classes where appropriate.
-
Draw a “syntactically correct” UML diagram representing your design. You should include all public and protected methods, including constructors, as well as all instance variables.
Rubric
Your completed design will be evaluated according to the following rubric:
| Item | Points |
|---|---|
| Design supports required functionality | 5 |
| Correct UML syntax | 5 |
| UML is visually well organized and neatly drawn. | 5 |
| Appropriate names (Names are meaningful. Method names are verbs and instance variables and classes are nouns. Plural nouns are only used for collections.) | 5 |
| Appropriate use of inheritance (Superclasses are used to prevent code duplication. Subclasses meaningfully extend the functionality of superclasses. Instance variables are not shadowed in subclasses.) | 5 |
| Classes and methods are abstract where appropriate. | 5 |
| Appropriate use of polymorphism | 5 |
Game Specification
The following screen-shot and description of game play are taken from the Frogger Wikipedia page :
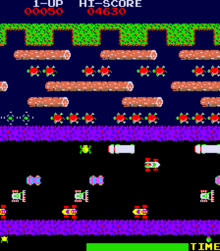
Frogger
The game starts with three, five, or seven frogs (lives), depending on the settings used by the operator. The player guides a frog which starts at the bottom of the screen, to his home in one of 5 slots at the top of the screen. The lower half of the screen contains a road with motor vehicles, which in various versions include cars, trucks, buses, dune buggies, bulldozers, vans, taxis, bicyclists, and/or motorcycles, speeding along it horizontally. The upper half of the screen consists of a river with logs, alligators, and turtles, all moving horizontally across the screen. The very top of the screen contains five “frog homes” which are the destinations for each frog. Every level is timed; the player must act quickly to finish each level before the time expires.
The only player control is the 4 direction joystick used to navigate the frog; each push in a direction causes the frog to hop once in that direction. On the bottom half of the screen, the player must successfully guide the frog between opposing lanes of trucks, cars, and other vehicles, to avoid becoming roadkill.
The middle of the screen, after the road, contains a median where the player must prepare to navigate the river.
By jumping on swiftly moving logs and the backs of turtles and alligators except the alligator jaws, the player can guide his or her frog safely to one of the empty lily pads. The player must avoid alligators sticking out at one of the five “frog homes”, snakes, and otters in the river, but may catch bugs or escort a frog friend for bonuses. When all five frogs are directed home, the game progresses to the next, level with an increased difficulty. After five levels, the game gets briefly easier yet again gets progressively harder to the next fifth level.
1 A sprite is a small image which may be moved.
11.1 - Class Design Tips
Class Design Tips
- Classes and instance variables should be nouns
- Classes should be singular unless they represent a collection. (Multiple ones come from multiple instantiations.)
- Question classes of just one instantiation. (e.g. should it be a class at all?)
- Methods should be verbs that describe behaviors/responsibilities.
- Use inheritance to add or change behaviors.
- Other differences can be managed by instance variable values most of the time. Add additional instance variables in subclass only if needed for new behavior, otherwise maybe it belongs in super class?
- Use inheritance to avoid code (and instance variable) duplication.
- If superclass has it, don’t redundantly add it to sub class.
- Use an interface to specify behavior (and anything needed for that behavior) that is common across classes without an is-a relationship.
- Names matter.
12 - Interfaces Lab
Introduction
Your goal for this assignment is to modify the Bob’s simulation in two ways: by adding a SortedAisle class, and by making it possible for the user to select the aisle type at run time.
Instructions
Interface
Download the following files:
Create a new class SortedAisle that extends Aisle. Your new class should override the addCustomer method so that every time a new customer is added, the entire list of customers is sorted. This way, the customer with the fewest items is always moved to the front. This type of aisle will model the effect of friendly customers that let other customers “cut” if they have fewer items.
- Implement the constructor. It should be only one line of code.
- In
Aisle.java, make thelineattribute visible to SortedAisle. (Hint: Don’t makelineprivate to Aisle. But don’t make it public either. - In
SortedAisle.java, override theaddCustomermethod so that every time a new customer is added, the line of customers is sorted. - Use the Collections.sort method to sort your ArrayList. Since this method only works when the items in the list implement the Comparable interface, you will also need to modify the
Customerclass to implementComparable.
Comparable is a generic interface. This means you can use it like this:
public class MyClass implements Comparable<MyClass>
or like this (not recommended):
public class MyClass implements Comparable
In the former class your compareTo method must take an argument of type MyClass in the latter it must take an argument of type Object.
Once you have completed your SortedAisle class modify MartSimulation so that it uses SortedAisles instead of LimitedAisles. (Simply find and replace LimitedAisle with SortedAisle.)
- Notice the compiler error when calling
getLeftStore. That method was added toLimitedAisleto get the number of customers who left the store.SortedAisledoesn’t have such a method. - Implement a new
getLeftStoremethod inAislethat simply returns 0. (By default, no customers leave the store.)SortedAislewill inherit that method, andLimitedAislewill override it.
Run the simulation a few times, and confirm that your code is working. Using SortedAisle should result in relatively short average waits, but very long longest waits. People with lots of items will tend to get stuck at the end of the line while others continually cut in front of them.
Polymporphism
It is unfortunate that the current version of the simulation requires the code to be modified and recompiled when we want to change the aisle type used in the simulation. Modify the file MartDriver and MartSimulation classes to allow the user to select any of the three aisle types at run time. Execute the simulation several times to see the effect of changing aisle types.
Submit Customer.java, MartDriver.java, and SortedAisle.java to Gradescope .
13 - Collections Lab
Introduction
Your goal in this lab is to complete the unfinished methods: CollectionExercises.java
The Gradescope JUnit tests are provided for your convenience: CollectionExercisesTest.java
For each method, you should first take a minute to think about the problem in order to select an appropriate collection type (or types) to use in your solution. The following documentation might be helpful.
You should take full advantage of the functionality provided by the collection classes to make your solutions as concise and efficient as possible. For example, the Collection interface provides an addAll method that makes it possible to add all of the elements of one collection to another using a single method call. Where appropriate, you should use that method rather than creating a loop that repeatedly calls the add method.
Your solutions for these exercises must satisfy the following requirements:
- You may not use indexed for loops. Use only for-each loops or iterators, as appropriate.
- None of your methods may include nested loops. Nested loops generally take a long time to iterate over large collections. (You will look at this more formally in CS 240).
Submitting
Submit your completed file to Gradescope. You may submit as many times as you like.
14 - Recursion in CodingBat Lab
Introduction
The goal of today’s lab is to practice writing recursive methods by competing as many CodingBat recursion exercises as possible in 50 minutes.
Creating an Account
- Navigate to the CodingBat web-site
- If you already have an account, log in. Otherwise, use the “create account” link on the upper right portion of the page to create a new account. (This account will be used for grading the lab so you need to use your real name.)
- Once your account is created, click on the
prefslink and enter the email address of you instructor in theShare Tobox at the bottom of the page. (e.g.mayfiecs@jmu.edu,stewarmc@jmu.edu, orweikleda@jmu.edu) - In principle, it should be possible to grade your work through the sharing mechanism from the previous step. Just in case that doesn’t work you should save copies of your solutions to a text file.
Advice
- Several of the exercises below involve string manipulation. Here are some
helpful String
methods:
someString.length()returns the number of characters in a string.someString.substring(0, 1)returns the the first letter ofsomeString.someString.substring(1)returns everything after the first letter. This will return the empty string ("") if the string only has one letter.
- Other methods involve processing integers one digit at a time. Here we can use the
/and%operators:int num = 745; int last = num % 10; // evaluates to 5, the last digit of 745. int rest = num / 10; // evaluates to 74, all of the digits except the last.
Start Programming
You are not required to work on these in order, but they do build on each other to some extent. If the exercises from Group 1 seem too easy, feel free to skip ahead to Group 2. To receive credit for the lab you must finish at least four exercises beyond “bunnyEars”.
Don’t use the “next” button to move between exercises: after you have completed an exercise come back to this page and select the next one.
Group 1
- bunnyEars (Includes hints and solution)
- count7
- sumDigits
- array6
- countX
- changeXY
- endX
- nestParen
- parenBit
Group 2
15 - Recursive Structures Lab
Introduction
The goal of this lab is to practice using recursion to interact with recursively structured data. One example of a recursively structured collection is the file system of a computer. A file system is made up of directories, each of which may contain additional directories, and so forth.
Please watch this 6-minute video by Gayle Laakmann McDowell :
Source Files
The following files are provided:
- DirectorySearcher.java – This (unfinished) class is responsible for recursively traversing a directory tree starting from a designated directory.
-
DirectoryDriver.java
– This is a driver class for executing the methods provided by
DirectorySearcher. As currently written, themainmethod uses aDirectorySearcherto list the contents of the current directory.
Instructions
- Download and test the two files above. Make sure you understand how the existing code works.
- Complete the
listDirectories(plural) method of theDirectorySearcherclass. Test your method by modifying the driver so that it calls this method instead oflistDirectory(singular).- Your solution should print a
"/"after each directory name and indent the files under each directory. For example, if the starting path is"../P5", the output might look like this:P5/ Beetle.class Pose.java SwarmConstants.java StdDraw.java Actor.class StdDraw$RetinaImageIcon.class Point.java Bee.java beetles.txt Swarm.class Actor.java Insect.class Simulation.class .checkstyle all_examples.txt Beetle.java Flower.class Swarm.java SwarmConstants.class PoseUtils.class PoseUtils.java Simulation.java Pose.class Bee.class .settings/ org.eclipse.jdt.core.prefs SwarmDriver.class StdDraw.class swarm.txt flowers.txt bees.txt interesting.txt SwarmDriver.java .classpath .project Insect.java Point.class Flower.java
- Your solution should print a
- Complete the
searchDirectoriesmethod of theDirectorySearcherclass. Test your method by modifying the driver; search for different patterns to make sure it works.- Your solution should print the path to each file that is found. (Just print the File object itself, rather than calling getName.) For example, if the search string is
"se", the output might look like this:../P5/Pose.java ../P5/Insect.class ../P5/PoseUtils.class ../P5/PoseUtils.java ../P5/Pose.class ../P5/.settings ../P5/.settings/org.eclipse.jdt.core.prefs ../P5/Insect.java
- Your solution should print the path to each file that is found. (Just print the File object itself, rather than calling getName.) For example, if the search string is
- Submit your completed
DirectorySearcher.javafile via GradeScope.