Lab: Creating Class Diagrams in Visual Paradigm
Instructions:
Answer as many of the following questions as you can during the lab period.
If you are unable to complete the assignment during the lab period it
is strongly recommended that you complete it on your own.
1. General Preparation:
Before doing anything else, if you haven't already done so, you
should read a little about Visual Paradigm for UML.
-
Open the course "Help" page on "Visual Paradigm - Tips".
-
Read the section on "Colors, Fonts, etc...".
-
Read the section on "Finding Icons".
-
Read the section on "Finding Tabs".
-
Read the section on "Exporting Diagrams".
You should also read the UML Style Guide for the course (if there is one)
which can be found on the course "Policies" page.
2. Specific Preparation:
To get ready for this assignment, you should do the following.
-
If you haven't already done so, you should read a little about
Class Diagrams in Visual Paradigm for UML in the course "Help" page on
"Visual Paradigm - Tips" (in the section on "Class Diagrams").
-
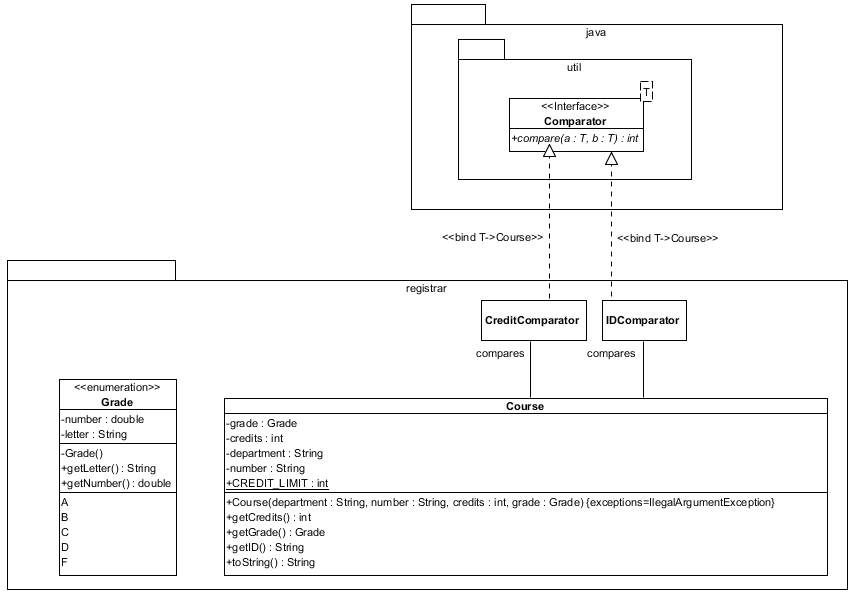
Review the following UML class diagram (which you will be replicating).
-
Create a new class diagram.
3. Working with Enumerated Types:
This part of the lab will help improve your ability to create and
edit enumerated types.
-
Add an enumeration to the diagram. Hint: Remember, icons are sometimes
stacked.
-
Set the name of the enumeration to
Grade.
-
Right-click on
Grade and pull down to Add
and over to Attribute.
-
Set the name of the attribute
number.
-
Right-click on
number and pull down to Open
Specification.
-
On the "General" tab, set the "Visibility"
to
private, the "Type" to
double, and the "Scope" to instance
(i.e., non-static).
-
Select
Grade (if it isn't already) and press
Alt+Shift+A (which is a shortcut
for Add+Attribute).
-
Set the name and type of the attribute by entering
letter:String. (Note: By default, attributes are private and
non-static.
-
Right-click on
Grade and pull down to Add
and over to Enumeration Literal.
-
Set the name of the literal to
A.
-
Select
Grade (if it isn't already) and press
Alt+Shift+L (which is a shortcut
for Add+Enumeration Literal) and set
the name to B.
-
Press Enter and add the literal
C.
-
Add the literals
D and F.
-
Right-click on
Grade and pull down to Add
and over to Constructor.
-
Right-click on the constructor and pull over to
Open Specification.
-
On the "General" tab, set the visibility to private.
-
Why shouldn't constructors in enumerations be public?
Because an enumeration is an extensive definition of a set, and the
creator of the enumeration constructs all of the instances. Nobody else has any
need of the constructor.

-
Right-click on
Grade and pull down to Add
and over to Operation.
-
Set the name of the operation to
getLetter.
-
Right-click on
getLetter() and pull down
to Open Specification.
-
Make the "Return type"
String (with a uppercase "S").
-
Select
Grade (if it isn't already) and press
Alt+Shift+O (which is a shortcut
for Add+Operation) and set
the signature to getNumber():double.
4. Working with Classes:
This part of the lab will help improve your ability to create and
edit enumerated types.
-
Add a class to the diagram. Hint: Remember, icons are sometimes
stacked.
-
Set the name of the class to
Course.
-
Add the necessary non-static attributes to
Course (as
in the Class Diagram you are replicating) using any of the
techniques you used to add an attribute to the Grade
enumeration .
-
Add an attribute to
Course named CREDIT_LIMT.
-
Right-click on
CREDIT_LIMIT and pull down to
Open Specification.
-
On the "General" tab, set the "Initial value" to
6,
the "Visibility" to
public, the "Type" to int, and the
"Scope" to classifier (i.e., static).
-
On the "Attribute Code Details" tab select
final.
-
Add a constructor to the
Course class.
-
Right-click on the constructor and pull down to
Open Specification.
-
Click on the "Parameters" tab.
-
Click on Add... and add a parameter with a "Name" of
department, a "Type" of String, and a
"Direction" of in.
-
Add the other parameters to the constructor.
-
Click on the "Raised Exceptions" tab.
-
Click on Add and pull down
to Text. (Note: You would use Model
if the exception you want to add is a class in the diagram. In
this case, it's an exception that is part of the Java API and is
not explicitly included in the diagram.)
-
Set the "Text" to
IllegalArgumentException and click on
OK
-
Click on OK and re-size the
Course class
if necessary.
-
If the exception is not shown, right-click on
Course,
pull down to Presentation Options, pull over to
Operations, and select Show Raised
Exceptions.
-
Add the necessry methods to the
Course class using any of the
techniques you used to add a method to the Grade
enumeration.
5. Creating Interfaces and Using Parameterized Types:
This part of the lab will help improve your ability to create and
edit interfaces and to work with parameterized types.
-
Add an interface to the diagram. Hint: Remember, icons are sometimes
stacked.
-
Set the name of the interface to
Comparator.
-
Right-click on
Comparator and pull down to
Open Specification.
-
On the "Template Parameters" tab, click on Add...
and add a parameter with a "Name" of
T.
-
If
T is not visible in the diagram, right-click on
Comparator, pull down to Presentation Options,
and select Show Template Parameters.
-
Add a
compare() method with the appropriate signature.
-
Right-click on
compare() and pull down to
Open Specification.
-
On the "General" tab, select Abstract.
6. Working with Packages:
This part of the lab will help improve your ability to create and
edit packages types.
-
Create a package named
registrar.
-
Re-size and re-position
registrar so that Grade
and Course are inside of it.
-
If asked whether you want to "Add covered shapes as children?"
select Yes.
-
Create a package named
util that contains
Comparator.
-
Create a package named
java that contains
util.
7. Working with Realizations/Specializations:
This part of the lab will help improve your ability to create and
edit realizations and specializations.
-
Add the
CreditComparator class to the registrar
package.
-
Draw a realization arrow from the
Comparator interface to the
CreditComparator class. Hint: Remember, icons are sometimes
stacked.
-
Bind the parameter
T in the Comparator interface
to Course by right-clicking on the realization arrow,
pulling down to OpenSpecification, selecting the
"Stereotypes" tab, clicking on Edit Stereotypes...,
clicking on Add..., and setting the "Name" to
bind t->Course.
-
If the stereotype is not visible, right-click on the realization arrow,
pull down to Stereotypes and select
bind t->Course.
-
Right-click on
CreditComparator, pull down to
Presentation Options, over to Class Members,
add select Hide All Class Members.
-
Add the
IDComparator class.
8. Working with Associations:
This part of the lab will help improve your ability to create and
edit associations.
-
Draw an association from
CreditComparator
to Course.
-
Right-click on the association and pull down to Open
Specification.
-
Set the "Role" on the
CreditComparator end (i.e., the
"End From") to "compares".
-
Add the association from
IDComparator to Course.
9. Generating Code from Class Diagrams:
This part of the lab will help you learn how to generate code
from UML Class Diagrams.
-
Click on Tools.
-
Click on Code and select Generate Java Code.
-
Click on Ignore Classes.
-
Select the
java package and click on >
and OK.
-
Set the "Source Path" as appropriate (which is where the generated
code will be located).
-
Click on OK.
10. Changing the Level of Abstraction:
This part of the lab will help you learn how to generate class diagrams that
are more/less abstract.
-
At a low level of abstraction it is useful to include attributes in
class diagrams, but at a higher level of abstraction it isn't.
Select both the
Grade enumeration and the Course
class (e.g., by clicking on one and control-clicking on the other),
right-click on one of them, pull down to
Presentation Options, over to Attributes,
and over to Hide All.
-
To get the "big picture" of how classes interact, it is sometimes useful
to exclude even the operations/methods from classes.
Select both the
Grade enumeration and the Course
class, right-click on one of them, pull down to
Presentation Options, over to Operations,
and over to Hide All.