Lab: Creating Activity Diagrams in Visual Paradigm
Instructions:
Answer as many of the following questions as you can during the lab period.
If you are unable to complete the assignment during the lab period it
is strongly recommended that you complete it on your own.
1. General Preparation:
Before doing anything else, if you haven't already done so, you
should read a little about Visual Paradigm for UML.
-
Open the course "Help" page on "Visual Paradigm - Tips".
-
Read the section on "Colors, Fonts, etc...".
-
Read the section on "Finding Icons".
-
Read the section on "Exporting Diagrams".
2. Specific Preparation:
If you haven't already done so, you should read a little about
Activity Diagrams in Visual Paradigm for UML.
-
Read the section on "Activity Diagrams".
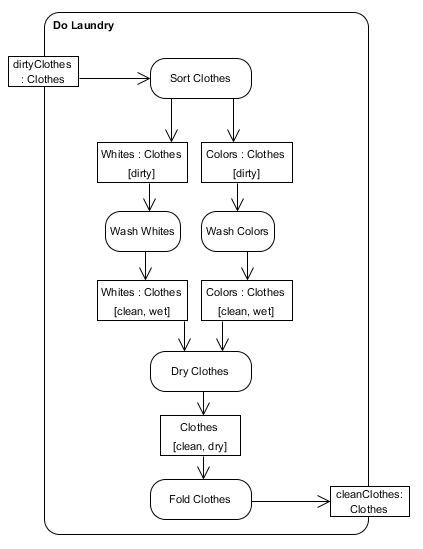
3. Replicating an Example from Lecture:
In this part of the lab you will replicate the following Activity Diagram
that was used in lecture.
-
Add a new Activity (not a new Action) with a name of "Do Laundry".
-
Resize the "Do Laundry" Activity so that it is large enough to
handle all of the Action nodes.
-
Add an Action named "Sort Clothes".
-
Add an Activity Parameter (not an Object node) named "dirtyClothes"
to "Do Laundry". (Note: Be careful to make it an input. That is,
-
Right-click on "dirtyClothes", pull down to
Open Specification and, on the General tab,
change the Type to "Clothes" and click OK.
-
Try to add a Control Flow from "dirtyClothes" to "Sort Clothes".
-
What happens and why?
It isn't allowed because control can't be passed from an Activity Parameter
(or an Object node) to an Action node.

-
Add an Object Flow from "dirtyClothes" to "Sort Clothes".
-
Add an Object node named "Whites".
-
Right-click on "Whites", pull down to Open Specification.
-
On the General tab, change the Type to "Clothes".
-
On the InStates tab, add a state named "dirty", select it
(if necessary), and click on OK.
-
Right-click on "Whites", pull down to Presentation Options,
pull across to Show InStates, and select Yes.
-
Adjust the size of the "Whites" node as needed.
-
Add a similar Object node named "Colors" and set its attributes.
-
Add one Object Flow from "Sort Clothes" to "Whites" and another Object Flow
from "Sort Clothes" to "Colors".
-
Add two Action nodes, one named "Wash Whites" and one named "Wash Colors".
-
Add one Object Flow from "Whites" to "Wash Whites" and another Object Flow
from "Colors" to "Wash Colors".
-
Which Action happens first, "Wash Whites" or "Wash Colors", or do they
happen at the same time?
This Activity Diagram does not specify. Either could happen first or
they could happen at the same time. If we wanted to specifiy an order
we would have to include a flow from one to another. If we wanted to
specify that they happen at the same time then we would have to
include a Fork Node. We'll do this later.
-
Add the Object Nodes for "Whites" and "Colors" that have states of
"clean" and "wet".
-
Add the Object Flows from "Wash Whites" to "Whites" and from "Wash Colors"
to "Colors".
-
Add the "Dry Clothes" Action.
-
Re-size the "Dry Clothes" Action so that it is aligned on the left and
right with the "Sort Clothes" Action.
-
Add the Object Flows from "Whites" to "Dry Clothes" and from "Colors"
to "Dry Clothes".
-
When can/does the "Dry Clothes" Action begin?
In general, an Action begins when tokens are available on all of the
incoming edges. In this case, the "Dry Clothes" Action begins when both
the "Whites" that are clean and wet and the "Colors" that are clean and wet
are available.
-
Complete the Activity Diagram.
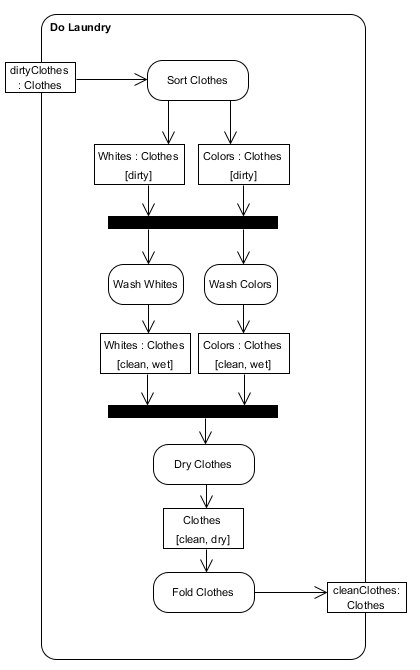
4. Modeling Parallel Actions:
In this part of the lab you will modify the Activity Diagram so that
it includes parallel actions as follows.
-
Increase the vertical size of the "Do Laundry" Activity. Note: You may need
to move the input and output parameters.
-
Select all of the nodes below "Whites [dirty]" and "Colors [dirty]" and
move them lower.
-
Delete the Object Flow into "Wash Whites" and the Object Flow into
"Wash Colors".
-
The Decision Node, Fork Node, and Join Node icons are stacked. Expand the
stack and select the Fork Node icon.
-
Add a Fork Node below the "Whites [dirty]" and "Colors [dirty]" nodes.
-
If necessary, change the orientation of the Fork Node to horizontal
and adjust its size.
-
Add one Object Flow from "Whites [dirty]" to the Fork Node and another
from "Colors [dirty]" to the Fork Node.
-
Add one Control Flow from the Fork Node to "Wash Whites" and another
from the Fork Node to "Wash Colors".
-
Delete the two Object Flows into "Dry Clothes".
-
Add a Join Node below the "Whites [clean, wet]" and "Colors [clean, wet]"
nodes.
-
If necessary, change the orientation of the Join Node to horizontal and
adjust its size.
-
Add Object Flows from the "Whites [clean, wet]" and "Colors [clean, wet]"
nodes to the Join Node.
-
Add a Control Flor from the Join Node to the "Dry Clothes" node.
-
Now which Action happens first, "Wash Whites" or "Wash Colors", or do they
happen at the same time?
Now they happen in parallel.
-
In the real world, is it always possible to wash whites and colors at the
same time?
No, there may not be two washing machines available.
5. Modeling Decisions:
In this part of the lab you further modify the Activity Diagram so that it
includes a decision and a timed event as follows.

-
Increase the vertical size and horizontal size of the "Do Laundry" Activity.
-
Delete the Object Flow into "Sort Clothes".
-
Add a "Put Clothes In Basket" Action above the "Sort Clothes" Action.
-
Add an Object Flow from the "dirtyClothes" parameter to the "Put
Clothes In Basket" Action.
-
Add a "Go To Laundry Room" Action below the "Put Clothes In Basket"
Action.
-
Add a Decision node below the "Go To Laundry Room" Action. (Hint:
Remember some icons are stacked.)
-
Add a Control Flow from the "Go To Laundry ROom" Action to the
Decision node.
-
Add a Control Flow from the Decision node to the "Sort Clothes" Action.
-
Place a Guard of "two washers available" on the Control Flow you just added.
-
Add an Action named "Leave Laundry Room" to the right of the
decision node.
-
Add a Control Flow from the Decision node to the "Wait One Hour" Action.
-
Place a Guard of "else" on the Control Flow you just added.
-
Add an Accept Time Event Action named "Wait One Hour" above
the "Leave Laundry Room" Action. (Hint: It is a kind of Action
and its icon is stacked.)
-
Add a Control Flow from the "Leave Laundry Room" action
to the "Wait One Hour" Action.
-
You might be inclined to add one Control Flow from "Put Clothes In
Basket" to "Go To Laundry Room" and another Control Flow from
"Wait One Hour" to "Go To Laundry Room". Why would this be inappropriate?
An Action only begins executing when tokens are available on all incoming edges.
So, if both of these Control Flows were added, it would be impossible for the
"Go To Laundry Room" Action to every execute.
-
How can we resolve this problem?
Use a Merge node (not to be confused with a Join node).
-
Add a Merge node between the "Put Clothes In Basket" Action and the
"Go To Laundry Room" Action.
-
Add the remaining Control Flows.