

Slot objects is
replaced with a doubly-linked circular data structure.
Driver6.cpp (that must be
in the DukeDisc directory). The only difference
between this driver and Driver5.cpp is that it
must #include v6 of the DiscChanger
class. Specifically:
#include "v6/DiscChanger.h"
#include "v5/TextInterface.h"
Slot class which must
be in directory v6. In version 6 the Slot
class will play the role of a "node" (actually, an exogenous node)
in a linked data structure. This can be illustrated as follows:
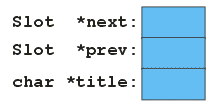
Note that your Slot class can include other attributes
in addition to the two Slot pointers and the
char pointers illustrated above.
The constructor in the Slot class will need to be
changed accordingly. It may not be necessary to make any
other changes to the Slot class. (Indeed, the
functionality of the Slot class must not be changed.)
DiscChanger class which
must be in directory v6. Version 6 must use a doubly-linked
circular structure of Slot objects in place of the
array used in version 5.
You will almost certainly need to change the implementation of the
next() and previous() methods, and the
destructor. You must change the constructors [or the
method(s) that they call to perform common construction tasks] in
such a way that it/they construct the linked data structure.
The linked data structure has to be constructed using an iterative
process. Suppose, for example, you are constructing a
DiscChanger that contains three Slot
objects. Initially, the linked structure can be illustrated as
follows:
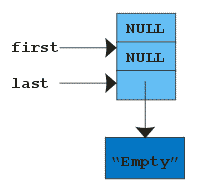
Note that in these illustrations, the Slot pointers
actually "point to" the entire Slot even though they
might appear to point to a component.
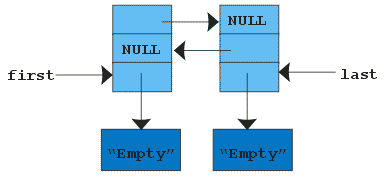
When the next Slot is added, the linked structure
can be illustrated as follows:
When the final (in this case, third) Slot is added, the
linked structure can be illustrated as follows:
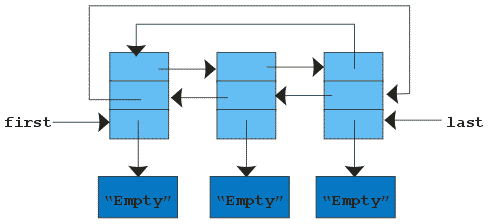
Of course, the actual size of the linked data structure will be determined by the size parameter passed to the explicit value constructor.
Hint: First create a doubly-linked linear structure in a loop. Then,
outside of the loop, connect the first and last Slots.
When creating the linear structure, think about using a point to the
first Slot, a pointer to the last Slot,
and a pointer to the Slot being added.
DiscChanger class as a
friend in the Slot class.
Starting with pencil and paper:
next() and previous().
next(), previous(), and the
destructor.
Now start typing, following the steps described above.
While it seems like this will take a long time, any other approach will almost certainly take much longer.
makefile may prove to be useful in this
regard:
# Phony target to build all versions
#
all: v1 v2 v3 v4 v5 v6

# Phony targets for each version
#
v1: Driver1
v2: Driver2
v3: Driver3
v4: Driver4
v5: Driver5
v6: Driver6

# Drivers
#
Driver1: Driver1.o v1/DiscChanger.o v1/Slot.o
	g++ Driver1.o v1/DiscChanger.o v1/Slot.o -o Driver1

Driver1.o:  Driver1.cpp v1/DiscChanger.h
	g++ -c Driver1.cpp

Driver2: Driver2.o v2/TextInterface.o v1/DiscChanger.o v1/Slot.o
	g++ Driver2.o v2/TextInterface.o v1/DiscChanger.o v1/Slot.o -o Driver2

Driver2.o:  Driver2.cpp v2/TextInterface.h v1/DiscChanger.h
	g++ -c Driver2.cpp

Driver3: Driver3.o v2/TextInterface.o v3/DiscChanger.o v1/Slot.o
	g++ Driver3.o v2/TextInterface.o v3/DiscChanger.o v1/Slot.o -o Driver3

Driver3.o:  Driver3.cpp v2/TextInterface.h v3/DiscChanger.h
	g++ -c Driver3.cpp

Driver4: Driver4.o v2/TextInterface.o v3/DiscChanger.o v1/Slot.o
	g++ Driver4.o v2/TextInterface.o v3/DiscChanger.o v1/Slot.o -o Driver4

Driver4.o:  Driver4.cpp v2/TextInterface.h v3/DiscChanger.h
	g++ -c Driver4.cpp

Driver5: Driver5.o v5/TextInterface.o v5/DiscChanger.o v5/Slot.o
	g++ Driver5.o v5/TextInterface.o v5/DiscChanger.o v5/Slot.o -o Driver5

Driver5.o:  Driver5.cpp v5/TextInterface.h v5/DiscChanger.h
	g++ -c Driver5.cpp


Driver6: Driver6.o v5/TextInterface.o v6/DiscChanger.o v6/Slot.o
	g++ Driver6.o v5/TextInterface.o v6/DiscChanger.o v6/Slot.o -o Driver6

Driver6.o:  Driver6.cpp v5/TextInterface.h v6/DiscChanger.h
	g++ -c Driver6.cpp


# v1 of DiscChanger and Slot
#
v1/DiscChanger.o: v1/DiscChanger.cpp v1/DiscChanger.h v1/Slot.h
	g++ -c v1/DiscChanger.cpp -o v1/DiscChanger.o

v1/Slot.o: v1/Slot.cpp v1/Slot.h
	g++ -c v1/Slot.cpp  -o v1/Slot.o


# v2 of TextInterface
#
v2/TextInterface.o: v2/TextInterface.cpp v2/TextInterface.h
	g++ -c v2/TextInterface.cpp -o v2/TextInterface.o


# v3 of DiscChanger
#
v3/DiscChanger.o: v3/DiscChanger.cpp v3/DiscChanger.h v1/Slot.h
	g++ -c v3/DiscChanger.cpp -o v3/DiscChanger.o


# v5 of DiscChanger, Slot and TextInterface
#
v5/DiscChanger.o: v5/DiscChanger.cpp v5/DiscChanger.h v5/Slot.h
	g++ -c v5/DiscChanger.cpp -o v5/DiscChanger.o

v5/Slot.o: v5/Slot.cpp v5/Slot.h
	g++ -c v5/Slot.cpp  -o v5/Slot.o

v5/TextInterface.o: v5/TextInterface.cpp v5/TextInterface.h
	g++ -c v5/TextInterface.cpp -o v5/TextInterface.o


# v6 of DiscChanger and Slot
#
v6/DiscChanger.o: v6/DiscChanger.cpp v6/DiscChanger.h v6/Slot.h
	g++ -c v6/DiscChanger.cpp -o v6/DiscChanger.o

v6/Slot.o: v6/Slot.cpp v6/Slot.h
	g++ -c v6/Slot.cpp  -o v6/Slot.o
You can build version 6 of DukeDisc
with the command make v6.
Copyright 2010